
Chen Caijie - Project Portfolio for The Food Diary
Overview
This portfolio showcases my contributions to a software engineering team project for our software engineering module. Our project, The Food Diary, is a food journal meant for tech-savvy food lovers looking to document their food adventures. You can get personalised recommendations, document your food adventures as well as organise the restaurants you have visited with categories so that you can easily filter them later.
My role was to implement the categorisation of restaurants as well as manage the git workflow of members. The following sections illustrate these enhancements and the relevant sections I added to the User and Developer Guide.
Note the following use of symbols and formatting in order to understand their meanings:
|
|
-
A grey highlight indicates a command line instruction or specific functionalities of the application. e.g.
setCategories,Cuisine -
A bolded word or phrase indicates important words that you should take note of.
-
A phrase in italics indicates that it is either a Figure label or a reference to a Figure.
Summary of contributions
The following documents both the code enhancements and how I helped manage the project.
-
Major enhancement: I implemented Restaurant Categorisation for the Food Diary
-
Feature Description: Allows the users to set specific categories to restaurants.
-
Feature Importance: Allows food lovers to better organise their food diary.
-
Feature Highlights:
-
One command that covers adding and editing categories. Categories are auto-capitalized.
-
Autocomplete suggestions for categories for faster typing.
-
-
-
Minor enhancement: I added a filter command to display specific restaurants based on its categories
-
Feature Description: Allows food lovers to filter out restaurants based on categories.
-
Feature Importance: Helps food lovers locate and refer back to specific restaurants with specific categories set.
-
-
Code contributed: The code I contributed can be viewed at the link here: Code Contributed
-
Other contributions:
-
Project management:
-
Set up project repository
-
Managed merging of PR, issue tracking and handling of repository cleanups
-
-
Enhancements to existing features:
-
Refactored existing address book classes (PR #9)
-
-
Documentation:
-
Community:
-
Contributions to the User Guide
The following excerpt describes the contributions I made to the User Guide and shows my ability to document the Restaurant Categorization feature for end users. |
Setting the categories of a restaurant : setCategories
Sets the categories of a restaurant identified by the index number used in the list.
Format: setCategories INDEX [c/CUISINE] [oc/OCCASION] [pr/PRICE_RANGE]
|
Step by step guide on how to set categories:
Step 1: List all the restaurants by typing list, then press enter, as shown below.
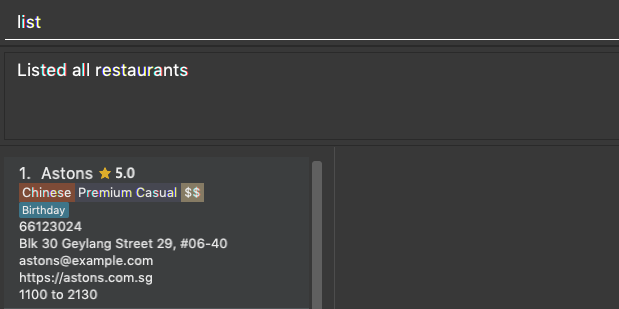
Figure 1: After typing list. Oh no, the categories for Aston’s are wrong! It is definitely not Chinese. Let’s change it.
Step 2: Choose a restaurant you want to set categories to. Let us choose Astons for this example. Take note that Astons
is identified by INDEX 1. Start typing setCategories 1 c/ as follows:
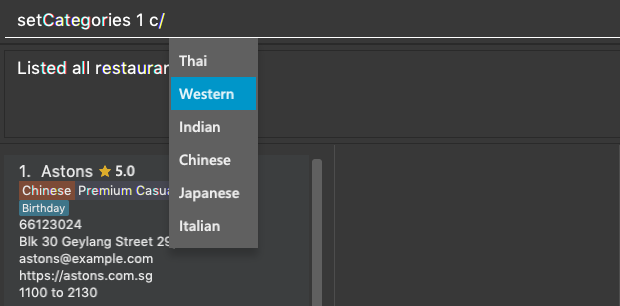
Figure 2: Notice suggestions for cuisines will pop up. Use arrow keys to select the desired suggestion and press enter, or you can also choose to continue typing something not in the suggestions.
Step 3: Continue keying in the occasion prefix after you finished keying in the cuisine. The occasion prefix is oc/.
Follow Figure 3 shown below.
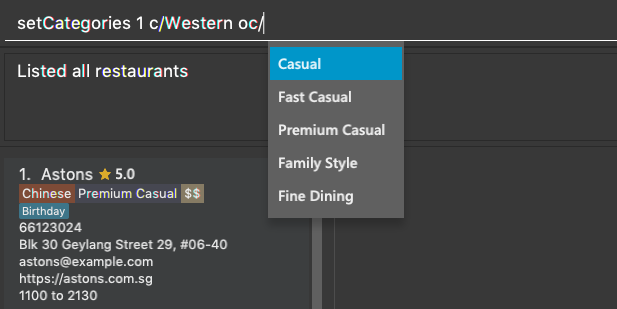
Figure 3: Once again, you can pick the occasion you see in the suggestions or continue typing.
Step 4: Key in the price range next, as demonstrated by Figure 4 below. The price range prefix is pr/.
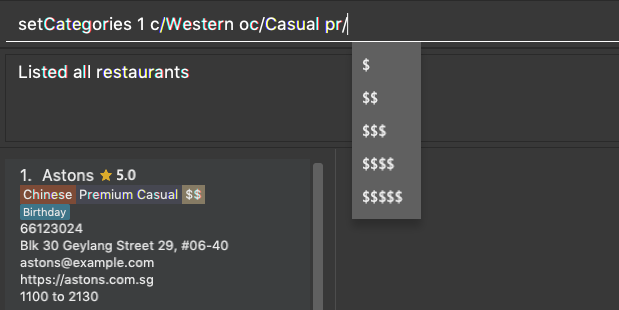
Figure 4: Pick a price range from the list or just type, whichever is faster for you.
Step 5: Press enter and the categories will be set! Else, you might have made a typo somewhere. You should see the following status message shown in the Figure below.
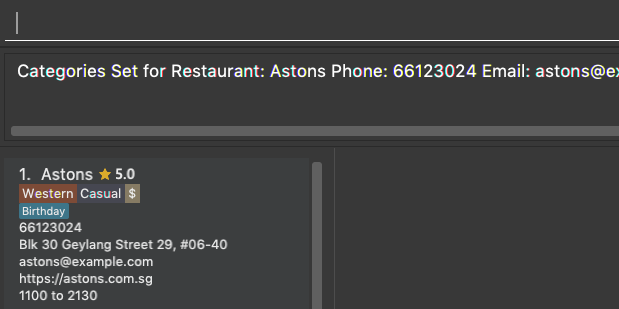
Figure 5: Success!
|
Other examples you can try:
-
setCategories 2 oc/Premium Casual pr/$
Sets the categories of the second restaurant in the list toPremium Casualfor occasion and$for price range. -
setCategories 3 c/Western
Only sets the cuisine of the third restaurant toWestern.
Filtering restaurants based on category: filter
Filters and lists the restaurants with categories matching the keywords entered.
Format: filter KEYWORD [MORE_KEYWORDS]
Step by step guide on how to filter:
Step 1: Suppose you want to filter out all Western, Japanese, as well as Chinese restaurants. Type filter
western japanese chinese into the command box.
Step 2: Press enter again and now all Western, Japanese and Chinese restaurants will be shown.
|
Some examples you can try:
-
filter fine dining casual
Displays restaurants with any category matchingfine,diningorcasual. -
filter $ casual western
Displays restaurants with any category matching$,casualorwestern.
Contributions to the Developer Guide
For the Developer Guide, I documented how Categorization is implemented as shown below. It reflects my ability to articulate how I implemented my features |
Restaurant Categorisation
Restaurants can be classified using categories. Each restaurant can have each of the optional categories defined.
Currently, 3 different types of categories are implemented in v1.4: Cuisine, Occasion and Price Range.
Current Implementation
Restaurant Categorisation is mainly implemented using the following commands:
-
setCategories— sets the different categories of the restaurant using its respective prefixes. -
filter— filters out restaurants using keywords matching that of its categories.
All supported categories are defined in the seedu.address.model.restaurant.categories package. A Facade design pattern
is used to allow access to individual Cuisine, Occasion and PriceRange categories through the Categories class.
Figure 1 below shows the chain of events when setting categories of a restaurant with the setCategories command:
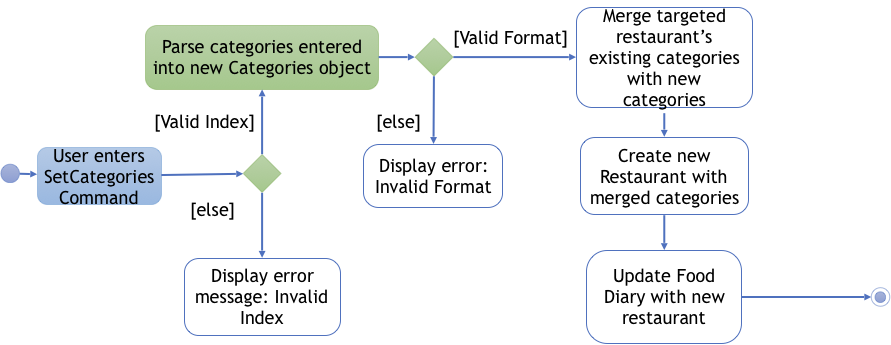
Figure 1: setCategories Activity Diagram
The following elaborates in detail on how the setCategories mechanism behaves at each step:
Step 1: User starts keying in the command into the command box. Once prefixes for either Cuisine, Occasion or Price Range
are detected, suggestions for that Category type are retrieved by CategoriesAutoCompleteTextField and populated in the appearing
context menu.
Step 2: User finishes typing and submits command for execution. The keyed-in text is sent to the Food Diary Parser to be parsed
into a SetCategoriesCommand object. The SetCategoriesCommand object contains the categories parsed from the text encapsulated
in a Categories object as well as the target Index.
Step 3: The SetCategoriesCommand is executed by calling SetCategoriesCommand#execute(). The target restaurant is retrieved
from Model via Model#getFilteredRestaurantList(). The categories of the target restaurant are merged by calling
Categories#merge() and the result is used to create a new restaurant, with all other restaurant data preserved.
The new restaurant is then updated into the Food Diary via Model#commitFoodDiary().
You can refer to Figure 2 below to get a better understanding of how a typical valid setCategories command executes internally.
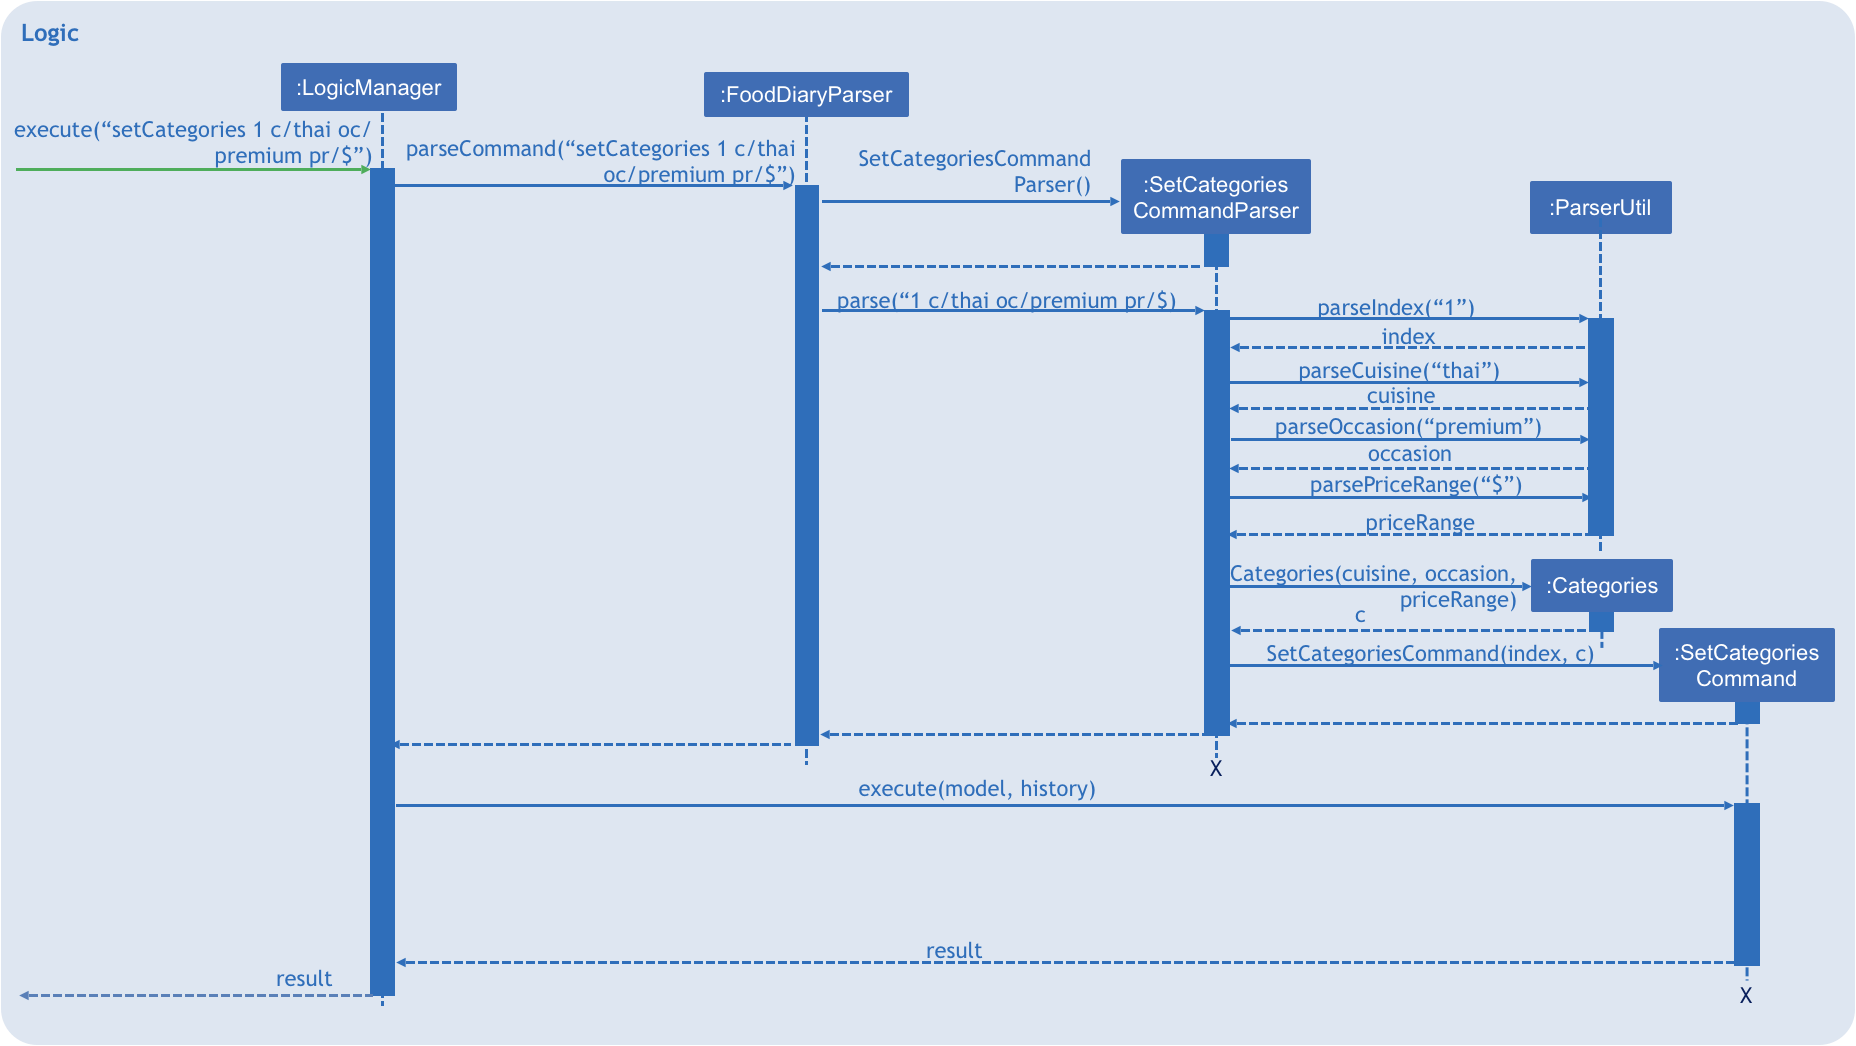
Figure 2: setCategories Sequence Diagram
Design Considerations
You can find out more about why certain areas of the feature are implemented a certain way here. Other possible alternatives are also considered and reasons as to why they were not chosen are also explained here.
How a restaurant’s Price Range is categorised
This section discusses the different ways price ranges could have been categorised.
-
Alternative 1: Use dollar signs to represent price (Current implementation)
Pros |
It is easier for the user to type and also visually clearer to the viewer |
Cons |
Restricts the range of price between one and five |
-
Alternative 2: Use words such as
cheap,expensiveto represent price range
Pros |
User has complete freedom as to how they want to key in the price range |
Cons |
Lacks proper structure, not very intuitive to the viewer if the user keys in something that does not make sense |
I chose Alternative 1 because it offers a better user experience. Users just need to type in a few characters. It also ensures that all restaurants' price ranges are visually consistent.
How categories are added and edited
This section discusses how categories could have been handled.
-
Alternative 1: Use one single command to add and edit, only overriding the present categories keyed in (Current implementation)
Pros |
User does not need to remember multiple commands to set categories. |
Cons |
Users are restricted to the preset types of categories they can set. |
-
Alternative 2: Use separate commands for add and edit
Pros |
User can add their own types of categories. |
Cons |
User needs to remember which restaurants do not have categories added yet, else add or edit commands might fail. |
I chose Alternative 1 because there are not many categories a restaurant can have. By having one command to set any category, users only need to remember one command, hence it is more intuitive for the user.