By: W17-1 Since: Feb 2019 Licence: MIT
- 1. Welcome to the Food Diary
- 2. Setting up
- 3. Design
- 4. Implementation
- 4.1. listUnvisited feature which sorts Restaurants by distance to a specified postal code
- 4.2. Display of Restaurants and Restaurant Details
- 4.3. Undo/Redo feature
- 4.4. Restaurant Categorisation
- 4.5. Add/AddDefault/Edit/Delete Reviews
- 4.6. Visit Webpage Feature
- 4.7. [Proposed] Data Encryption
- 4.8. [Proposed] Share Reviews to Facebook
- 4.9. Logging
- 4.10. Configuration
- 5. Documentation
- 6. Testing
- 7. Dev Ops
- Appendix A: Product Scope
- Appendix B: User Stories
- Appendix C: Use Cases
- Appendix D: Non Functional Requirements
- Appendix E: Glossary
- Appendix F: Instructions for Manual Testing
- F.1. Launch and Shutdown
- F.2. Deleting a restaurant
- F.3. Selecting a restaurant
- F.4. Sorting restaurant list
- F.5. Adding a Review to a restaurant
- F.6. Adding a default Review to a restaurant
- F.7. Editing the Review of a restaurant
- F.8. Deleting the Review of a restaurant
- F.9. Setting the categories of a restaurant
- F.10. Visiting website of a restaurant
1. Welcome to the Food Diary

Welcome to the Food Diary! The Food Diary is a desktop app for storing your personal food reviews and obtain food recommendations based on your past reviews.
This developer guide contains information on the mechanics of all of the features of the Food Diary and is thus suited for developers of all levels to learn the inner workings of our application and how to effectively build on them.
If you would like to improve on the Food Diary, here’s a good place to start!
Callouts
Callouts are boxes with important information regarding the usage of the Food Diary. These 3 callouts are used throughout our User Guide.
| This is a note. A note indicates important additional information that should be read. |
| This is a tip. A tip indicates good to know information that would improve your user experience |
| This is a warning. A warning indicates critical information that would affect the functionality of this programme. |
2. Setting up
2.1. Prerequisites
-
JDK
9or laterJDK 10on Windows will fail to run tests in headless mode due to a JavaFX bug. Windows developers are highly recommended to use JDK9. -
IntelliJ IDE
IntelliJ by default has Gradle and JavaFx plugins installed.
Do not disable them. If you have disabled them, go toFile>Settings>Pluginsto re-enable them.
2.2. Setting up the project in your computer
-
Fork this repo, and clone the fork to your computer
-
Open IntelliJ (if you are not in the welcome screen, click
File>Close Projectto close the existing project dialog first) -
Set up the correct JDK version for Gradle
-
Click
Configure>Project Defaults>Project Structure -
Click
New…and find the directory of the JDK
-
-
Click
Import Project -
Locate the
build.gradlefile and select it. ClickOK -
Click
Open as Project -
Click
OKto accept the default settings -
Open a console and run the command
gradlew processResources(Mac/Linux:./gradlew processResources). It should finish with theBUILD SUCCESSFULmessage.
This will generate all resources required by the application and tests. -
Open
MainWindow.javaand check for any code errors-
Due to an ongoing issue with some of the newer versions of IntelliJ, code errors may be detected even if the project can be built and run successfully
-
To resolve this, place your cursor over any of the code section highlighted in red. Press ALT+ENTER, and select
Add '--add-modules=…' to module compiler optionsfor each error
-
-
Repeat this for the test folder as well (e.g. check
HelpWindowTest.javafor code errors, and if so, resolve it the same way)
2.3. Verifying the setup
-
Run the
seedu.address.MainAppand try a few commands -
Run the tests to ensure they all pass.
2.4. Configurations to do before writing code
2.4.1. Configuring the coding style
This project follows oss-generic coding standards. IntelliJ’s default style is mostly compliant with ours but it uses a different import order from ours. To rectify,
-
Go to
File>Settings…(Windows/Linux), orIntelliJ IDEA>Preferences…(macOS) -
Select
Editor>Code Style>Java -
Click on the
Importstab to set the order-
For
Class count to use import with '*'andNames count to use static import with '*': Set to999to prevent IntelliJ from contracting the import statements -
For
Import Layout: The order isimport static all other imports,import java.*,import javax.*,import org.*,import com.*,import all other imports. Add a<blank line>between eachimport
-
Optionally, you can follow the UsingCheckstyle.adoc document to configure Intellij to check style-compliance as you write code.
2.4.2. Updating documentation to match your fork
After forking the repo, the documentation will still have the SE-EDU branding and refer to the se-edu/addressbook-level4 repo.
If you plan to develop this fork as a separate product (i.e. instead of contributing to se-edu/addressbook-level4), you should do the following:
-
Configure the site-wide documentation settings in
build.gradle, such as thesite-name, to suit your own project. -
Replace the URL in the attribute
repoURLinDeveloperGuide.adocandUserGuide.adocwith the URL of your fork.
2.4.3. Setting up CI
Set up Travis to perform Continuous Integration (CI) for your fork. See UsingTravis.adoc to learn how to set it up.
After setting up Travis, you can optionally set up coverage reporting for your team fork (see UsingCoveralls.adoc).
| Coverage reporting could be useful for a team repository that hosts the final version but it is not that useful for your restaurantal fork. |
Optionally, you can set up AppVeyor as a second CI (see UsingAppVeyor.adoc).
| Having both Travis and AppVeyor ensures your App works on both Unix-based platforms and Windows-based platforms (Travis is Unix-based and AppVeyor is Windows-based) |
2.4.4. Getting started with coding
When you are ready to start coding,
-
Get some sense of the overall design by reading Section 3.1, “Architecture”.
-
Take a look at Appendix A, Product Scope.
3. Design
3.1. Architecture
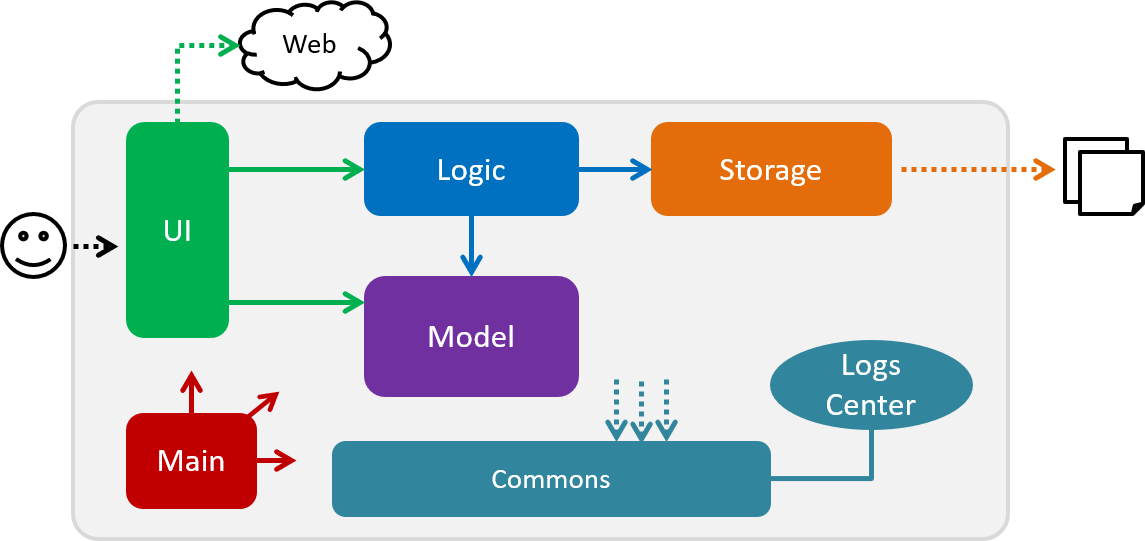
The Architecture Diagram given above explains the high-level design of the App. Given below is a quick overview of each component.
The .pptx files used to create diagrams in this document can be found in the diagrams folder. To update a diagram, modify the diagram in the pptx file, select the objects of the diagram, and choose Save as picture.
|
Main has only one class called MainApp. It is responsible for,
-
At app launch: Initializes the components in the correct sequence, and connects them up with each other.
-
At shut down: Shuts down the components and invokes cleanup method where necessary.
Commons represents a collection of classes used by multiple other components.
The following class plays an important role at the architecture level:
-
LogsCenter: Used by many classes to write log messages to the App’s log file.
The rest of the App consists of four components.
Each of the four components
-
Defines its API in an
interfacewith the same name as the Component. -
Exposes its functionality using a
{Component Name}Managerclass.
For example, the Logic component (see the class diagram given below) defines it’s API in the Logic.java interface and exposes its functionality using the LogicManager.java class.
How the architecture components interact with each other
The Sequence Diagram below shows how the components interact with each other for the scenario where the user issues the command delete 1.
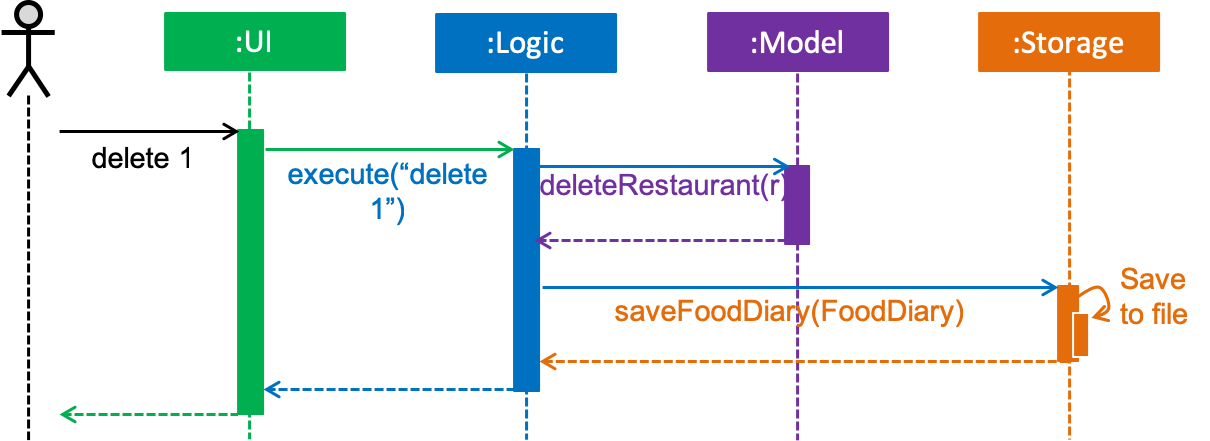
delete 1 commandThe sections below give more details of each component.
3.2. UI component
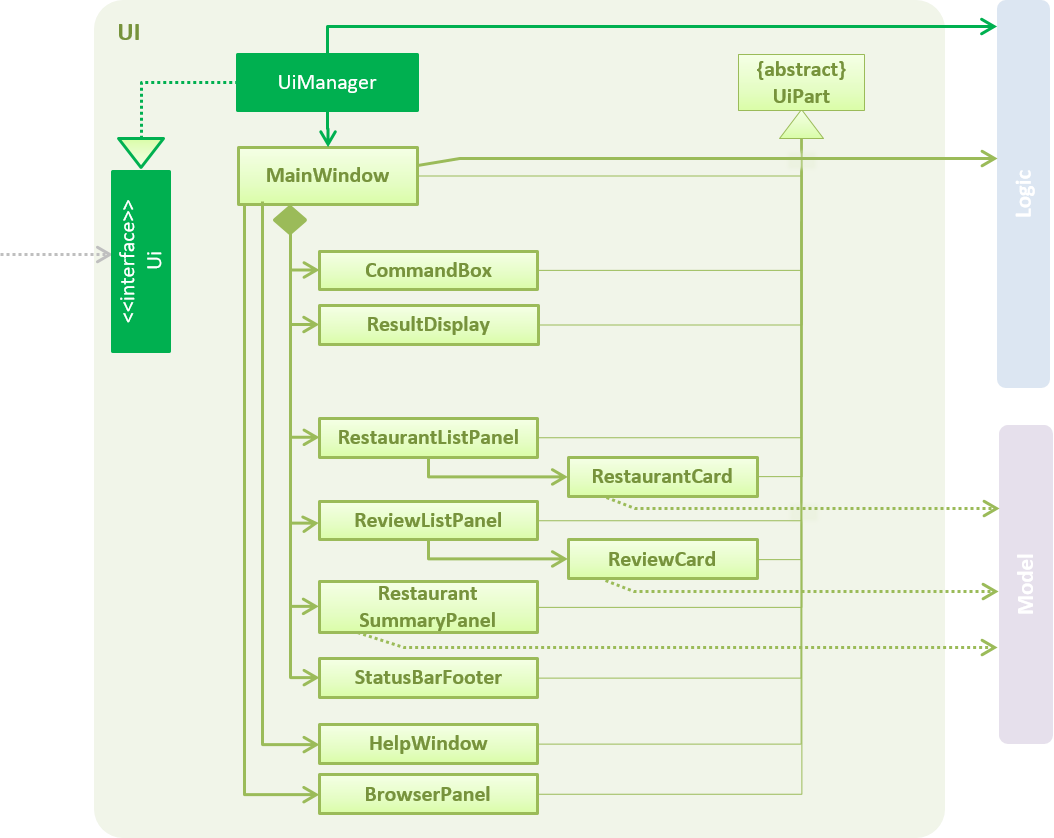
API : Ui.java
The UI consists of a MainWindow that is made up of parts e.g.CommandBox, ResultDisplay, RestaurantListPanel, StatusBarFooter, BrowserPanel, ReviewListPanel, etc. All these, including the MainWindow, inherit from the abstract UiPart class.
The UI component uses JavaFx UI framework. The layout of these UI parts are defined in matching .fxml files that are in the src/main/resources/view folder. For example, the layout of the MainWindow is specified in MainWindow.fxml
The UI component,
-
Executes user commands using the
Logiccomponent. -
Listens for changes to
Modeldata so that the UI can be updated with the modified data.
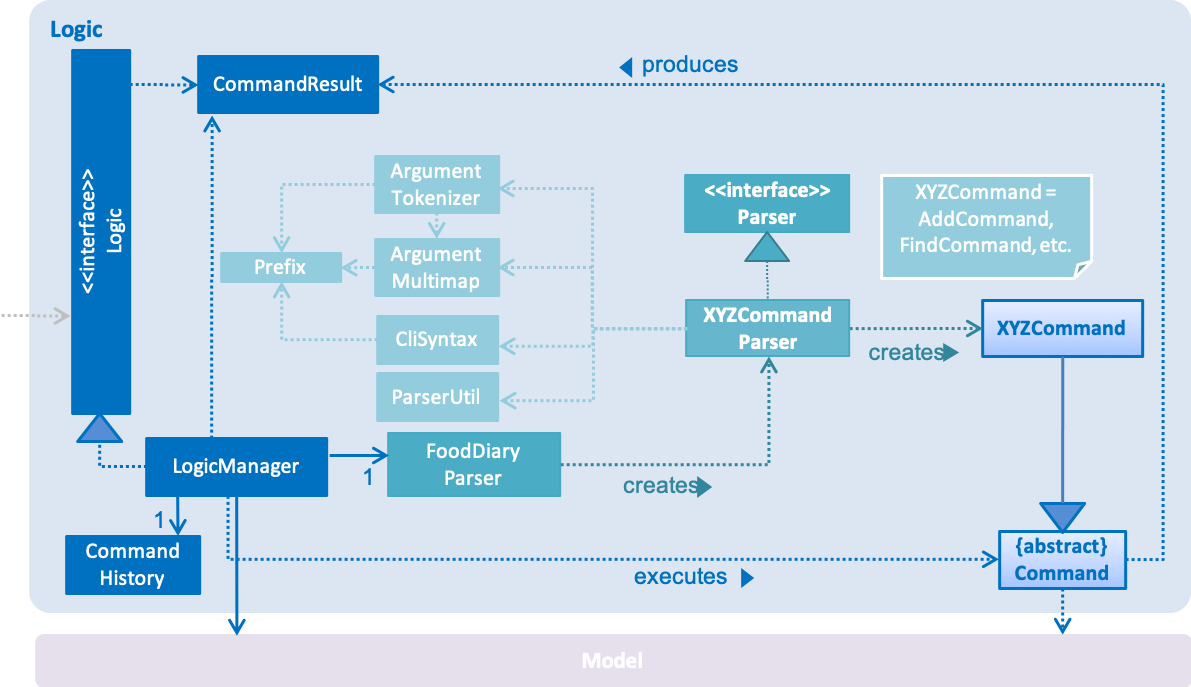
3.3. Logic component
API :
Logic.java
-
Logicuses theAddressBookParserclass to parse the user command. -
This results in a
Commandobject which is executed by theLogicManager. -
The command execution can affect the
Model(e.g. adding a restaurant). -
The result of the command execution is encapsulated as a
CommandResultobject which is passed back to theUi. -
In addition, the
CommandResultobject can also instruct theUito perform certain actions, such as displaying help to the user.
Given below is the Sequence Diagram for interactions within the Logic component for the execute("delete 1") API call.

delete 1 Command3.4. Model component
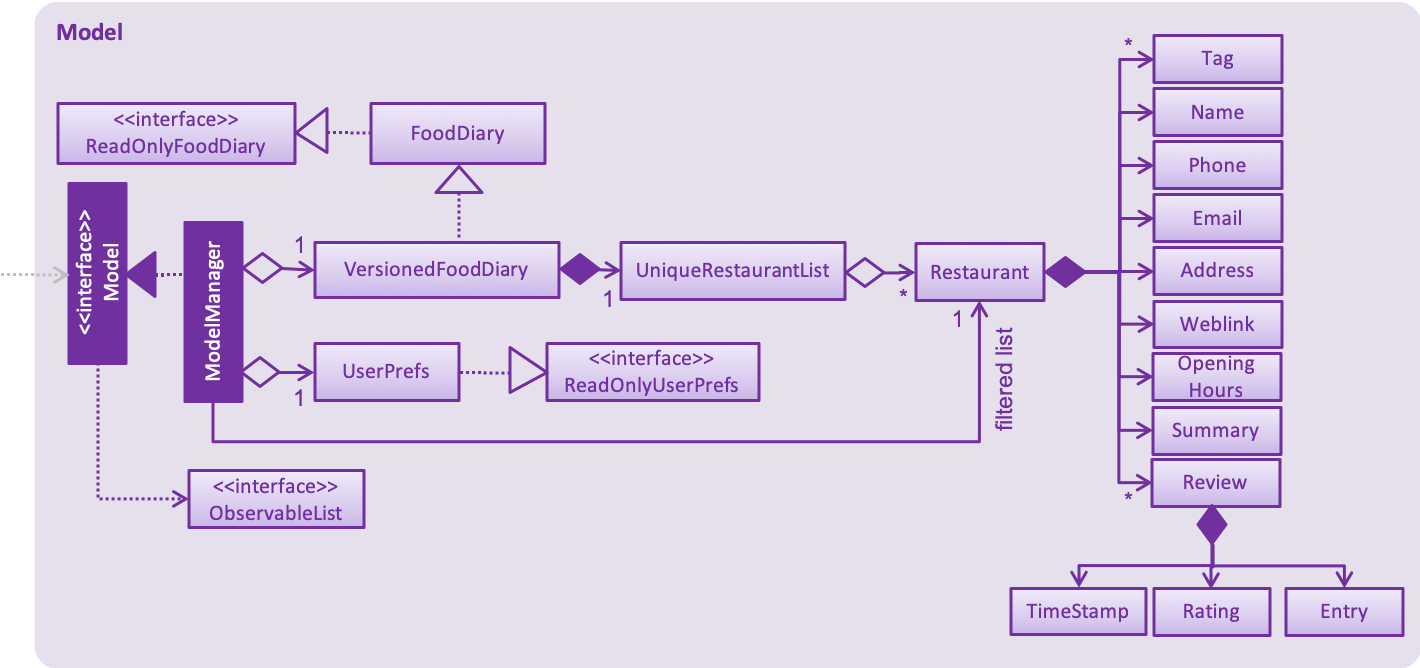
API : Model.java
The Model,
-
stores a
UserPrefobject that represents the user’s preferences. -
stores the Food Diary data.
-
exposes an unmodifiable
ObservableList<Restaurant>that can be 'observed' e.g. the UI can be bound to this list so that the UI automatically updates when the data in the list change. -
does not depend on any of the other three components.
As a more OOP model, we can store a Tag list in Food Diary, which Restaurant can reference. This would allow Food Diary to only require one Tag object per unique Tag, instead of each Restaurant needing their own Tag object. An example of how such a model may look like is given below.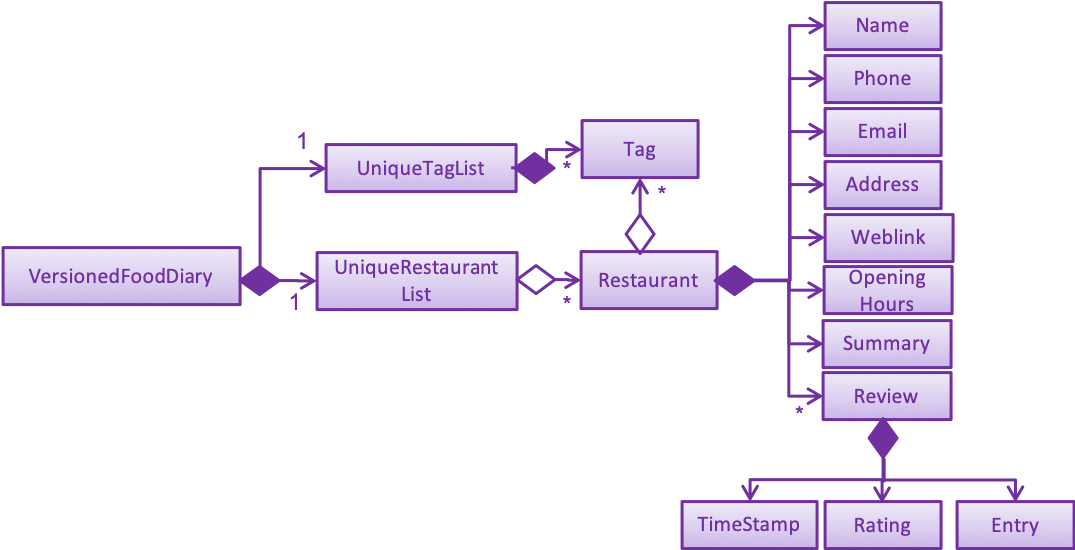
|
3.5. Storage component
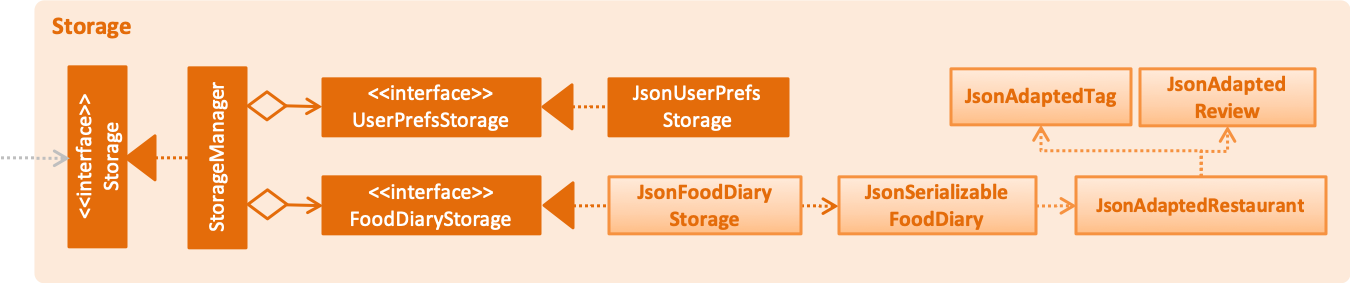
API : Storage.java
The Storage component,
-
can save
UserPrefobjects in json format and read it back. -
can save the Food Diary data in json format and read it back.
3.6. Common classes
Classes used by multiple components are in the seedu.addressbook.commons package.
4. Implementation
This section describes some noteworthy details on how certain features are implemented.
4.1. listUnvisited feature which sorts Restaurants by distance to a specified postal code
4.1.1. Current Implementation
The listUnvisited feature accepts a postal code as user input and displays restaurants without reviews nearest to the user’s inputted postal code.
The implementation of this feature can be broken down into 3 main components.
1) Storage Component
2) Model Component
3) Logic Component
The implementations of these components will be discussed below.
1. Storage Component
The Storage component’s function is to serialise the JSON data file PostalData.json, which contains the x and y-coordinates of every postal code in Singapore as of 13/03/2019.
The data is serialised into JsonSerializablePostalData which contains a List of JsonAdaptedPostalData.
This data can be retrieved through the StorageManager#getPostalData() method.
| In order to update the PostalData.json, you can run the script found here. |
2. Model Component
The Model component’s function is to allow the retrieval of the PostalData of a specific postal code.
It contains a PostalDataSet which contains a HashMap of String representing the postal code mapped to the corresponding PostalData.
This contains the x and y-coordinates of the corresponding postal code.
The retrieval is done through the PostalDataSet#getPostalData(int postal) method.
PostalDataSet is obtained through the Model#getPostalDataSet() interface.
3.Logic Component
The Logic component consists of two key sub-components, the Command component and the Comparator component.
The Command component parses the user input into a Postal and then checks if the Postal is within the PostalDataSet.
If the postal code provided is not within PostalDataSet, the ListUnvisitedCommand will simply filter out unreviewed restaurants.
Otherwise, if the postal code is valid, it will create a new SortDistanceComparator<Restaurant> class with the postal code and PostalDataSet inputted as the parameters.
This SortDistanceComparator is then passed to the Model class to sort the SortedList which encapsulates the FilteredList.
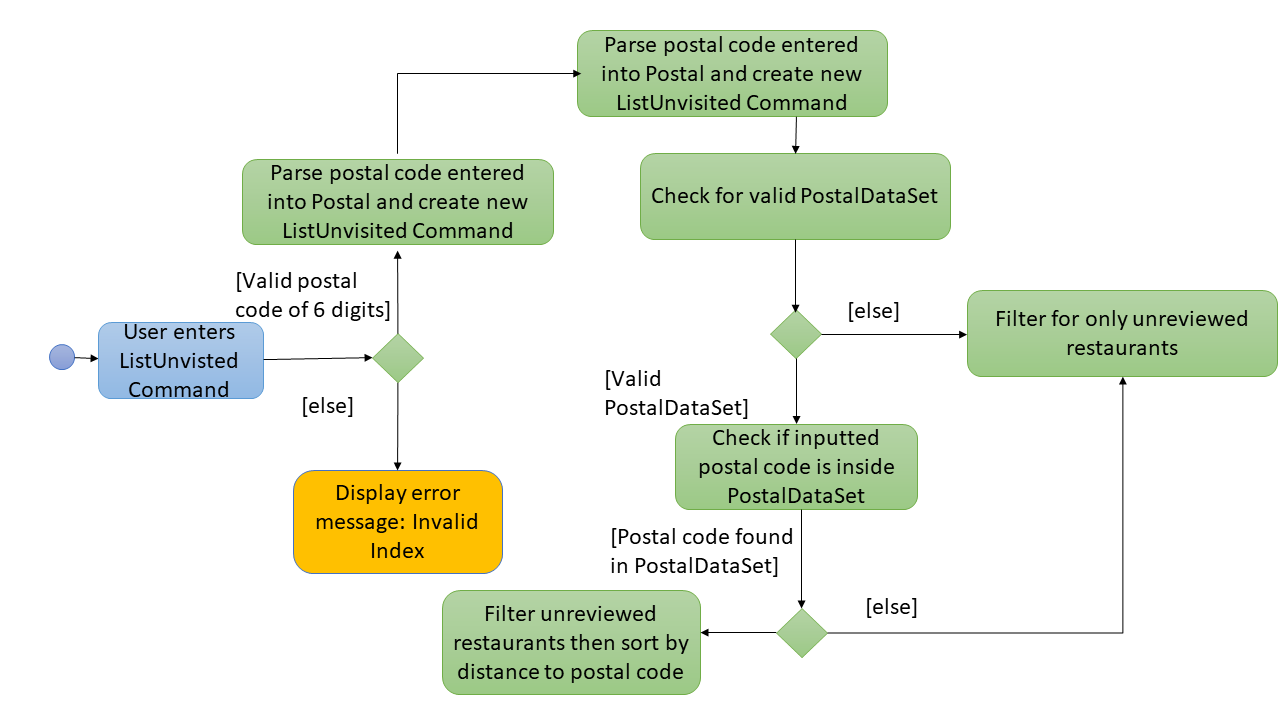
This sequence is illustrated in the activity diagram below.
The SortDistanceComparator<Restaurant> class sorts the Restaurant based on the distance to the user’s inputted postal code.
It does this by first querying the PostalData of the postal code of the Restaurant from PostalDataSet then
calculating the distance from the user inputted postal code.
This result is then stored within the Comparator class.
If a Restaurant 's postal code is not in PostalDataSet, the distance will be set to Double.MAX_VALUE.
This implies that this Restaurant will appear at the bottom of the SortedList.
|
Given below is an example usage scenario and how 3 components behaves at each step.
Step 1. The user launches the application for the first time. The PostalDataSet will be initialised with data from PostalData.json
through the Storage component.
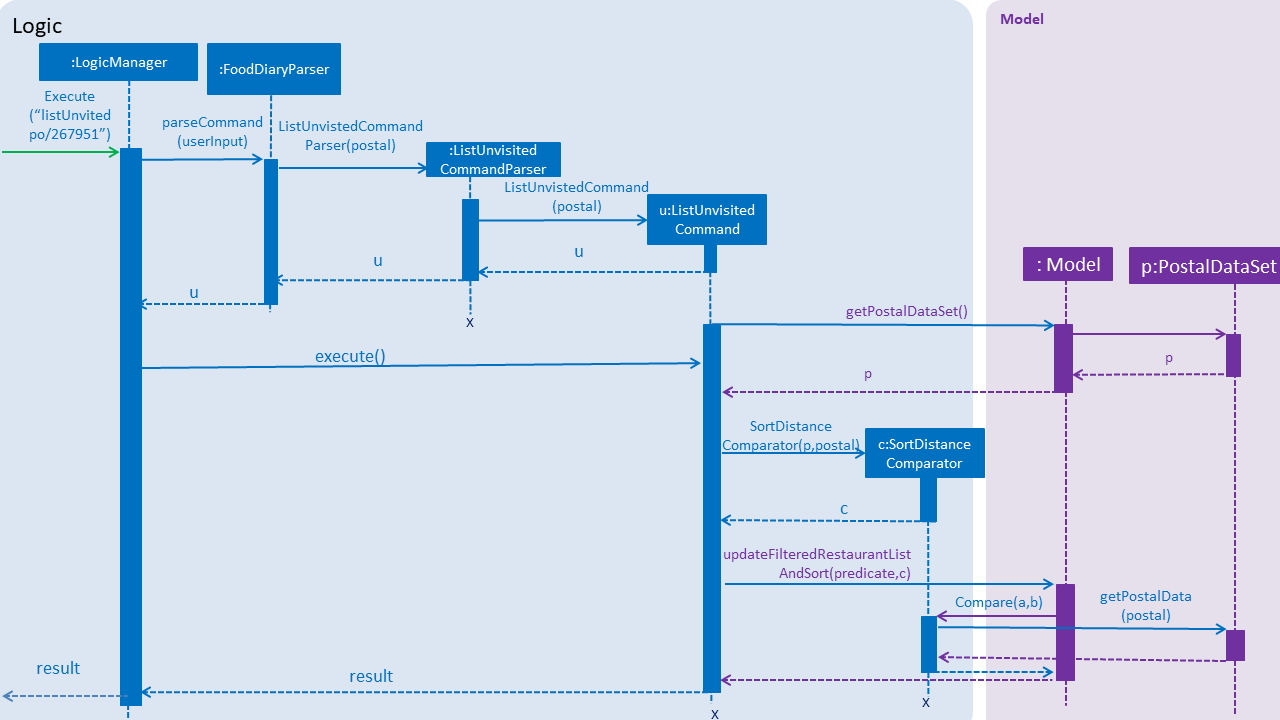
Step 2. The user calls listUnvisited po/267951. The listUnvisitedCommand class will be initialised.
A new SortDistanceComparator will be created by the
listUnvisitedCommand class containing the PostalData of '267951'.
The command will then call the method Model#filterAndSort(Predicate PREDICATE_SHOW_UNVISITED_RESTAURANTS, Comparator sortBy).
If the postal code provided by the user is invalid, there will be no change in ordering of the Restaurant. The list of Restaurant will be filtered to only show Restaurant without any Review.
|
Step 3. The Model#filterAndSortByLocation() will first filter the filterList to show all Restaurants with zero reviews.
Step 4. The sortedList which encapsulates the filteredList will then be sorted based on the Comparator
provided to show the nearest Restaurants with zero review.
The following sequence diagram summarizes what happens when the user executes a listUnvisited Command.
4.1.2. Design Considerations
Aspect: How is location data accessed for each postal code?
-
Alternative 1 (current choice): Preload the data from a json file
-
Pros: Internet Service is not required.
-
Cons: May have performance issues in terms of memory usage.
-
-
Alternative 2: Making a API call to an external library e.g.Google API
-
Pros: Will use less memory and will always be updated and accurate.
-
Cons: Internet Service is required for the usage of the feature.
-
Aspect: Accessing of local postal data
-
Alternative 1 (current choice):
PostalDatais retrieved for eachRestaurantby theComparator.-
Pros: Easy to implement.
-
Cons: Increased coupling between
LogicandModel. There might also be performance issues.
-
-
Alternative 2: Using the x and y coordinates as a field in the Restaurant class
-
Pros: Repeated calls to retrieve the
PostalDatafromPostalDataSetis not required. -
Cons: If incorrect postal data is provided, the incorrect x and y coordinates will be written to the data file. This may be difficult to correct.
-
4.2. Display of Restaurants and Restaurant Details
In order to enhance user’s experience in the Food Diary, the select feature is enhanced and a new sort feature is implemented.
These two features complete the diary aspect of the application by generating total visits and average ratings from the user’s own reviews and allowing users to sort the restaurants to see their favourite ones.
This section describes the implementation of these two features.
4.2.1. Select Feature
The select feature displays a restaurant’s summary and reviews when it is selected.
The restaurant’s summary is made up its generated data, the average rating and total visits, which are calculated from the reviews of a restaurant in the Summary class.
Current Implementation
The select feature is a pre-existing one from AddressBook Level 4.
The enhancement made is to display greater quantity and quality of restaurant information upon selection.
You can refer to Figure 1 to see the chain of activities that happen when the select command is executed.
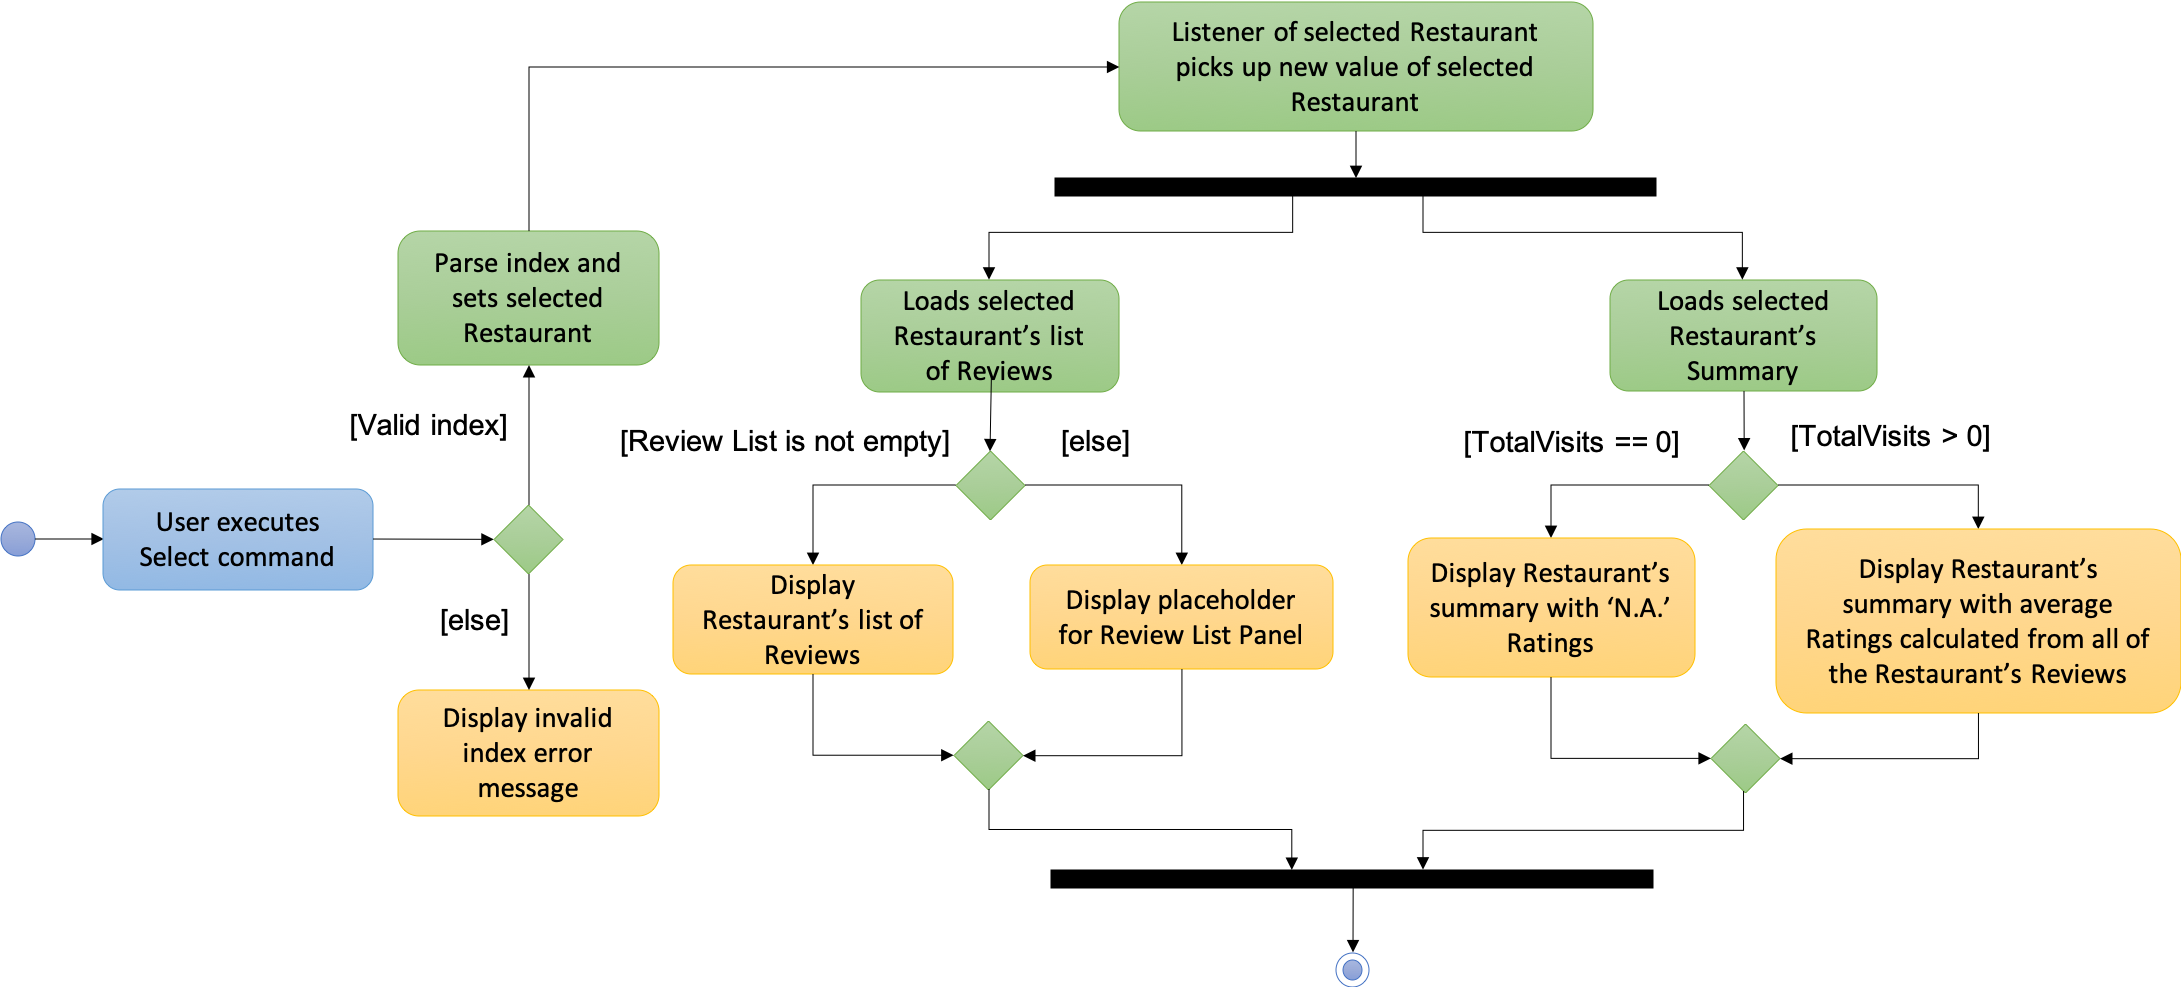
Figure 1. Activity Diagram for select command
The following describes how the select mechanism behaves at each step:
Step 1. User executes select INDEX command, with INDEX as a positive integer within the range of indexes in the filtered restaurant list.
Step 2. The FoodDiaryParser parses the user’s input and constructs a SelectCommandParser object, which then parses the input index into an Index object and constructs a SelectCommand object.
Step 3. The SelectCommand is executed and calls on Model#setSelectedRestaurant() to set the selected restaurant to be the restaurant with the target Index in the current filtered restaurant list.
Step 4. The listeners in the RestaurantSummaryPanel and ReviewListPanel pick up the new value of the selected restaurant and loads the restaurant’s summary and reviews respectively onto the GUI.
The RestaurantSummaryPanel does so by calling its own RestaurantSummaryPanel#loadSummary() operation, which retrieves the selected restaurant’s attributes such as Summary, and through it,
the restaurant’s avgRating and totalVisit.
A restaurant with no reviews is indicated with totalVisits = 0 and avgRating = -1. The number -1 is chosen as all user input Ratings can only be a number between [0, 5], thus -1 is a clear
indication that there is no avgRating for the particular restaurant. This is a clear check to decide whether the avgRating field displayed in the UI should be N.A..
|
There is no state change to the Food Diary as the select command only selects a restaurant from the current FilteredList of restaurants.
As such, this command cannot be undone or redone through the undo and redo commands respectively.
|
You can refer to Figure 2 for the internal implementation flow when a select command is executed.
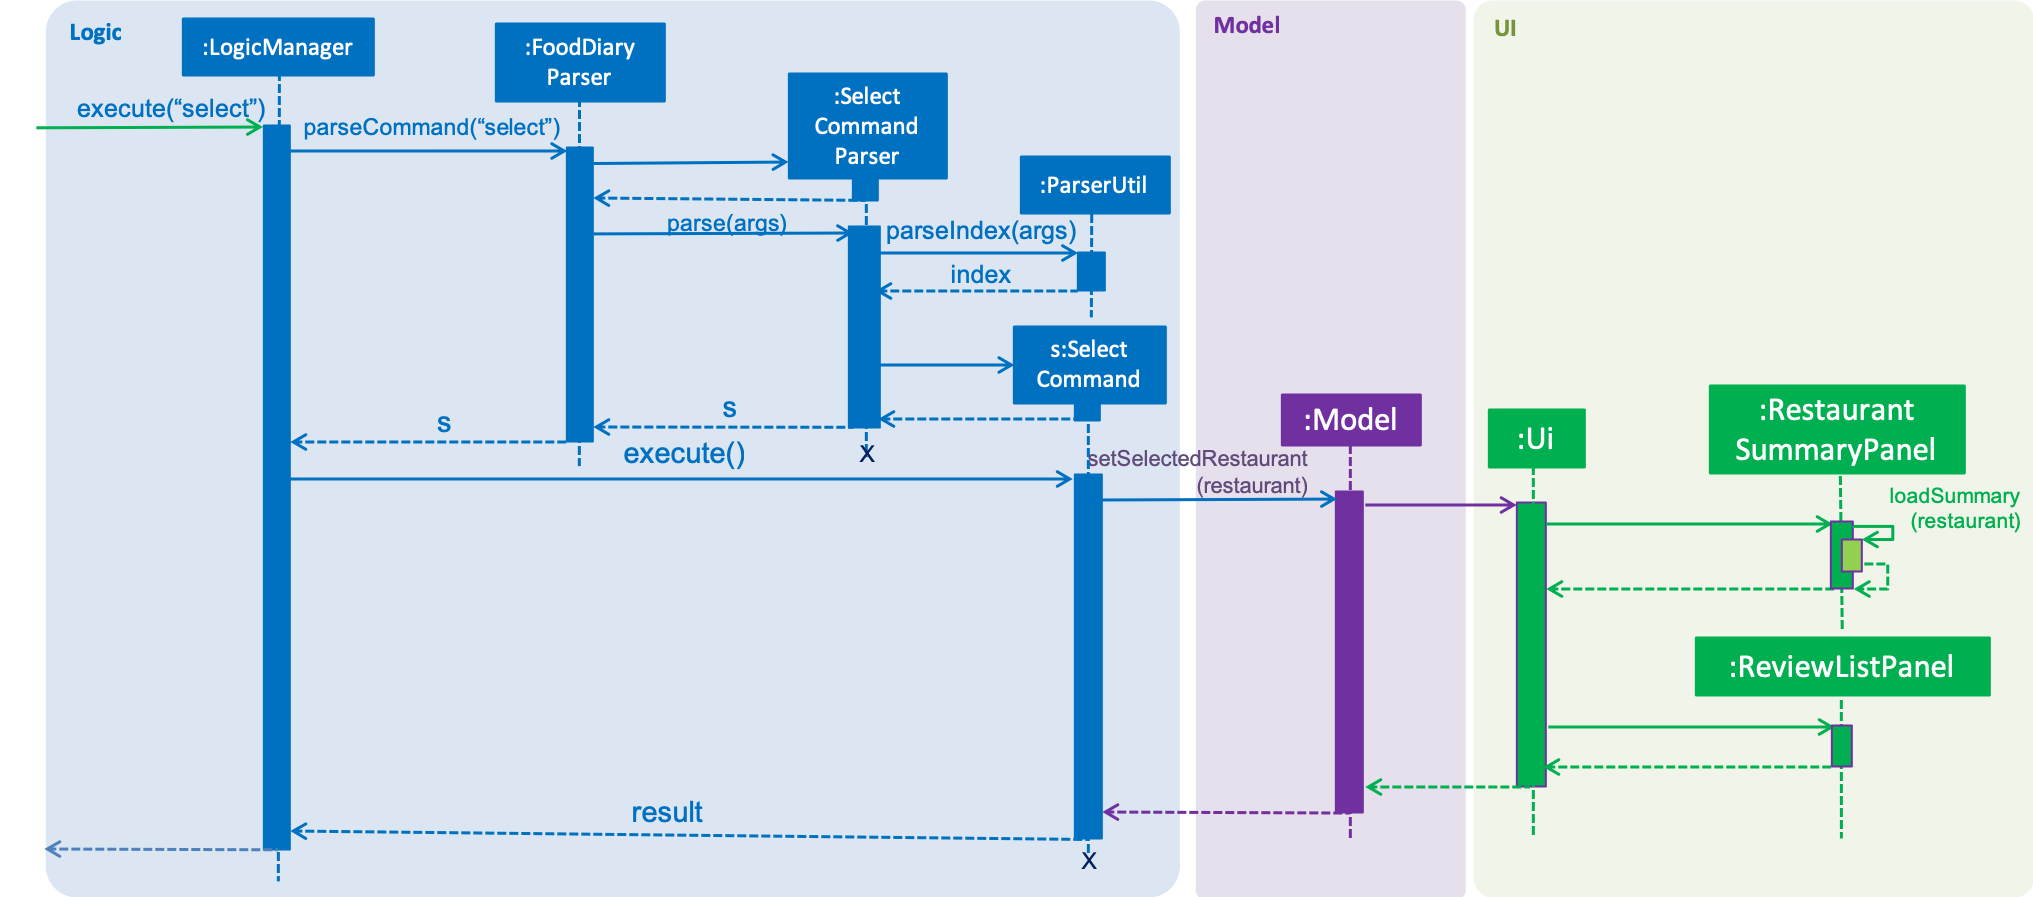
Figure 2. Sequence Diagram for select command
Design Considerations
Two guiding design patterns are applied to this feature:
-
The Facade design pattern is used to allow access to
avgRatingandtotalVisitsof aRestaurantonly through itsSummaryclass. -
The Observer pattern is also applied in the UI component as the
RestaurantSummaryPanelandReviewListPanelgets updated automatically once the selected restaurant is changed through the use of a listener forselectedRestaurant.
Aspect: How to structure the Summary in the UI
-
Alternative 1 (current choice): Implement
Summaryas a class in theRestaurantpackage-
Pros: Applies Observer pattern and reduces duplicate code as calculation of
avgRatingonly has to be done once inSummaryclass to display it on bothRestaurantCardandRestaurantSummaryPanel. -
Cons: Results in coupling as it introduces dependency of
SummaryonReviewclass.
-
-
Alternative 2: Implement
Summaryas a class in the UI component that listens to changes in theReviewof theRestaurant-
Pros: Reduces dependency within Model component.
-
Cons: Increases duplicate code as
avgRatingof a Restaurant’sSummaryis displayed in both theRestaurantCardandRestaurantSummaryPaneland will thus have to be calculated twice.
-
4.2.2. Sort Feature
The sort feature allows users to sort the restaurants in the Food Diary in ascending or descending order of ratings, and even limit the number of top/bottom ranked Restaurants shown.
Current Implementation
The command format is sort [or/ORDER] [l/LIMIT] with optional ORDER and LIMIT parameters.
By default, the restaurants would be sorted in descending order of ratings with no limit applied.
You can refer to Figure 3 below for a better understanding of the activity flow of the sort command.
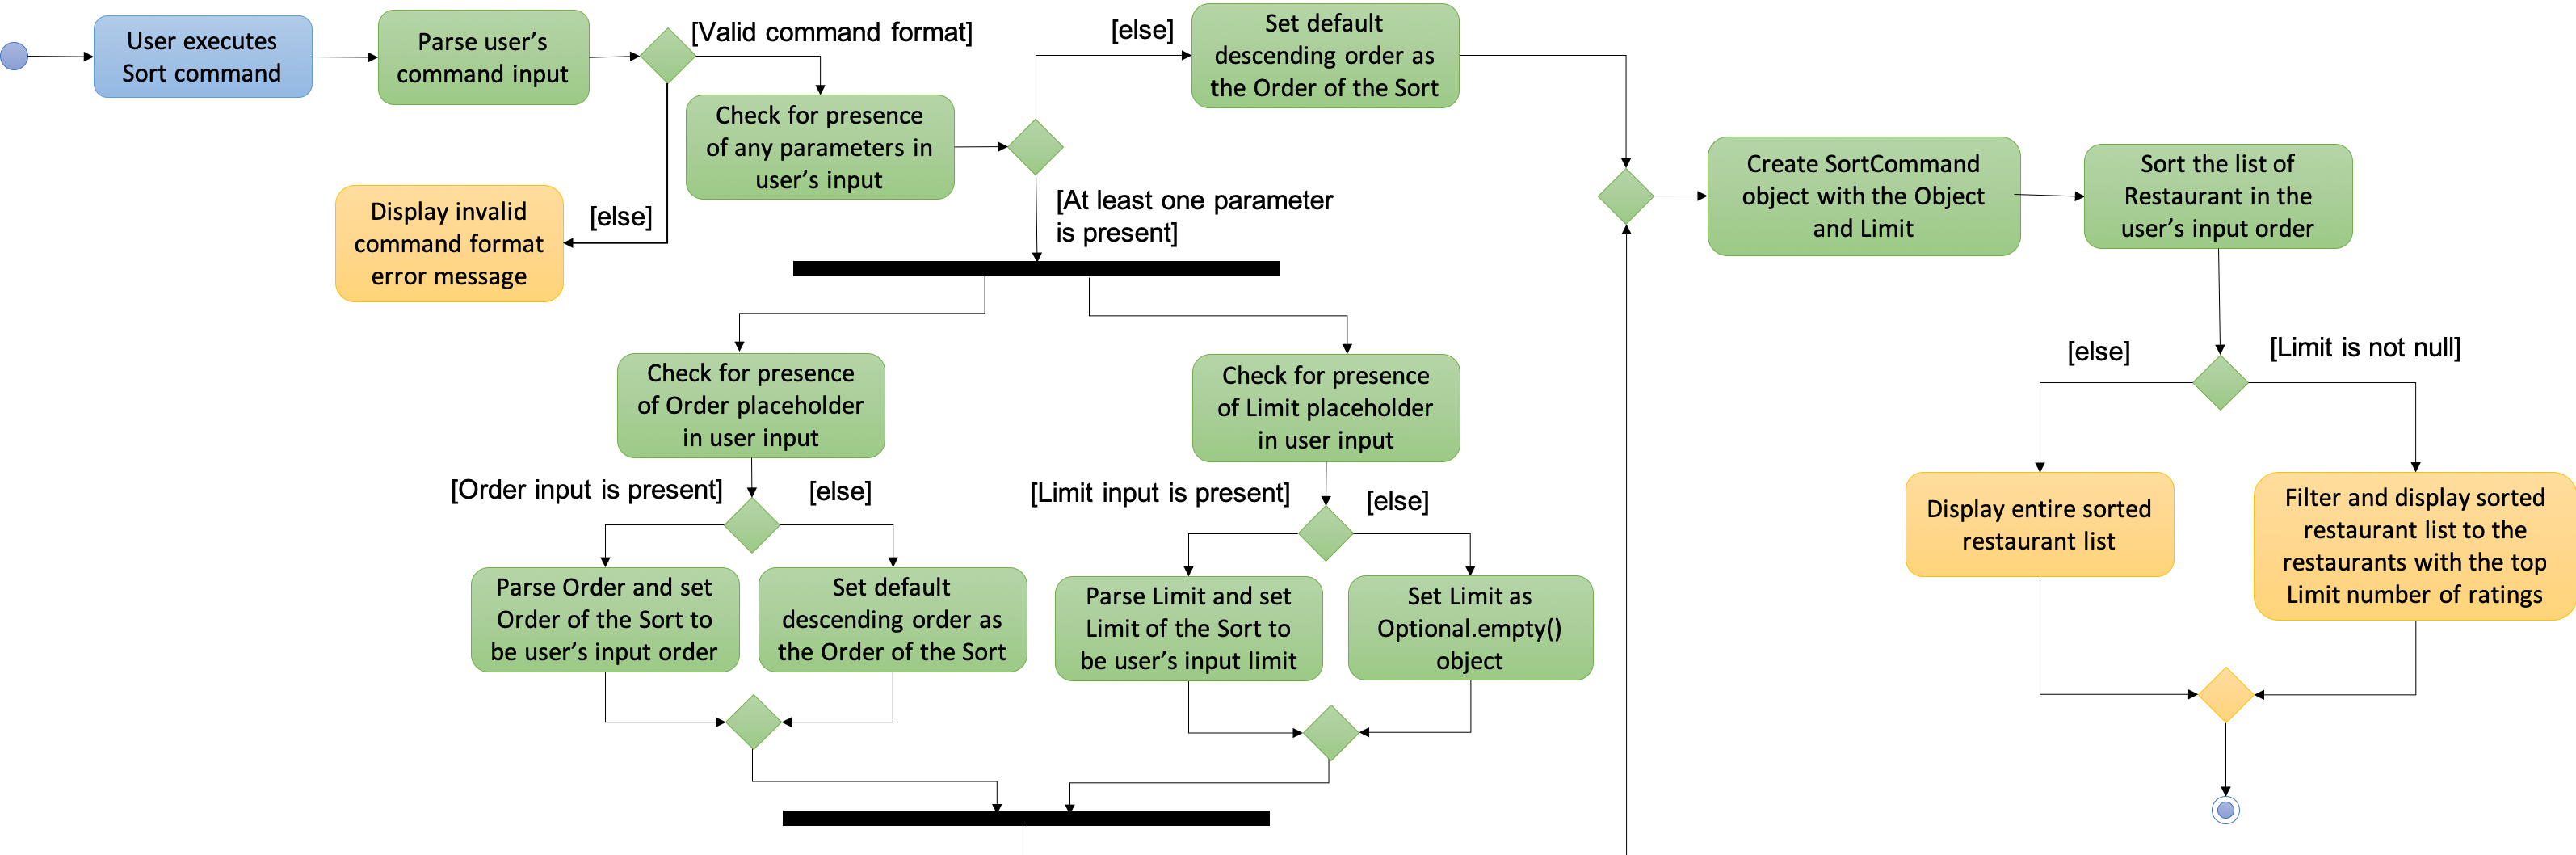
Figure 3. Activity Diagram for sort command
The majors components involved in the implementation of this feature are:
-
FoodDiaryParser, which parses the user’s input and constructs aSelectCommandParser, which then parses the input intoOrderandLimitand constructs aSortCommand. -
SortRating, which implementsComparator<Restaurant>, serves as a comparator to sort the restaurants in the Food Diary by itsavgRating. To construct this comparator, anOrderhas to be passed in to determine whetherSortRating#compare()will be indicating ascending or descending order. -
SortCommand, contains 2 sub-classes,OrderandLimit, which are used for the construction ofSortCommand.SortCommandis where theSortRatingcomparator is constructed and passed into theModel#sortRestaurantList()operation. The filtering of the sorted list to theLimit, if present, also takes place here.
The following shows how the sort mechanism behaves at each step.
Step 1. The user executes sort [or/ORDER] [l/LIMIT] command.
Step 2. The FoodDiaryParser parses the user’s input and constructs a SortCommandParser object, which then parses the inputs into Order and Limit objects, and constructs a SortCommand object using the Order and Limit constructed.
If there is no order in the user’s input, the default Order will be constructed using the String "DES".
|
If there is no limit in the user’s input, an Optional.empty() object will be used in place of Limit in the construction of a SortCommand object.
|
Step 3. The SortCommand is executed.
-
Step 3.1. A
SortRatingcomparator is constructed andModel#sortRestaurantList()call to sort the list of restaurants in the Food Diary. -
Step 3.2. If
Limitis present,SortCommand#filterToLimit()is called to get auniqueRatingslist fromModel#getUniqueRatings()to get the borderline of theavgRatingsto be included in the filtered list. A predicate containing the borderlineavgRatingis then created and passed intoModel#updateFilteredRestaurantList()to filter the sorted restaurant list. Else, ifLimitis not present, the predicate passed intoModel#updateFilteredRestaurantList()to display all restaurants.
Step 4. The sorted restaurant list is then stored in the Food Diary via Model#commitFoodDiary().
You can refer to Figure 4 below for a more detailed idea of how sort command is implemented internally.
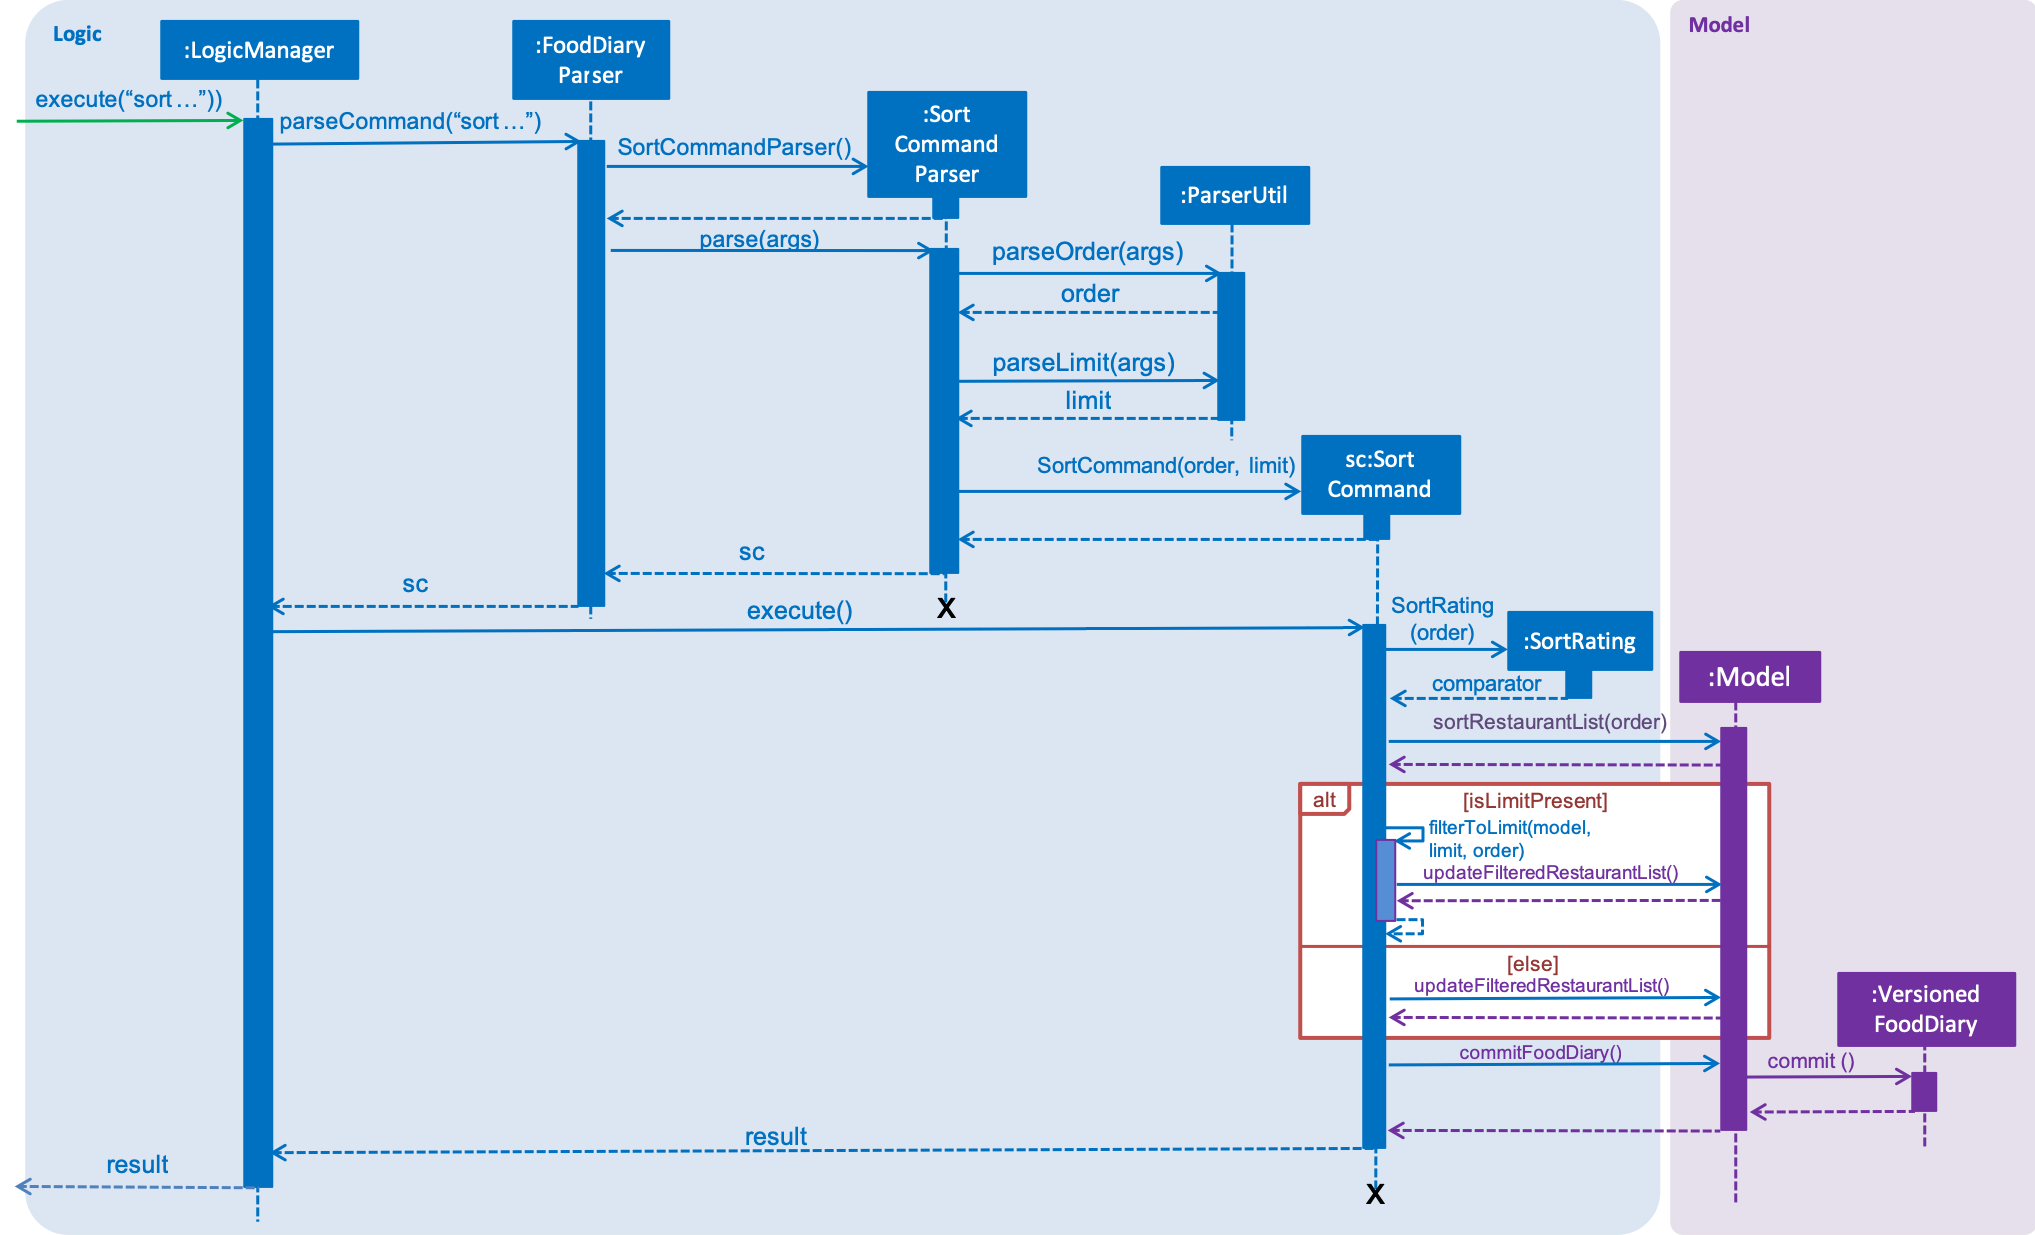
Figure 4. Sequence Diagram for sort command
Design Considerations
Aspect: How to apply the Limit
-
Alternative 1 (current choice): Let
Limitdenote the number of ranks of restaurants to be displayed-
Pros: Accurately shows the top/bottom ranked restaurants.
-
Cons: More expensive operations required to limit ranks of restaurants as a unique ratings list has to be stored to get the limited ranks.
-
-
Alternative 2: Let
Limitdenote the number of restaurants to be displayed-
Pros: More intuitive to users.
-
Cons: Does not provide an accurate depiction of top/bottom restaurants as multiple restaurants with the same ratings may not be displayed.
-
4.3. Undo/Redo feature
4.3.1. Current Implementation
The undo/redo mechanism is facilitated by VersionedFoodDiary.
It extends FoodDiary with an undo/redo history, stored internally as an foodDiaryStateList and currentStatePointer.
Additionally, it implements the following operations:
-
VersionedFoodDiary#commit()— Saves the current food diary state in its history. -
VersionedFoodDiary#undo()— Restores the previous food diary state from its history. -
VersionedFoodDiary#redo()— Restores a previously undone food diary state from its history.
These operations are exposed in the Model interface as Model#commitFoodDiary(), Model#undoFoodDiary() and Model#redoFoodDiary() respectively.
Given below is an example usage scenario and how the undo/redo mechanism behaves at each step.
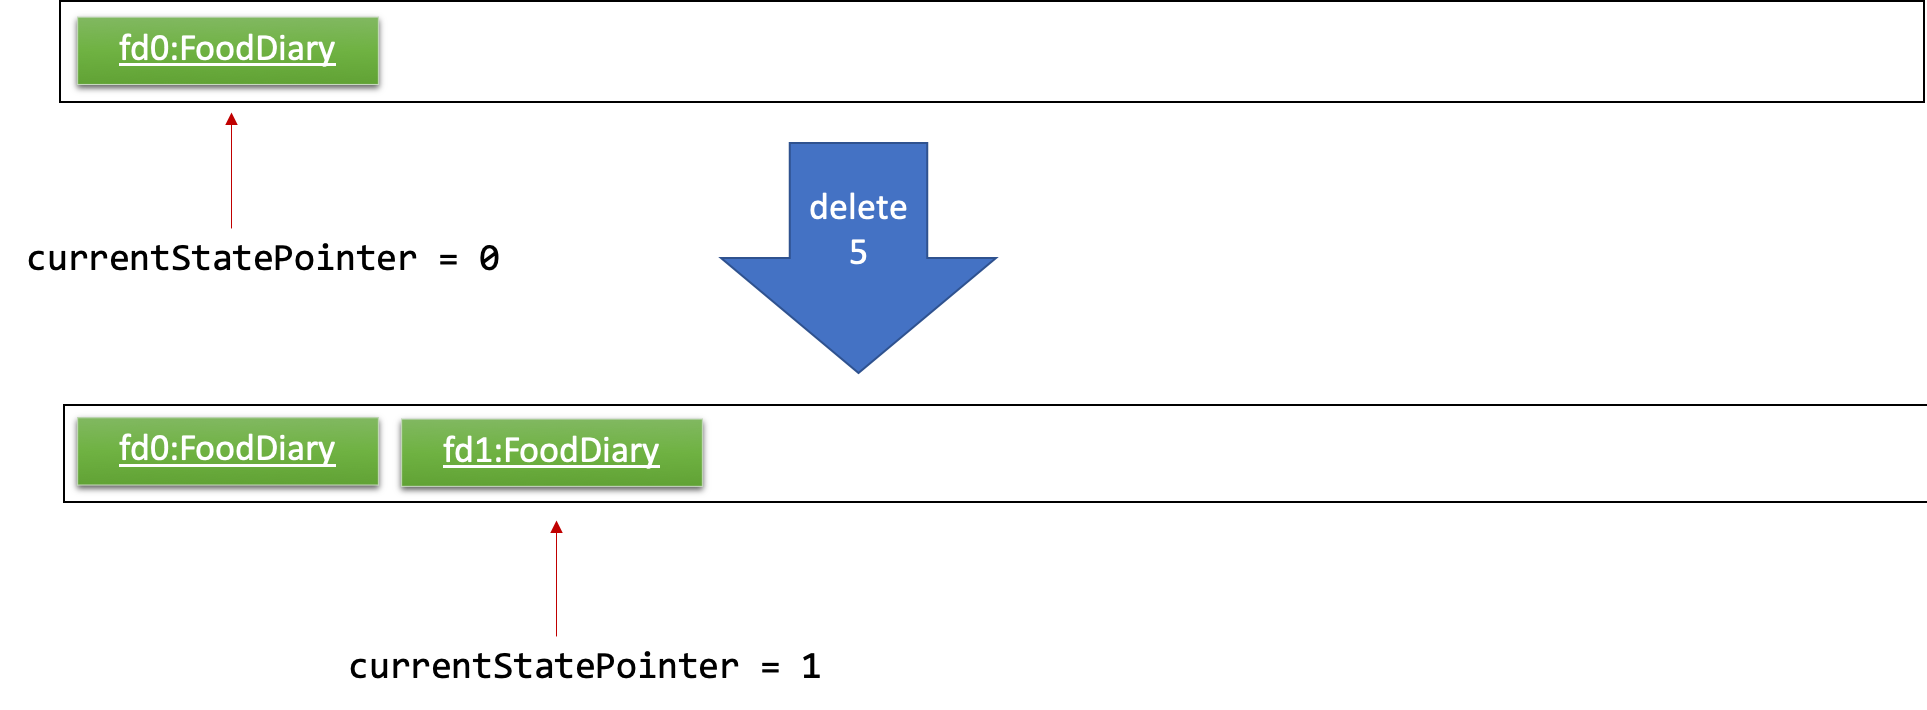
Step 1. The user launches the application for the first time. The VersionedFoodDiary will be initialized with the initial food diary state, and the currentStatePointer pointing to that single food diary state.

Step 2. The user executes delete 5 command to delete the 5th restaurant in the food diary. The delete command calls Model#commitFoodDiary(), causing the modified state of the food diary after the delete 5 command executes to be saved in the foodDiaryStateList, and the currentStatePointer is shifted to the newly inserted food diary state.
Step 3. The user executes add n/David … to add a new restaurant. The add command also calls Model#commitFoodDiary(), causing another modified food diary state to be saved into the foodDiaryStateList.
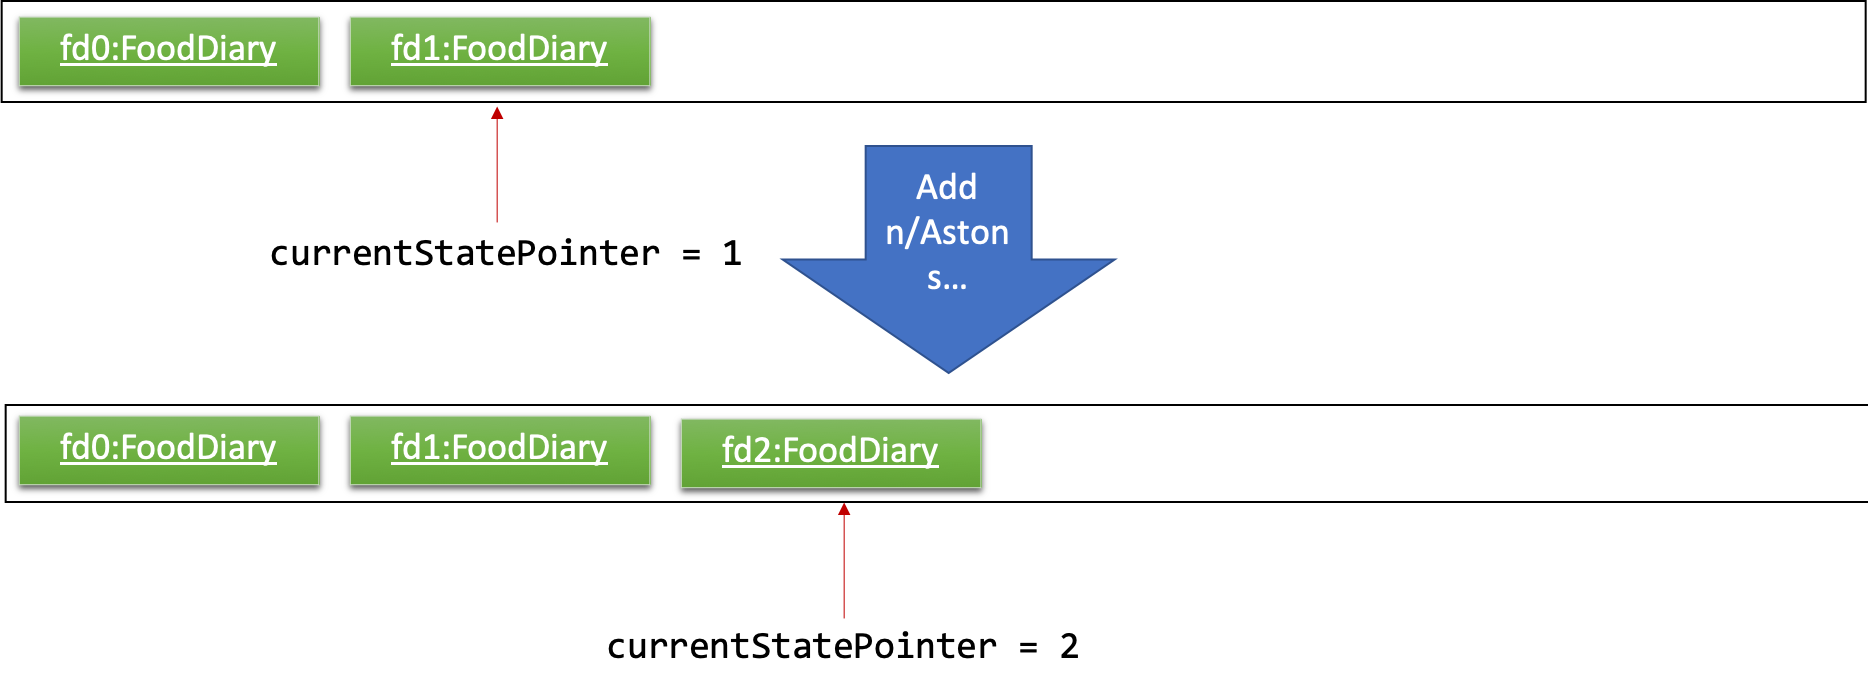
If a command fails its execution, it will not call Model#commitFoodDiary(), so the food diary state will not be saved into the foodDiaryStateList.
|
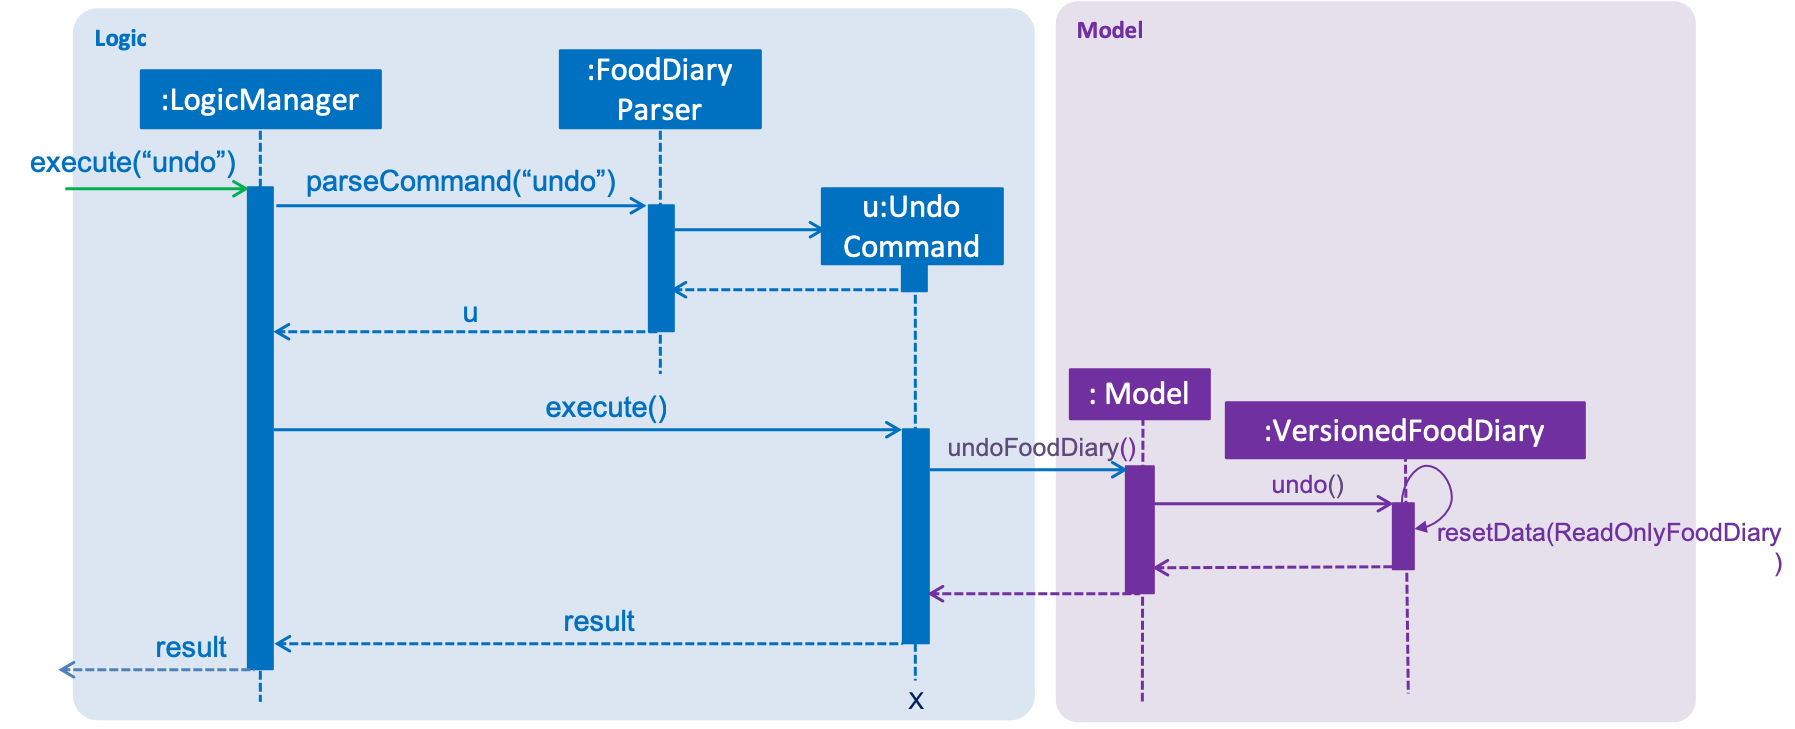
Step 4. The user now decides that adding the restaurant was a mistake, and decides to undo that action by executing the undo command. The undo command will call Model#undoFoodDiary(), which will shift the currentStatePointer once to the left, pointing it to the previous food diary state, and restores the food diary to that state.
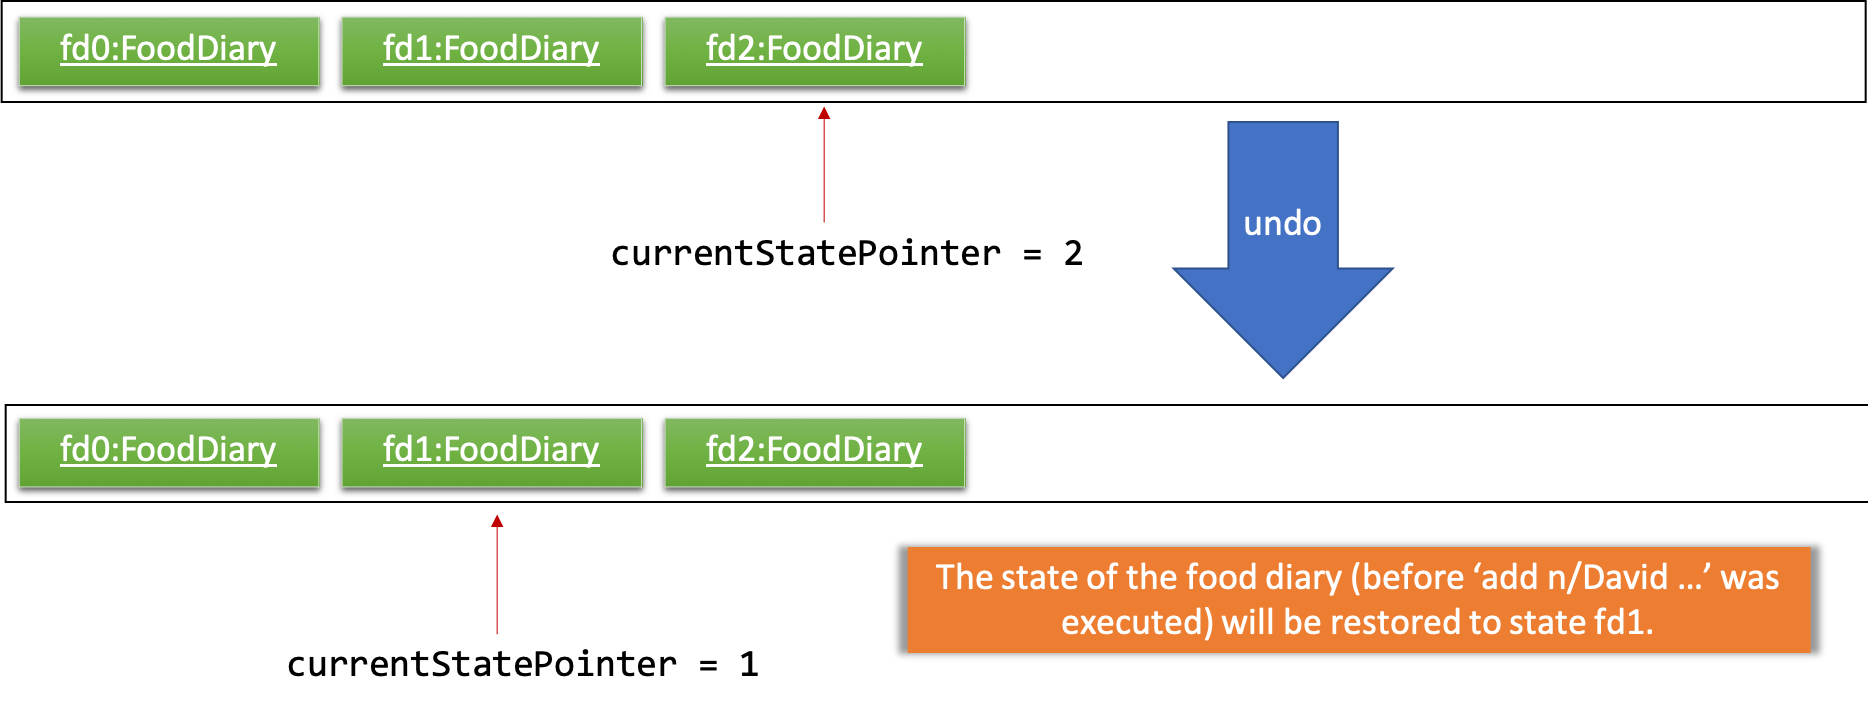
If the currentStatePointer is at index 0, pointing to the initial food diary state, then there are no previous food diary states to restore. The undo command uses Model#canUndoFoodDiary() to check if this is the case. If so, it will return an error to the user rather than attempting to perform the undo.
|
The following sequence diagram shows how the undo operation works:
The redo command does the opposite — it calls Model#redoFoodDiary(), which shifts the currentStatePointer once to the right, pointing to the previously undone state, and restores the food diary to that state.
If the currentStatePointer is at index foodDiaryStateList.size() - 1, pointing to the latest food diary state, then there are no undone food diary states to restore. The redo command uses Model#canRedoFoodDiary() to check if this is the case. If so, it will return an error to the user rather than attempting to perform the redo.
|
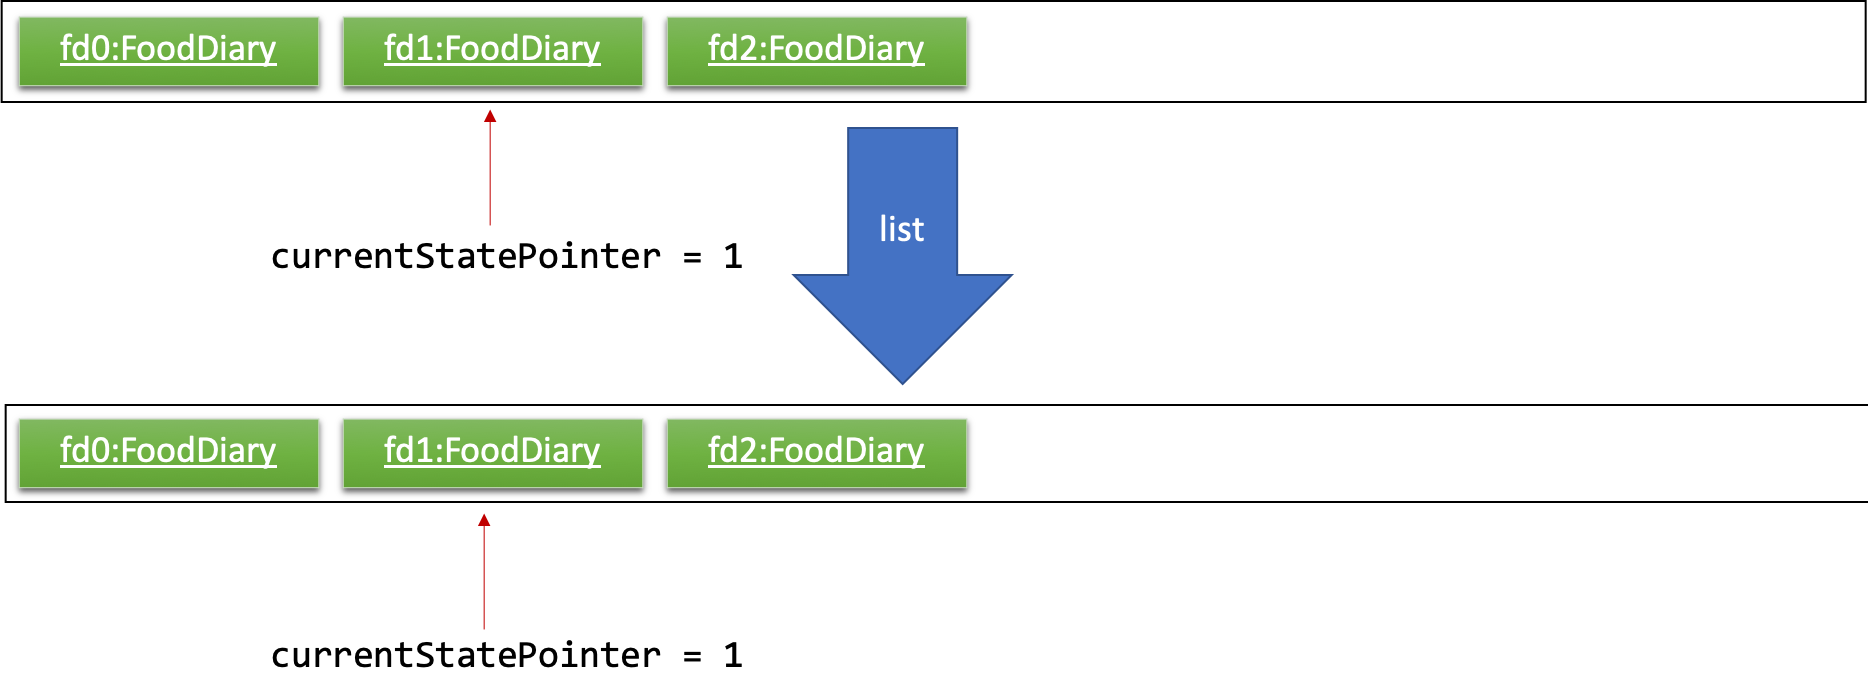
Step 5. The user then decides to execute the command list. Commands that do not modify the food diary, such as list, will usually not call Model#commitFoodDiary(), Model#undoFoodDiary() or Model#redoFoodDiary(). Thus, the foodDiaryStateList remains unchanged.
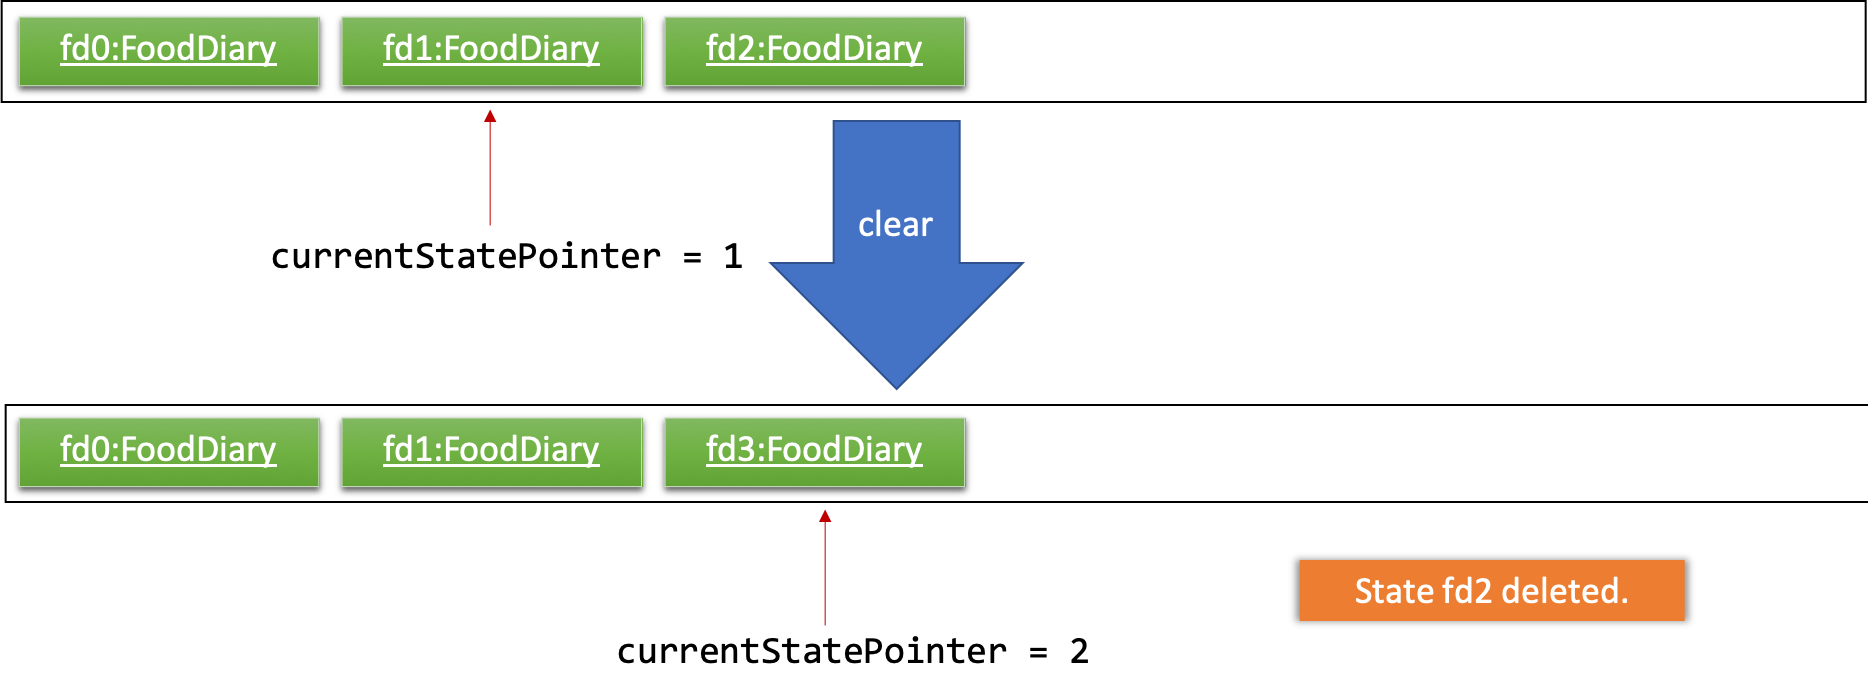
Step 6. The user executes clear, which calls Model#commitFoodDiary(). Since the currentStatePointer is not pointing at the end of the foodDiaryStateList, all food diary states after the currentStatePointer will be purged. We designed it this way because it no longer makes sense to redo the add n/David … command. This is the behavior that most modern desktop applications follow.
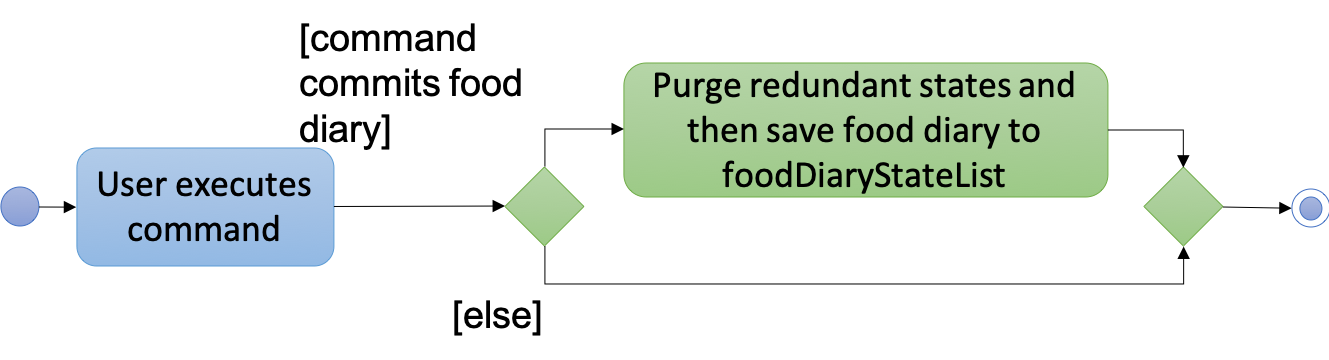
The following activity diagram summarizes what happens when a user executes a new command:
4.3.2. Design Considerations
Aspect: How undo & redo executes
-
Alternative 1 (current choice): Saves the entire food diary.
-
Pros: Easy to implement.
-
Cons: May have performance issues in terms of memory usage.
-
-
Alternative 2: Individual command knows how to undo/redo by itself.
-
Pros: Will use less memory (e.g. for
delete, just save the restaurant being deleted). -
Cons: We must ensure that the implementation of each individual command are correct.
-
Aspect: Data structure to support the undo/redo commands
-
Alternative 1 (current choice): Use a list to store the history of food diary states.
-
Pros: Easy for new Computer Science student undergraduates to understand, who are likely to be the new incoming developers of our project.
-
Cons: Logic is duplicated twice. For example, when a new command is executed, we must remember to update both
HistoryManagerandVersionedFoodDiary.
-
-
Alternative 2: Use
HistoryManagerfor undo/redo-
Pros: We do not need to maintain a separate list, and just reuse what is already in the codebase.
-
Cons: Requires dealing with commands that have already been undone: We must remember to skip these commands. Violates Single Responsibility Principle and Separation of Concerns as
HistoryManagernow needs to do two different things.
-
4.4. Restaurant Categorisation
Restaurants can be classified using categories. Each restaurant can have each of the optional categories defined.
Currently, 3 different types of categories are implemented in v1.4: Cuisine, Occasion and Price Range.
4.4.1. Current Implementation
Restaurant Categorisation is mainly implemented using the following commands:
-
setCategories— sets the different categories of the restaurant using its respective prefixes. -
filter— filters out restaurants using keywords matching that of its categories.
All supported categories are defined in the seedu.address.model.restaurant.categories package. A Facade design pattern
is used to allow access to individual Cuisine, Occasion and PriceRange categories through the Categories class.
Figure 1 below shows the chain of events when setting categories of a restaurant with the setCategories command:
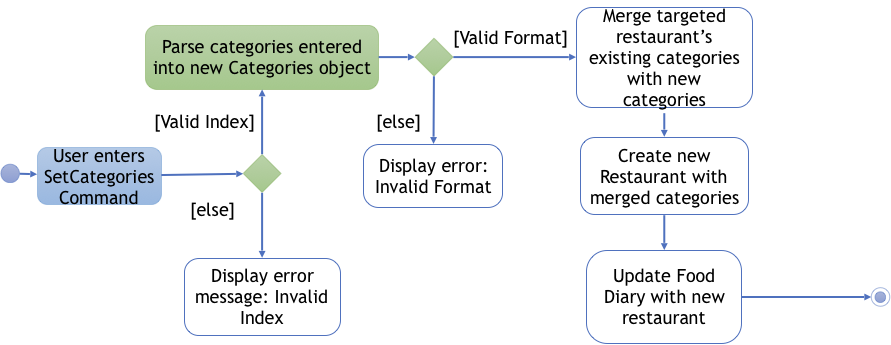
Figure 1: setCategories Activity Diagram
The following elaborates in detail on how the setCategories mechanism behaves at each step:
Step 1: User starts keying in the command into the command box. Once prefixes for either Cuisine, Occasion or Price Range
are detected, suggestions for that Category type are retrieved by CategoriesAutoCompleteTextField and populated in the appearing
context menu.
Step 2: User finishes typing and submits command for execution. The keyed-in text is sent to the Food Diary Parser to be parsed
into a SetCategoriesCommand object. The SetCategoriesCommand object contains the categories parsed from the text encapsulated
in a Categories object as well as the target Index.
Step 3: The SetCategoriesCommand is executed by calling SetCategoriesCommand#execute(). The target restaurant is retrieved
from Model via Model#getFilteredRestaurantList(). The categories of the target restaurant are merged by calling
Categories#merge() and the result is used to create a new restaurant, with all other restaurant data preserved.
The new restaurant is then updated into the Food Diary via Model#commitFoodDiary().
You can refer to Figure 2 below to get a better understanding of how a typical valid setCategories command executes internally.
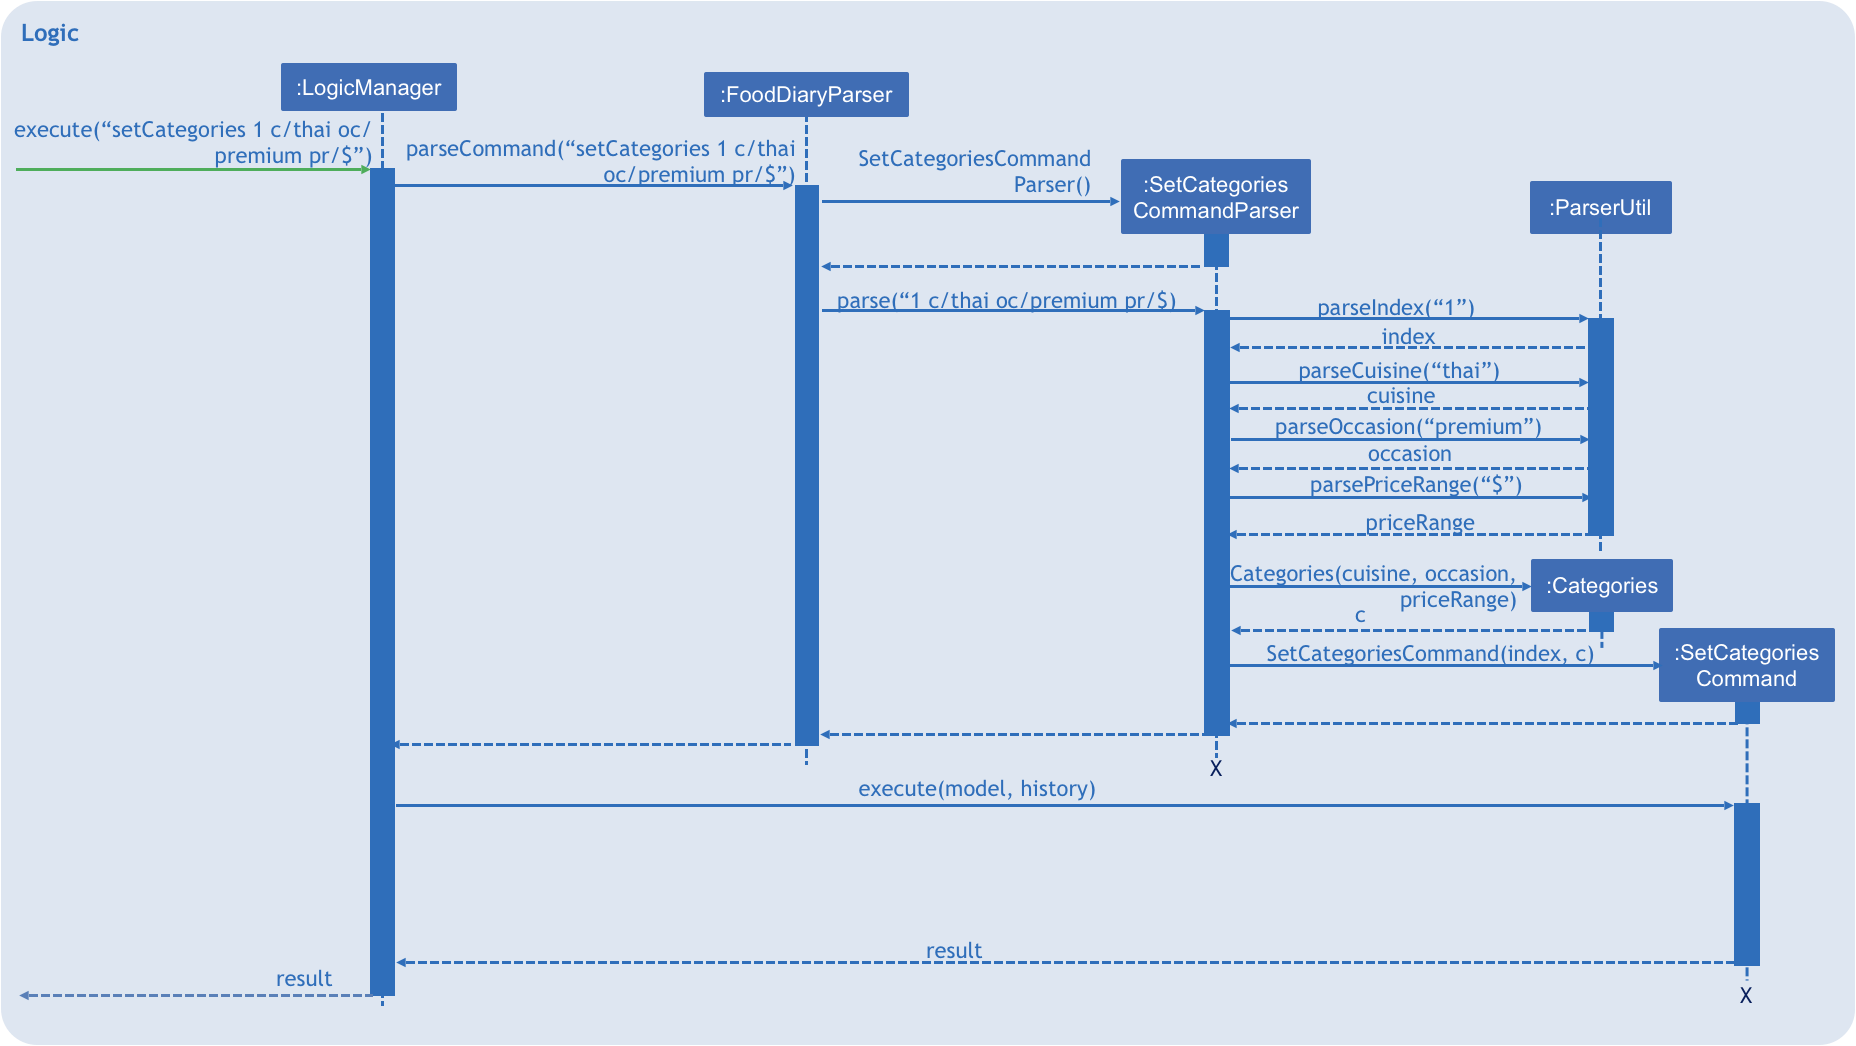
Figure 2: setCategories Sequence Diagram
4.4.2. Design Considerations
You can find out more about why certain areas of the feature are implemented a certain way here. Other possible alternatives are also considered and reasons as to why they were not chosen are also explained here.
How a restaurant’s Price Range is categorised
This section discusses the different ways price ranges could have been categorised.
-
Alternative 1: Use dollar signs to represent price (Current implementation)
Pros |
It is easier for the user to type and also visually clearer to the viewer |
Cons |
Restricts the range of price between one and five |
-
Alternative 2: Use words such as
cheap,expensiveto represent price range
Pros |
User has complete freedom as to how they want to key in the price range |
Cons |
Lacks proper structure, not very intuitive to the viewer if the user keys in something that does not make sense |
I chose Alternative 1 because it offers a better user experience. Users just need to type in a few characters. It also ensures that all restaurants' price ranges are visually consistent.
How categories are added and edited
This section discusses how categories could have been handled.
-
Alternative 1: Use one single command to add and edit, only overriding the present categories keyed in (Current implementation)
Pros |
User does not need to remember multiple commands to set categories. |
Cons |
Users are restricted to the preset types of categories they can set. |
-
Alternative 2: Use separate commands for add and edit
Pros |
User can add their own types of categories. |
Cons |
User needs to remember which restaurants do not have categories added yet, else add or edit commands might fail. |
I chose Alternative 1 because there are not many categories a restaurant can have. By having one command to set any category, users only need to remember one command, hence it is more intuitive for the user.
4.5. Add/AddDefault/Edit/Delete Reviews
Reviews are a core feature of the application. Each review is specific to a restaurant, and represents one visit/experience at that particular restaurant. This section describes the implementation of the functions dealing with creating, modifying and modifying reviews. There is also an enhancement in the form of adding default reviews which will be elaborated on.
4.5.1. Add Reviews
This command adds a review to a restaurant specified by the INDEX argument.
Command format: addReview INDEX re/(ENTRY) rr/(RATING)
Current Implementation
The functionality of the addReview command can be better understood with the following activity diagram:
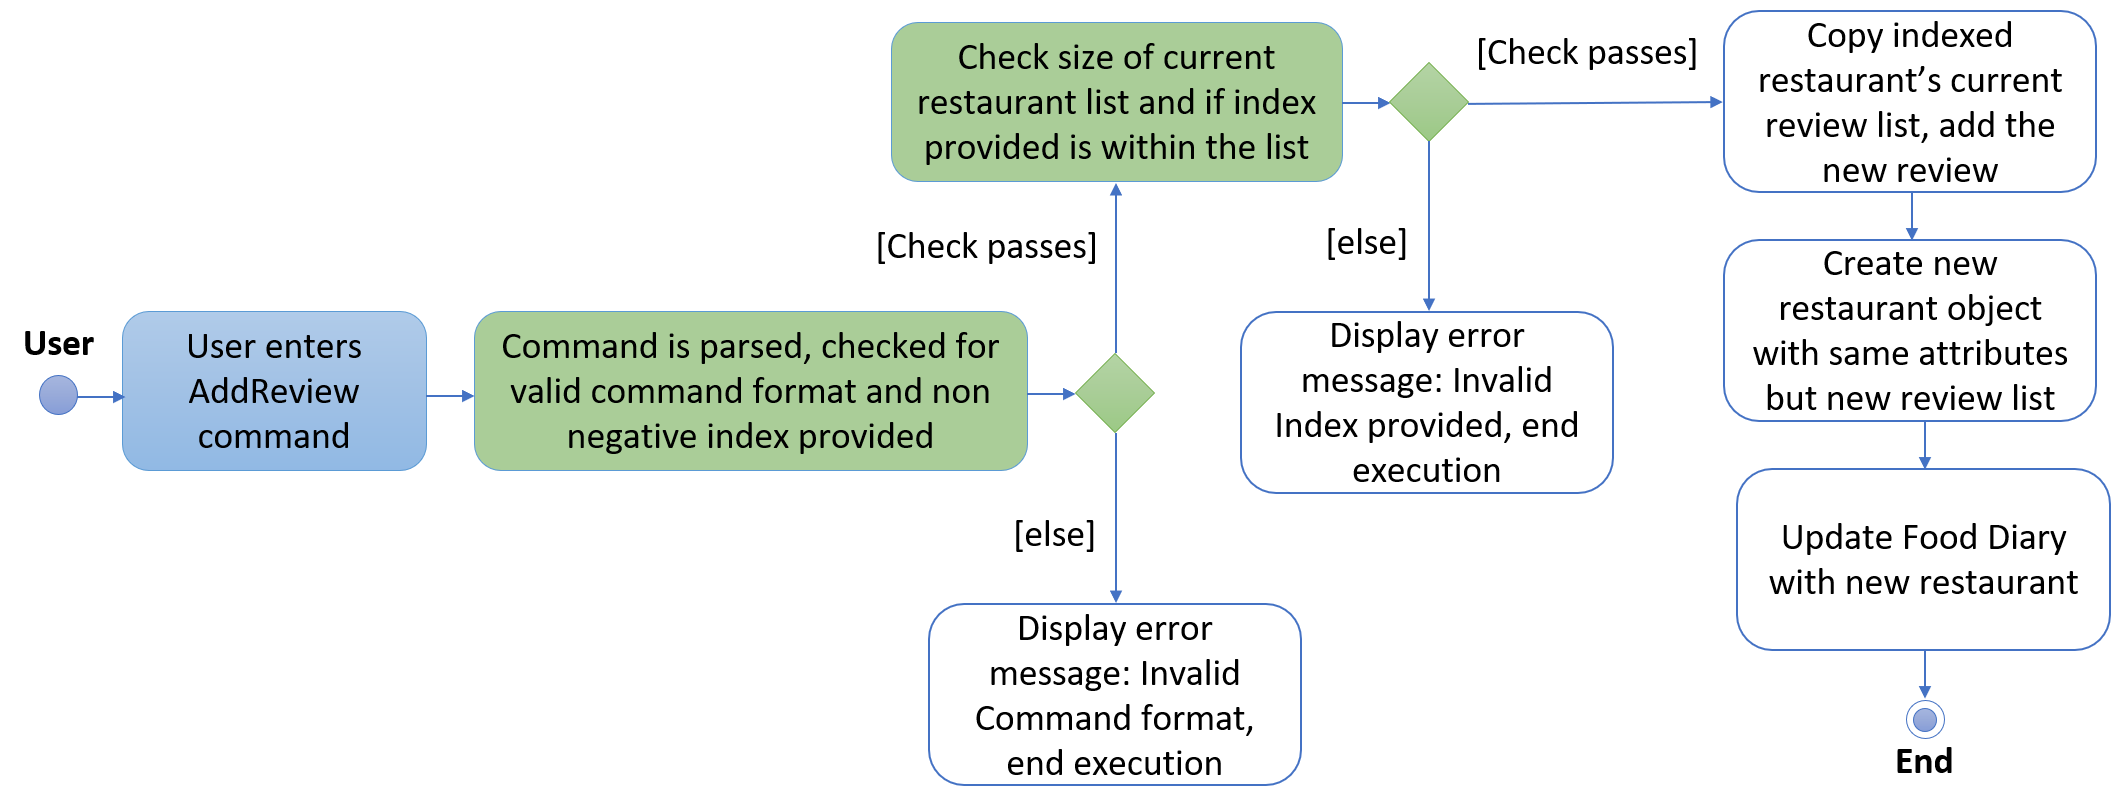
The execution of this command involves:
Step 1. Retrieving the last shown list from the Model and retrieving the restaurant indicated by the index from the last shown list.
Step 2. Creating a new list of reviews that copies everything from the original restaurant’s list of reviews and inserting the new review into the list and creating a new restaurant object with the new list.
Step 3. Replacing the original restaurant with the new restaurant object in the model.
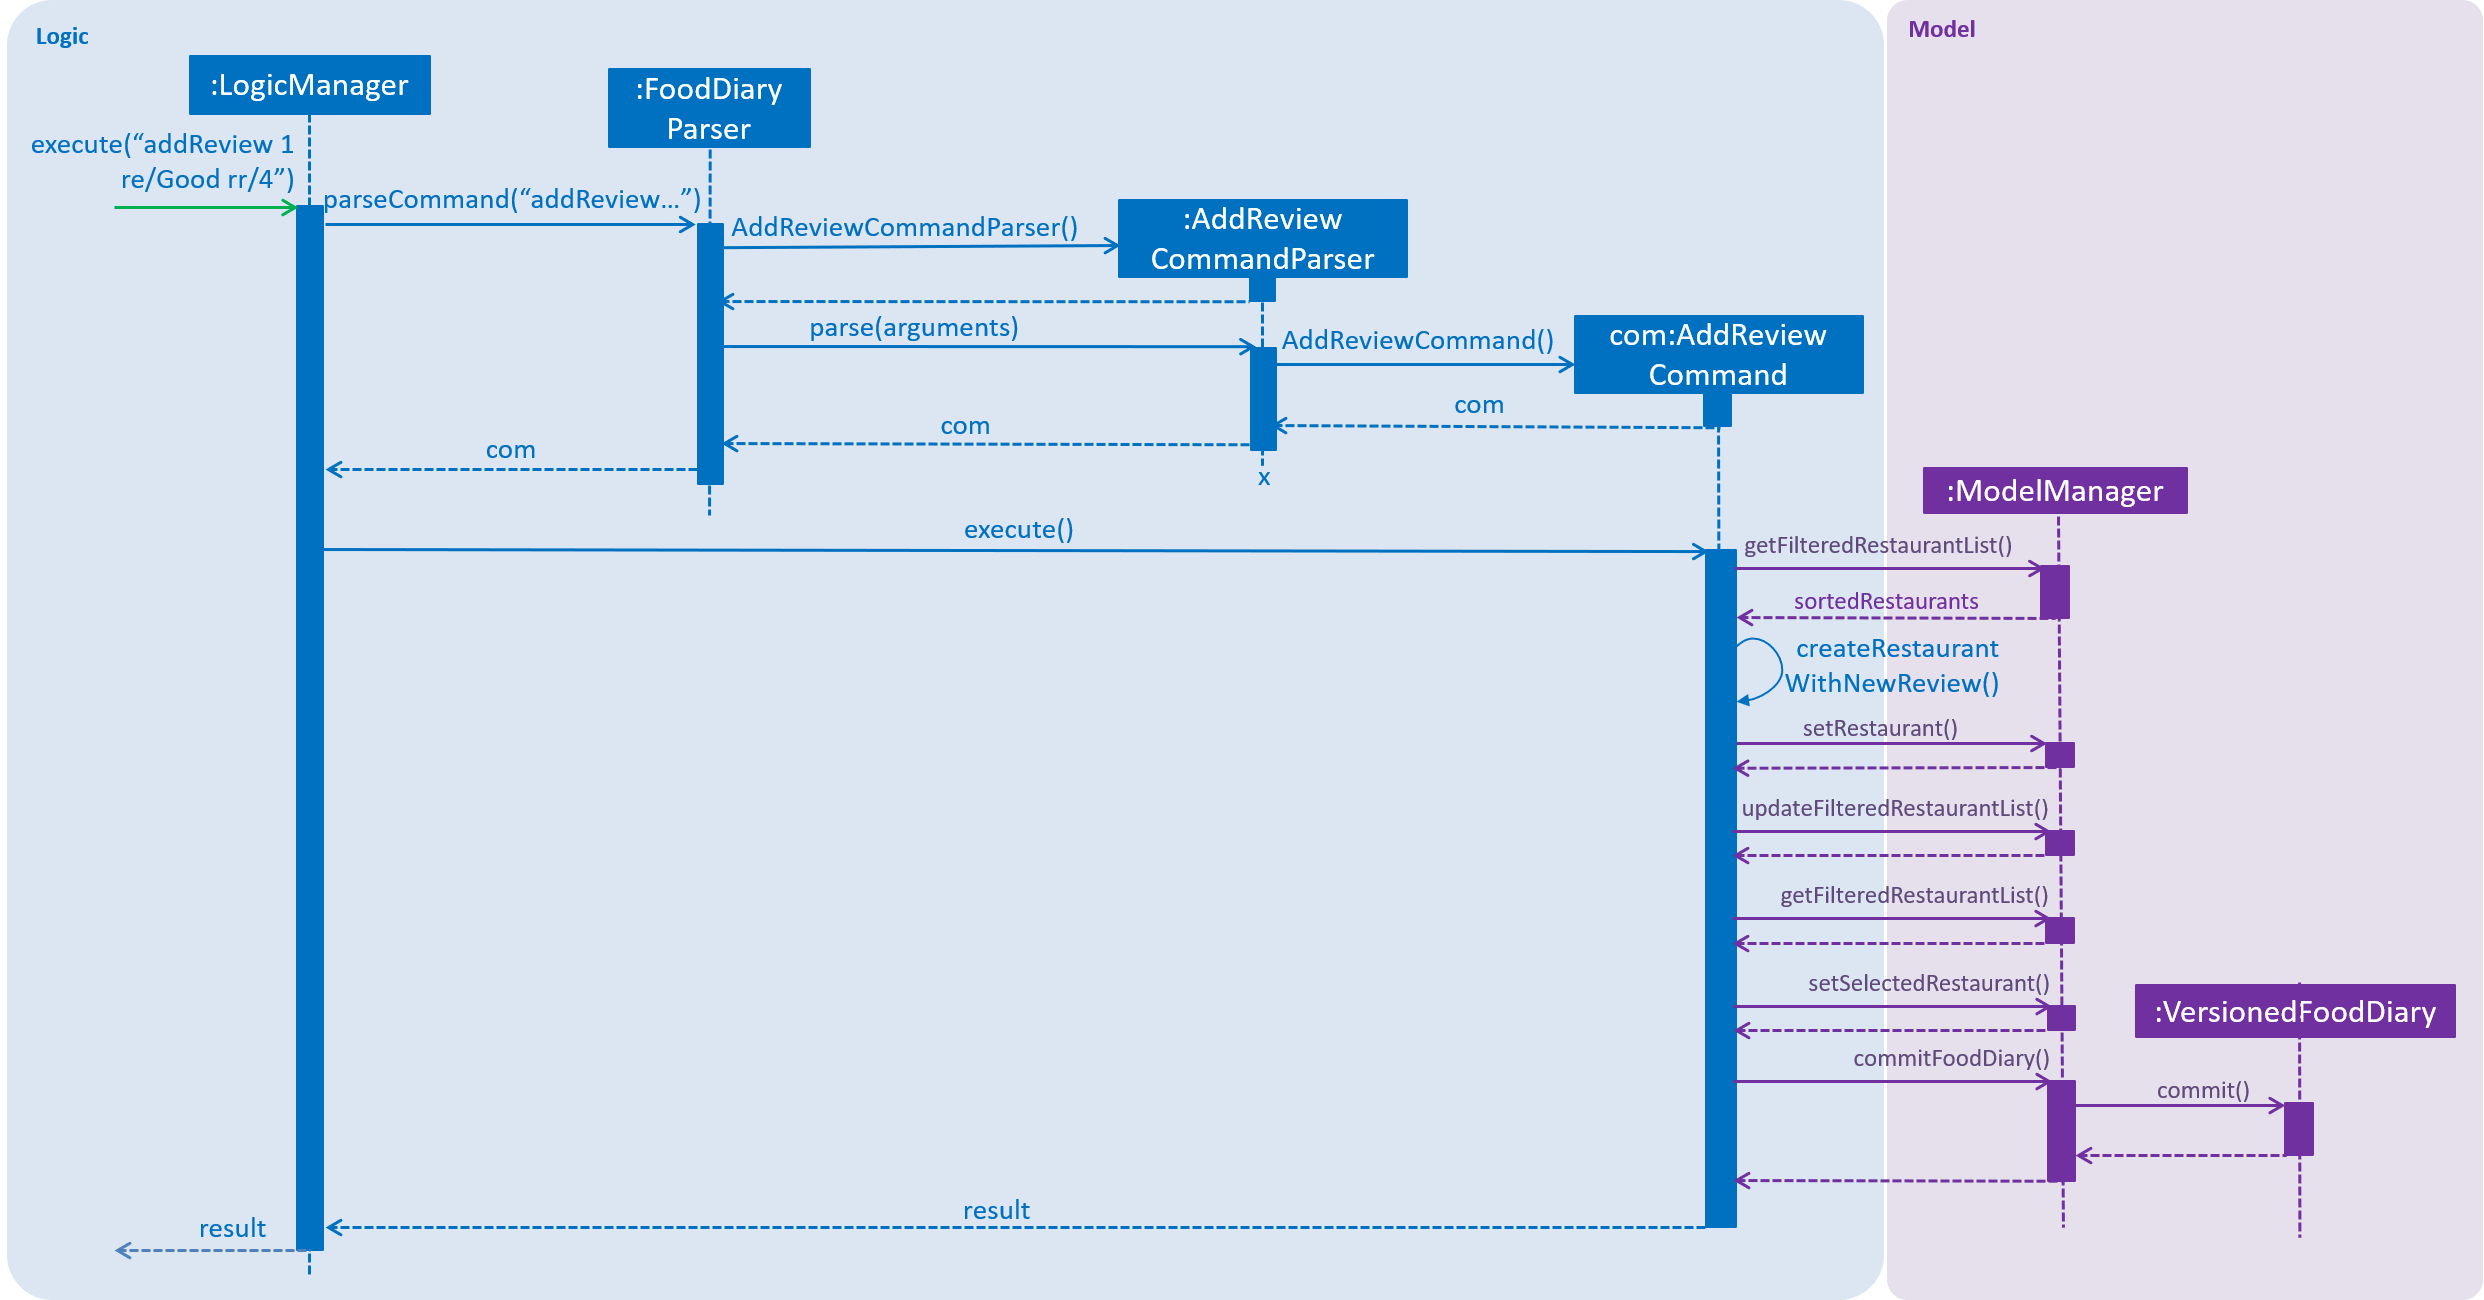
Refer to the sequence diagram below for an illustration of how this command is executed.
Design considerations
Plausible alternative implementations to the functionality are discussed in this section to illustrate the thought process and rationale behind our design decisions. You may wish to consider these ideas when further developing this application.
-
Alternative 1: Add reviews directly to the same restaurant object’s list rather than creating a new restaurant by object copy
Pros |
Less expensive operation to simply modify the same objects list of reviews |
Cons |
Requires modification of the |
4.5.2. AddDefault Reviews
This is a command to add pre-defined reviews with a shorter and simpler syntax. It is especially useful for people in a rush and who do not wish to enter the whole review.
Users need only specify the INDEX of the restaurant they want to add the review to, and a NUMBER representing the default review they wish to leave. For example, "addR 1 2" will add the default review of rating 2 to the 1st restaurant on the list.
Command format: addR INDEX NUMBER
Current Implementation
The Food Diary currently supports 5 default reviews, each corresponding to a rating from 1-5 inclusive. Do have a look at the User Guide for these 5 entries!
The review Entry, which is composed of a String value, will be taken from the AddDefaultReviewUtil class. The review Rating used is the indicated NUMBER in the command. A new Review object is created from these two attributes and added.
Design Considerations
This alternative was considered as well:
-
Alternative 1: Adding a review directly from the new
AddDefaultReviewCommandinstead of creating anAddReviewCommand
However, this violates the DRY (Don’t Repeat Yourself) Principle, as the code to add a review will be repeated. |
4.5.3. Edit Reviews
This command allows the modification of exiting reviews in the Food Diary.
Command format: editReview INDEX [re/ENTRY] [rr/RATING], where INDEX refers to the index of the review to edit in the selected restaurant, ENTRY and RATING are optional, but at least one of the two fields must be specified.
Current Implementation
Do refer to the sequence diagram below for a clearer picture of the implementation of this command. Note that the interaction between the EditReviewCommand and the Model is left out as it is the same as the one in AddReviewCommand above.
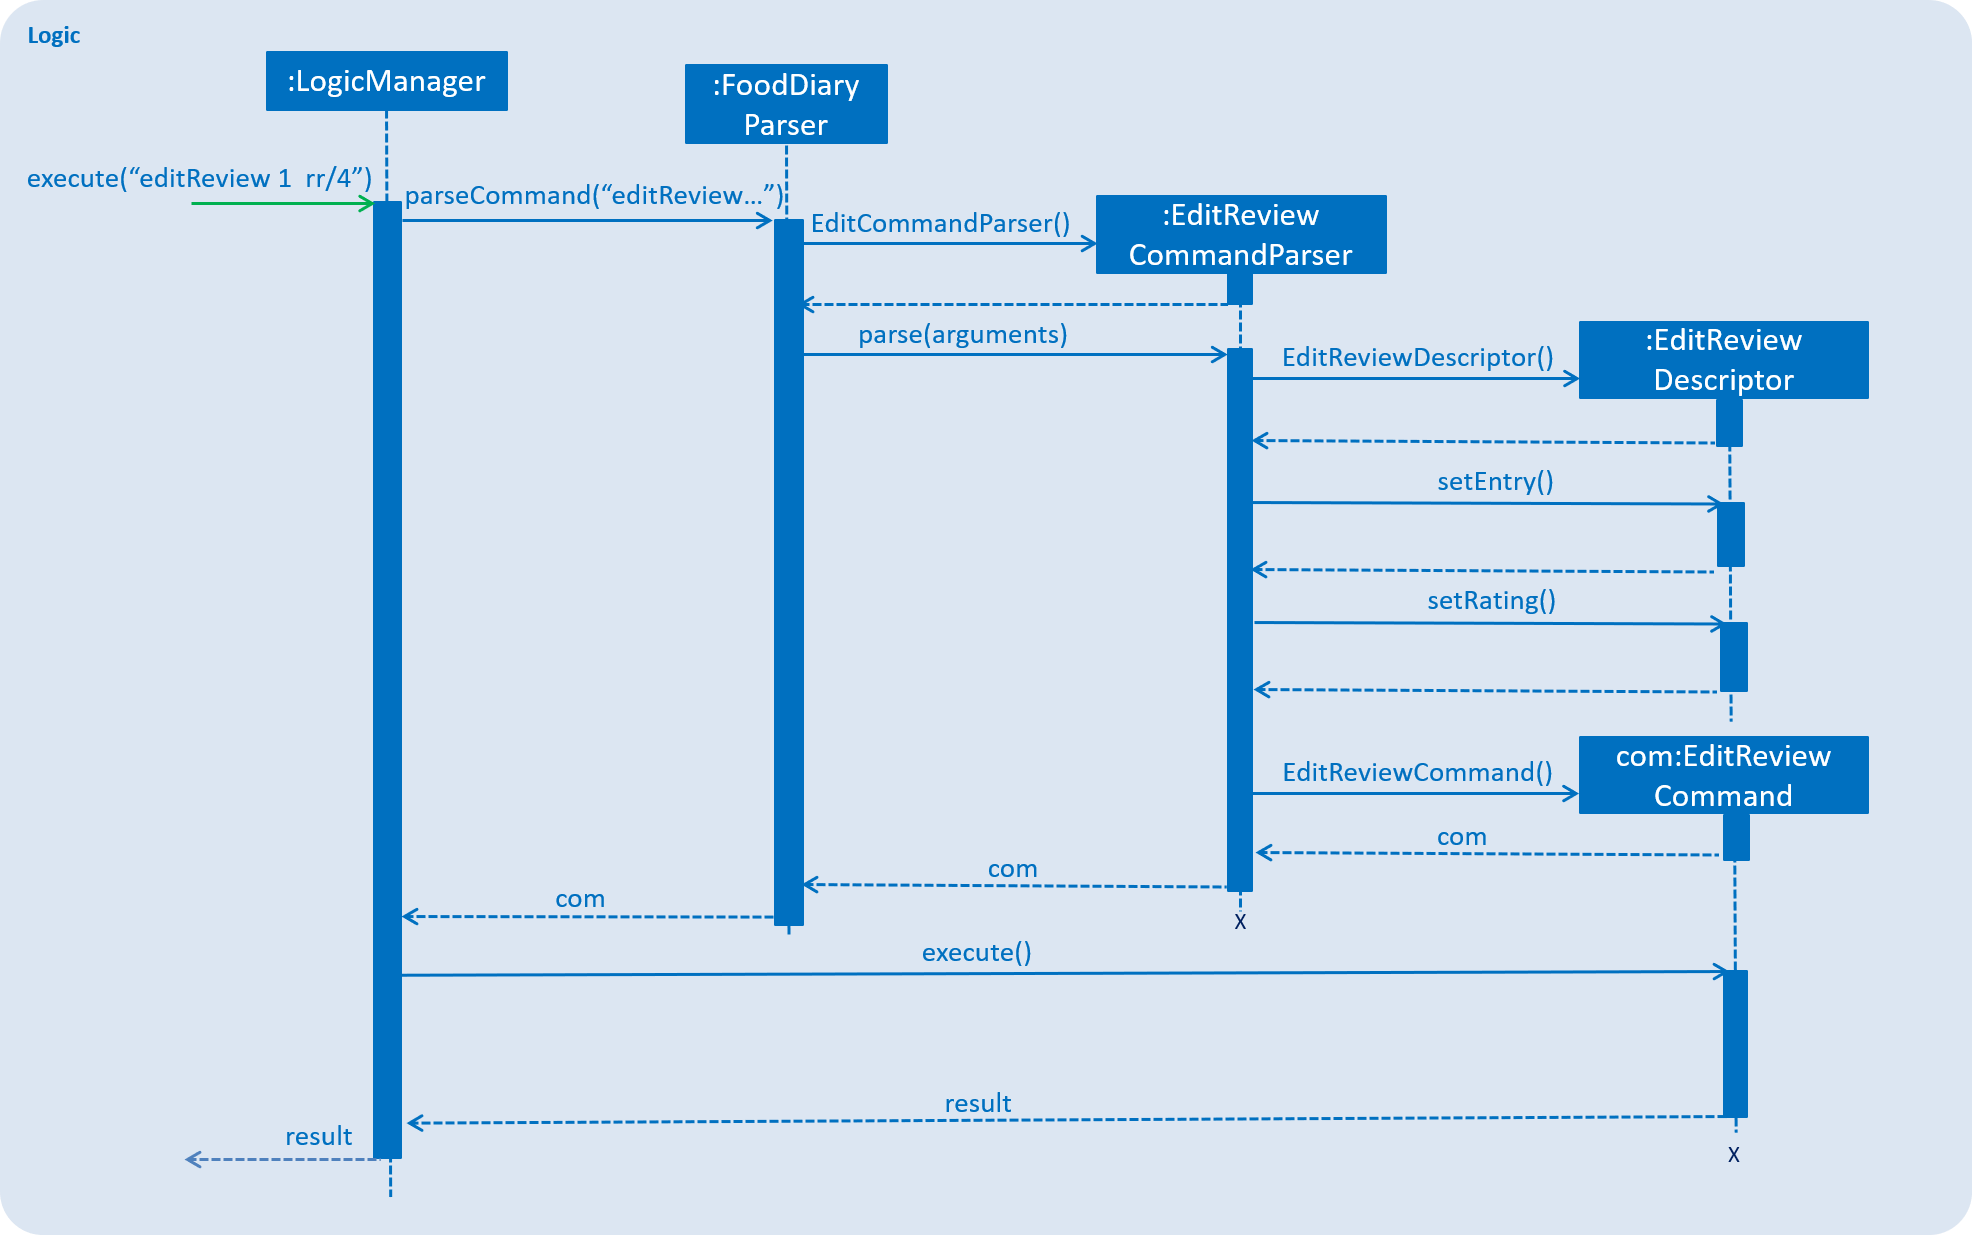
The components involved in the execution of this command include the FoodDiaryParser, the EditReviewCommandParser and the EditReviewCommand class itself. The main difference from the AddReviewCommand is the EditReviewDescriptor class, which is used to store the changes for the review.
The EditReviewDescriptor class can contain optional fields. This is so that the command does not have to modify every field in a review and users can specify which field they would like to modify.
The steps involved in the execution of this command are:
-
Step 1: Creating the
EditReviewDescriptorbased on input arguments. -
Step 2: Retrieving the currently selected restaurant from the model.
-
Step 3: Creating a new restaurant based on the currently selected restaurant and the
EditReviewDescriptor -
Step 4: Replacing the selected restaurant with the new restaurant object in the model.
Design Considerations
-
Alternative 1: Have users input the index of the restaurant into the command instead of having to select a restaurant first
Considering the technical aspect, there is not much of a difference between the two implementations. However, this design decision took into account the fact that users most likely had to select the restaurant to look at the review they wish to edit before editing it. As such, it reduces the arguments input by the user, and makes use of what is likely going to happen anyways (the selection of the restaurant). |
4.5.4. Delete Reviews
Similar to the command to edit reviews, execution of this command requires the user to select a restaurant from the displayed list.
Command format: deleteReview INDEX, where INDEX refers to the index of the review to be deleted from the selected restaurant.
The implementation is a combination of the add and edit review commands: the selected restaurant is copied to a new restaurant object with a new list of reviews without the review to be deleted. This new restaurant object then replaces the selected restaurant in the model.
4.6. Visit Webpage Feature
Website can be displayed on the BrowserPanel with visitWeb command.
4.6.1. visitWeb INDEX
Visits website of Restaurant selected by user.
Restaurants contains a Weblink field which encapsulates the Url of the restaurant website.
When restaurant is added to Food Diary with the Add feature, the Weblink added with the restaurant is checked by WebUtil to ensure that the Weblink is a Url that belongs to a website that exists.
If the protocol is absent, WebUtil will check if the Weblink uses HTTP or HTTPS protocol and append to it. This will be hidden from the user.
If there is no internet connection, WebUtil is unable to validate Weblink and Food Diary will add the restaurant without the Weblink.
|
Upon visitWeb INDEX command, Weblink of the Restaurant at the selected index will be retrieved and passed into
BrowerPanel of UI to load the website of the restaurant as a pop-up window.
Since website of restaurant might be taken down after it has been added to the restaurant, there is a need to validate the Weblink again before passing it to BrowserPanel.
The following steps illustrates the sequence to visitWeb INDEX command with reference to the sequence diagram below:
-
Weblinkis retrieved from the selectedRestaurant insideModelcomponent. -
Using
WebUtilutility class inCommonscomponent, check if there is internet connection so validate and display the website. -
If there is no internet connection, inform user.
-
Validate
Weblinkby pinging its Url and checking the HTTP response code. -
Pass
WeblinktoBrowserPanelthroughCommandResultand invokeWebViewengine to display website.
|
HTTP response codes: 2XX SUCCESS - Weblink is valid 3XX REDIRECTED - Weblink redirects user to the correct Website and hence is valid 4XX, 5XX (Error) - Weblink is invalid |
The following sequence diagram shows how the visitWeb index works:
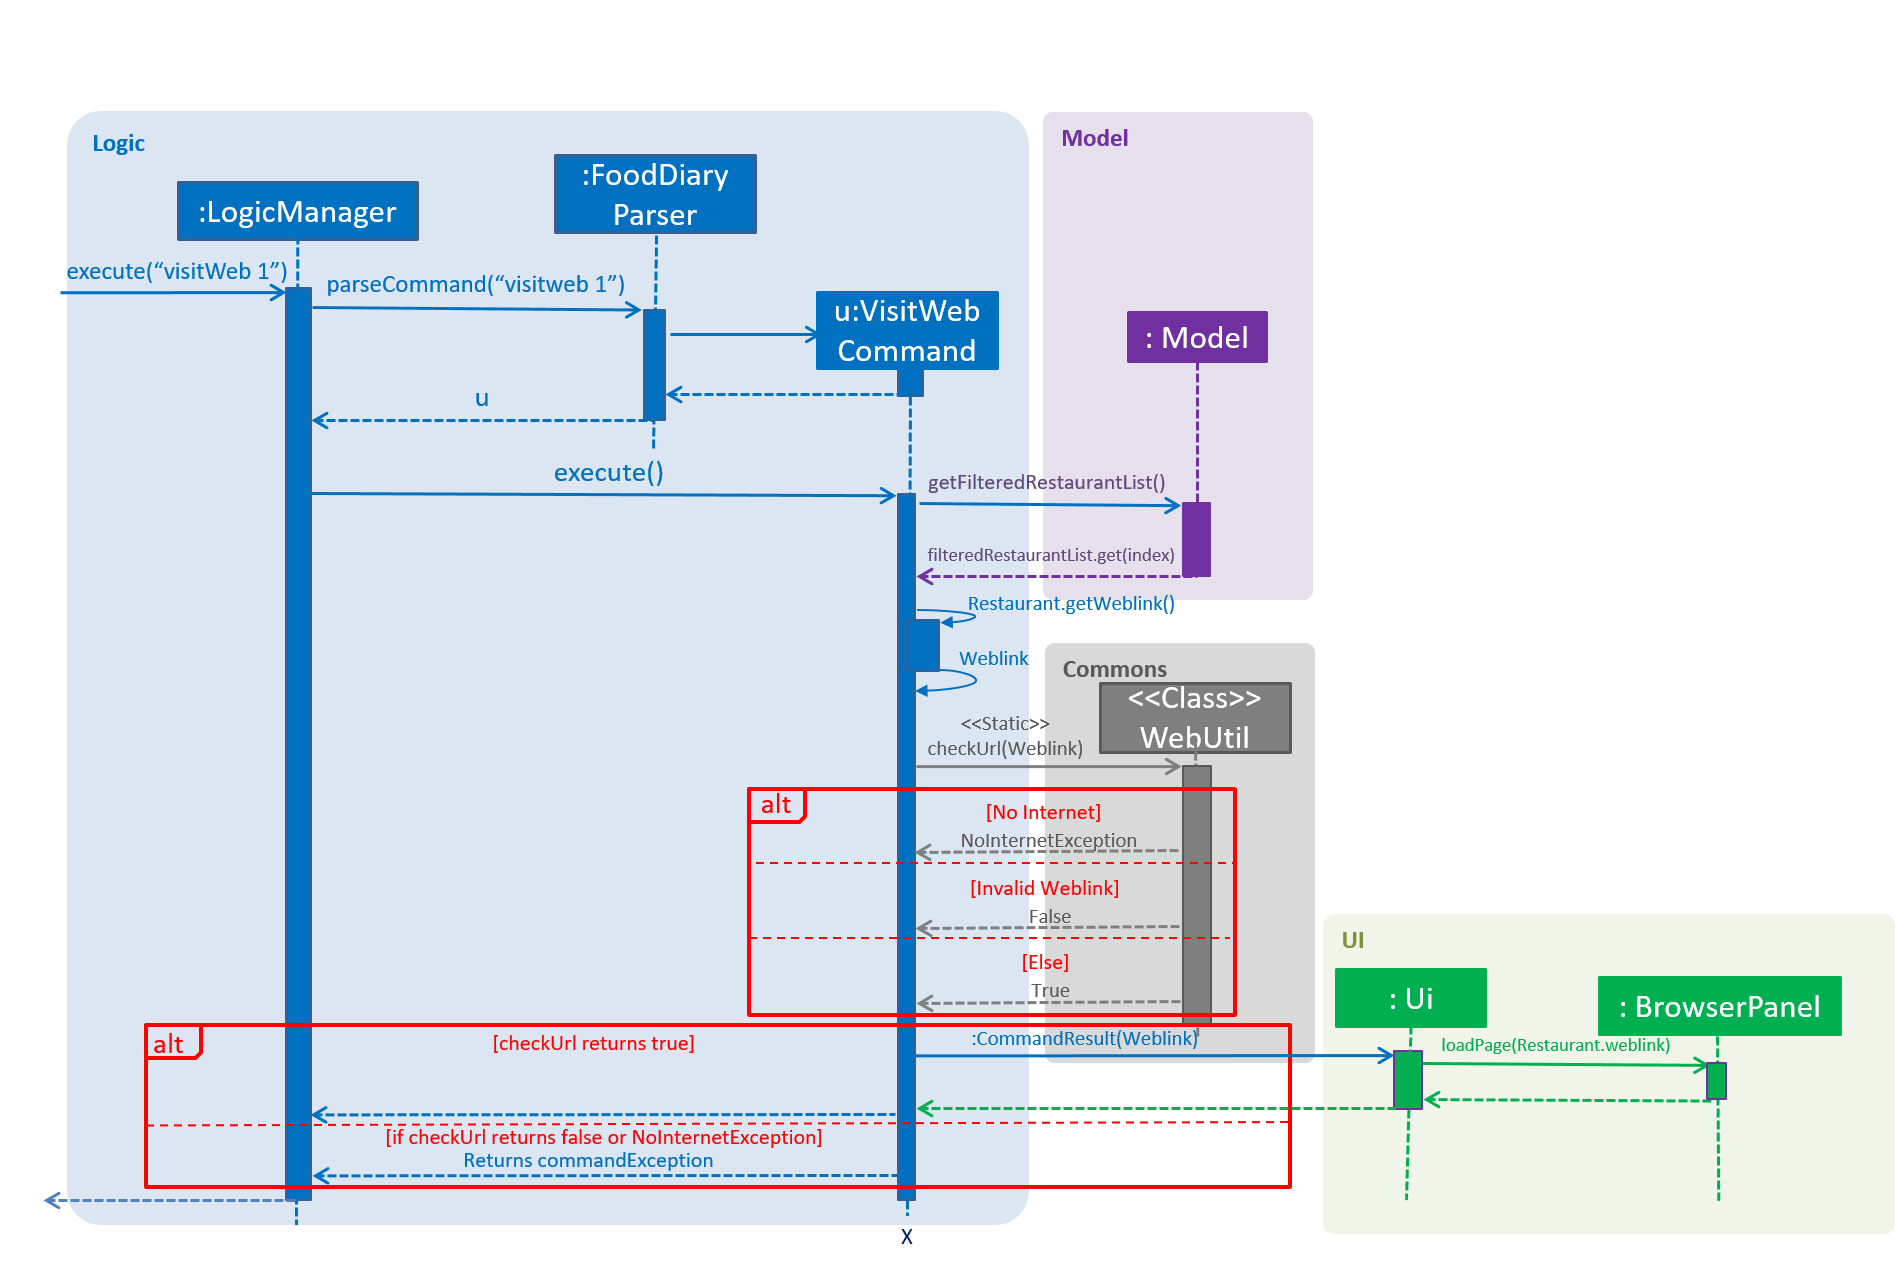
Figure 1.1 Sequence diagram of visitWeb INDEX command
4.6.2. visitWeb weblink
Visits website entered by user. This allows user to visit website of restaurant that are not added to the Food Diary.
The difference between this command and the previous is that, the Weblink is directly passed into VisitWebCommand instead of the INDEX of the restaurant.
Thus, there is a need to validate this Weblink with the help of WebUtil.
The following sequence diagram shows how the visitWeb weblink works:
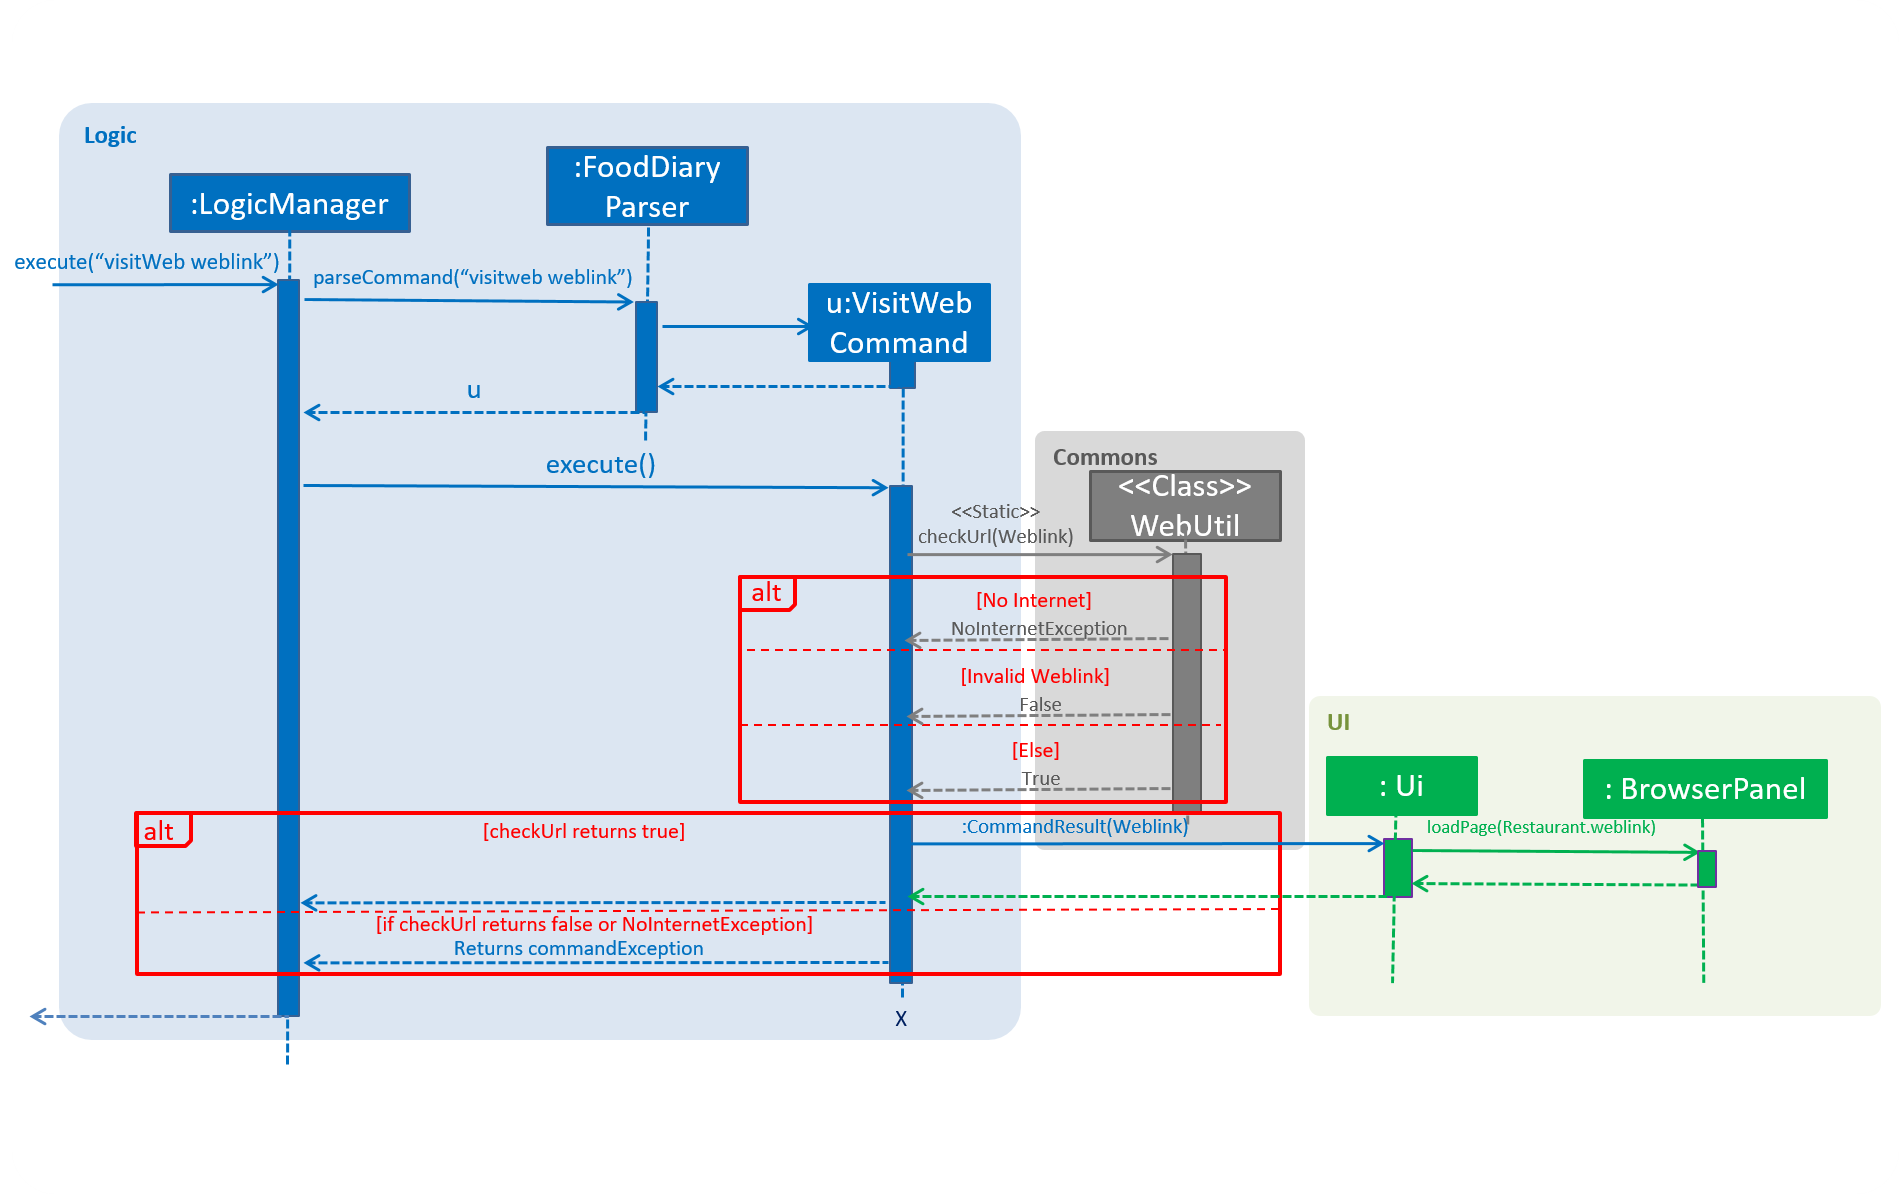
Figure 2.1 Sequence diagram of visitWeb weblink command
To illustrate the level of checks done in visiting web further, the command is broken down into the following steps.
Step 1. Food Lover enters visitWeb Weblink command.
Step 2. Food Diary checks if the entered Weblink is in the correct Url form. Else, display error message and show example of the correct form of Weblink
Step 2. Food Diary checks if internet connection is present. If not, throw NoInternetException and show error message.
Step 3. Food Diary validates the weblink entered. If weblink does not exist, or it is not in the correct Url format, throw ParseException and show error message.
Step 4. Display website on browser window.
The following activity diagram shows the steps of visitWeb command:
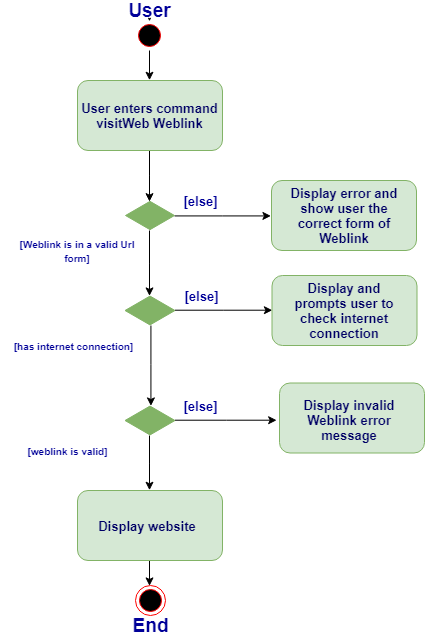
Figure 2.2 Activity diagram of visitWeb weblink command
4.6.3. Enhancements
-
Before loading the website, the
weblinkwill be validated by checking it’s HTTP response code. -
If response code is above 400, it suggests that the
weblinkis not found and that there is an error requesting the website if response code is above 500 -
Also, a
NoInternetExceptionis thrown if internet is absent. This is done by pinging to a Google as a reliable web server. If application fails to get a response, we can say that there is high chance that there is no internet connection and henceNoInternetExceptionis thrown.
4.6.4. Design considerations
-
To reduce coupling of
WeblinktoAddCommandParser,EditCommandParsersinLogic, and alsoBrowserPanelinUIcomponent, aWebUtilclass is implemented under Util of Commons component.
WebUtil supports the following functions:
-
hasInternetConnection()- Check if there is internet connection by pinging Google. -
isUrlValid(String url)- Checks if the input String is a valid Url with successful response code. -
validateAndAppend(String url)- Checks input Url if it uses HTTP or HTTPS protocol and append it to the Url.
4.7. [Proposed] Data Encryption
{Explain here how the data encryption feature will be implemented}
4.8. [Proposed] Share Reviews to Facebook
{Explain here how the share reviews feature will be implemented}
4.9. Logging
We are using java.util.logging package for logging. The LogsCenter class is used to manage the logging levels and logging destinations.
-
The logging level can be controlled using the
logLevelsetting in the configuration file (See Section 4.10, “Configuration”) -
The
Loggerfor a class can be obtained usingLogsCenter.getLogger(Class)which will log messages according to the specified logging level -
Currently log messages are output through:
Consoleand to a.logfile.
Logging Levels
-
SEVERE: Critical problem detected which may possibly cause the termination of the application -
WARNING: Can continue, but with caution -
INFO: Information showing the noteworthy actions by the App -
FINE: Details that is not usually noteworthy but may be useful in debugging e.g. print the actual list instead of just its size
4.10. Configuration
Certain properties of the application can be controlled (e.g user prefs file location, logging level) through the configuration file (default: config.json).
5. Documentation
We use asciidoc for writing documentation.
| We chose asciidoc over Markdown because asciidoc, although a bit more complex than Markdown, provides more flexibility in formatting. |
5.1. Editing Documentation
See UsingGradle.adoc to learn how to render .adoc files locally to preview the end result of your edits.
Alternatively, you can download the AsciiDoc plugin for IntelliJ, which allows you to preview the changes you have made to your .adoc files in real-time.
5.2. Publishing Documentation
See UsingTravis.adoc to learn how to deploy GitHub Pages using Travis.
5.3. Converting Documentation to PDF format
We use Google Chrome for converting documentation to PDF format, as Chrome’s PDF engine preserves hyperlinks used in webpages.
Here are the steps to convert the project documentation files to PDF format.
-
Follow the instructions in UsingGradle.adoc to convert the AsciiDoc files in the
docs/directory to HTML format. -
Go to your generated HTML files in the
build/docsfolder, right click on them and selectOpen with→Google Chrome. -
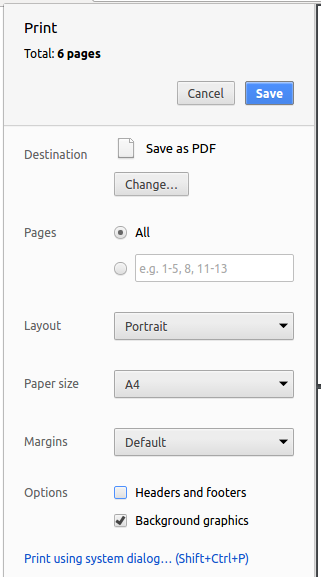
Within Chrome, click on the
Printoption in Chrome’s menu. -
Set the destination to
Save as PDF, then clickSaveto save a copy of the file in PDF format. For best results, use the settings indicated in the screenshot below.
5.4. Site-wide Documentation Settings
The build.gradle file specifies some project-specific asciidoc attributes which affects how all documentation files within this project are rendered.
Attributes left unset in the build.gradle file will use their default value, if any.
|
| Attribute name | Description | Default value |
|---|---|---|
|
The name of the website. If set, the name will be displayed near the top of the page. |
not set |
|
URL to the site’s repository on GitHub. Setting this will add a "View on GitHub" link in the navigation bar. |
not set |
|
Define this attribute if the project is an official SE-EDU project. This will render the SE-EDU navigation bar at the top of the page, and add some SE-EDU-specific navigation items. |
not set |
5.5. Per-file Documentation Settings
Each .adoc file may also specify some file-specific asciidoc attributes which affects how the file is rendered.
Asciidoctor’s built-in attributes may be specified and used as well.
Attributes left unset in .adoc files will use their default value, if any.
|
| Attribute name | Description | Default value |
|---|---|---|
|
Site section that the document belongs to.
This will cause the associated item in the navigation bar to be highlighted.
One of: * Official SE-EDU projects only |
not set |
|
Set this attribute to remove the site navigation bar. |
not set |
5.6. Site Template
The files in docs/stylesheets are the CSS stylesheets of the site.
You can modify them to change some properties of the site’s design.
The files in docs/templates controls the rendering of .adoc files into HTML5.
These template files are written in a mixture of Ruby and Slim.
|
Modifying the template files in |
6. Testing
6.1. Running Tests
There are three ways to run tests.
| The most reliable way to run tests is the 3rd one. The first two methods might fail some GUI tests due to platform/resolution-specific idiosyncrasies. |
Method 1: Using IntelliJ JUnit test runner
-
To run all tests, right-click on the
src/test/javafolder and chooseRun 'All Tests' -
To run a subset of tests, you can right-click on a test package, test class, or a test and choose
Run 'ABC'
Method 2: Using Gradle
-
Open a console and run the command
gradlew clean allTests(Mac/Linux:./gradlew clean allTests)
| See UsingGradle.adoc for more info on how to run tests using Gradle. |
Method 3: Using Gradle (headless)
Thanks to the TestFX library we use, our GUI tests can be run in the headless mode. In the headless mode, GUI tests do not show up on the screen. That means the developer can do other things on the Computer while the tests are running.
To run tests in headless mode, open a console and run the command gradlew clean headless allTests (Mac/Linux: ./gradlew clean headless allTests)
6.2. Types of tests
We have two types of tests:
-
GUI Tests - These are tests involving the GUI. They include,
-
System Tests that test the entire App by simulating user actions on the GUI. These are in the
systemtestspackage. -
Unit tests that test the individual components. These are in
seedu.address.uipackage.
-
-
Non-GUI Tests - These are tests not involving the GUI. They include,
-
Unit tests targeting the lowest level methods/classes.
e.g.seedu.address.commons.StringUtilTest -
Integration tests that are checking the integration of multiple code units (those code units are assumed to be working).
e.g.seedu.address.storage.StorageManagerTest -
Hybrids of unit and integration tests. These test are checking multiple code units as well as how the are connected together.
e.g.seedu.address.logic.LogicManagerTest
-
6.3. Troubleshooting Testing
Problem: HelpWindowTest fails with a NullPointerException.
-
Reason: One of its dependencies,
HelpWindow.htmlinsrc/main/resources/docsis missing. -
Solution: Execute Gradle task
processResources.
7. Dev Ops
7.1. Build Automation
See UsingGradle.adoc to learn how to use Gradle for build automation.
7.2. Continuous Integration
We use Travis CI and AppVeyor to perform Continuous Integration on our projects. See UsingTravis.adoc and UsingAppVeyor.adoc for more details.
7.3. Coverage Reporting
We use Coveralls to track the code coverage of our projects. See UsingCoveralls.adoc for more details.
7.4. Documentation Previews
When a pull request has changes to asciidoc files, you can use Netlify to see a preview of how the HTML version of those asciidoc files will look like when the pull request is merged. See UsingNetlify.adoc for more details.
7.5. Making a Release
Here are the steps to create a new release.
-
Update the version number in
MainApp.java. -
Generate a JAR file using Gradle.
-
Tag the repo with the version number. e.g.
v0.1 -
Create a new release using GitHub and upload the JAR file you created.
7.6. Managing Dependencies
A project often depends on third-party libraries. For example, Food Diary depends on the Jackson library for JSON parsing. Managing these dependencies can be automated using Gradle. For example, Gradle can download the dependencies automatically, which is better than these alternatives:
-
Include those libraries in the repo (this bloats the repo size)
-
Require developers to download those libraries manually (this creates extra work for developers)
Appendix A: Product Scope
Target user profile:
-
Food lovers who want to record their personal food reviews and at the same time obtain personalised food recommendations based on their food review, as well as decide quickly where to eat with personalised food recommendations.
Value proposition: Allow all food lovers to have a centralised platform to document their food adventures and experience at each restaurant
Appendix B: User Stories
Priorities: High (must have) - * * *, Medium (nice to have) - * *, Low (unlikely to have) - *
"Food lover" refers to the intended users of our application.
| Priority | As a … | I want to … | So that I can… |
|---|---|---|---|
|
Food lover |
Update or delete restaurant data conveniently |
Ensure all data are up to date |
|
Food lover |
Filter restaurants by cuisine |
Easily refer back to specific cuisines I want to try |
|
Food lover |
Filter restaurants by suitable occasion |
Easily refer back for suitable dining options during special occasions |
|
Price savvy food lover |
Add a price range to the restaurants I visited |
Look for restaurants within budget |
|
Food lover that is clumsy |
Undo/redo any command |
Quickly recover from a typo or wrong command |
|
Food lover |
Update and delete reviews for a restaurant |
Ensure all reviews for a restaurant are up to date |
|
Food lover |
View a summary my food adventure data |
Show off to my friends the number of food places I went |
|
Food lover |
View restaurants ranked by ratings |
Refer to my friends the restaurants I feel that are good |
|
Food lover |
Autocomplete categories I have keyed in before when setting categories |
I can set categories faster |
|
Food lover & influencer |
Share my reviews on Facebook |
Recommend my friends to food I’ve eaten |
|
Curious Food lover |
Go to the restaurant’s website |
Visit the restaurant’s website easily |
|
Food Lover |
List unreviewed restaurants |
Visit restaurants that I have added but yet to review |
Appendix C: Use Cases
(For all use cases below, the System is the Food Diary and the Actor is the Food Lover, unless specified otherwise)
Use case: Adding a restaurant by Food Lover to Food Diary
MSS
-
Food Lover enters command to add restaurant
-
Food Diary adds restaurant
Use case ends.
Extensions
-
2a. Food Lover enters a name and location that already exists in Food Diary
-
2a1. Food Diary tells Food Lover that the restaurant already exists and asks user to enter another name and location
-
Use case: Deleting a restaurant from Food Diary
MSS
-
Food Lover enters command and index to delete restaurant
-
Food Diary deletes restaurant
Use case ends.
Extensions
-
1a. Food Lover enters an invalid index
-
1a1. Food Diary tells user that he has entered an invalid index and deletion of restaurant has failed.
Use case ends
-
Use case: Selecting a Restaurant in Food Diary
MSS
-
Food Lover enters command and index to select restaurant
-
Food Diary displays restaurant’s detailed information and reviews
Use case ends.
Extensions
-
1a. Food Lover enters an invalid index
-
1a1. Food Diary tells user that he has entered an invalid index and selection of restaurant has failed.
-
Use case: Filter Restaurants in Food Diary (cuisine, occasion, price)
MSS
-
Food Lover enters command, category to filter by (i.e. cuisine, occasion, price range) and keyword / price range (e.g.japanese, lunch, 5 10)
-
Food Diary displays restaurant’s that fit the filter.
Use case ends.
Extensions
-
1a. Food Lover enters an invalid category
-
1a1. Food Lover tells user that no such category exists.
Use case ends.
-
-
1b. Food Lover enters an invalid price range (i.e. 1 number / 3 numbers input)
-
1b1. Food Lover tells user that an invalid price range is entered
-
1b2. Food Lover displays the correct format to input command
Use case ends.
-
-
1c. Food Lover enters an invalid price range (i.e. 1 number / 3 numbers input)
-
1c1. Food Lover tells user that an invalid price range is entered
-
1c2. Food Lover displays the correct format to input command
Use case ends.
-
Use case: Sort Restaurants in Food Diary (rating)
MSS
-
Food Lover enters command to sort restaurants by rating, order to sort it by and number of ranks to show
-
Food Diary displays restaurants according to order and ranks specified
Use case ends.
Extensions
-
1a. Food Lover enters an invalid order/rank
-
1a1. Food Lover tells user that no such category exists.
Use case ends.
-
Use case: Adding a review to a Restaurant in Food Diary
MSS
-
Food Lover lists all restaurants
-
Food Diary displays all restaurants
-
Food Lover enters command to add review and the index of the restaurant it should be added to
-
Food Lover enters rating and comment in the command
-
Food Diary adds review to restaurant selected
Use case ends.
Extensions
-
1a. Food Lover finds restaurants by criteria
-
1a1. Food Diary displays restaurants fulfilling criteria
Use case resumes at step 3.
-
-
4a. Food Lover enters an invalid rating, such as a number out of the range of 0 - 5
-
4a1. Food Diary tells Food Lover that the rating is out of the valid range (0 - 5)
-
4a2. Food Diary asks user to enter another rating
Use case resumes at step 6 if rating is valid else repeat step 4a.
-
Use case: Deleting a review to a Restaurant in Food Diary
MSS
-
Food Lover lists all reviews
-
Food Diary displays all reviews in chronological order
-
Food Lover enters command to delete review and the index of the review to be deleted
-
Food Diary deletes selected review
Use case ends.
Extensions
-
1a. Food Lover lists all restaurants
-
1a1. Food Diary displays all restaurants
-
1a2. Food Lover selects the restaurant from which the reviews are to be deleted
-
1a3. Food Diary displays all reviews for the restaurant selected
Use case resumes at step 3.
-
Use case: Editing a review to a Restaurant in Food Diary
MSS
-
Food Lover lists all reviews
-
Food Diary displays all reviews in chronological order
-
Food Lover enters command to edit review and the index of the review to be edited
-
Food Lover enters rating and comment
-
Food Diary updates selected review
Use case ends.
Extension
-
1a. Food Lover lists all restaurants
-
1a1. Food Diary displays all restaurants
-
1a2. Food Lover selects the restaurant from which the reviews are to be deleted
-
1a3. Food Diary displays all reviews for the restaurant selected
Use case resumes at step 3.
-
-
1b. Food Lover finds restaurants by criteria
-
1b1. Food Diary displays restaurants fulfilling criteria
-
1b2. Food Lover selects the restaurant from which the reviews are to be deleted
-
1b3. Food Diary displays all reviews for the restaurant selected
Use case resumes at step 3.
-
-
4a. Food Lover enters an invalid rating, such as a number out of the range of 0 - 5
-
4a1. Food Diary tells Food Lover that the rating is out of the valid range (0 - 5)
-
4a2. Food Diary asks user to enter another rating
Use case resumes at step 6 if rating is valid else repeat step 4a.
-
Use case: Share review on Facebook
MSS
-
Food Lover adds a new review
-
Food Lover enters command to share review on Facebook
-
Food Diary opens Facebook login page
-
Food Lover enters Facebook login details
-
Food Lover confirms Facebook sharing
Use case ends.
Extensions
-
1a. Food Lover lists all reviews
-
1a1. Food Diary displays all reviews in chronological order
-
1a2. Food Lover enters command to share review and the index of the selected review
Use case resumes at step 3.
-
-
1b. Food Lover lists all restaurants
-
1b1. Food Diary displays all restaurants
-
1b2. Food Lover selects the restaurant from which the reviews are to be deleted
-
1b3. Food Diary displays all reviews for the restaurant selected
Use case resumes at step 3.
-
Use case: Undo / Redo command
MSS
-
Food Lover enters command to undo / redo
-
Food Diary undos / redos previous command, tells user that undo / redo successful.
Use case ends.
Extensions
-
1a. There is no command to undo / redo
-
1a1. Food Diary tells Food Lover that there is no command to undo / redo.
Use case ends.
-
Use case: Opening Restaurant’s website
MSS
-
Food Lover enters command and index of restaurant
-
Food Diary displays website to User.
Use case ends
Extensions
-
1a. Food Lover enters command and website of any restaurant
-
2a. Website is valid and Food Diary displays website
-
2b. Website is invalid and Food Diary tells Food Lover that the website he entered is invalid
-
-
2c. There is no website added for this restaurant
-
2c1. Food Diary tells Food Lover that there is no website for this restaurant
Use case ends.
-
Use case: Getting unvisited restaurant recommendations
MSS
-
Food Lover enters command and his current postal code
-
Food Diary displays a list of restaurants ranked based on his proximity to the provided postal code.
Use case ends
Extensions
-
2a. Postal code entered is not valid.
-
2a1. Food Diary displays all the unreviewed restaurants.
Use case ends.
-
Appendix D: Non Functional Requirements
-
Should work on any mainstream OS as long as it has Java
9or higher installed. -
Food Lovers with fast typing speed should be able to accomplish tasks (such as adding, editing or deleting Restaurants or Reviews) with commands faster than with a mouse or GUI.
-
All application data should be stored in a human editable text file locally
-
Primary mode of input should be CLI.
-
Should not require installation to use the application
Appendix F: Instructions for Manual Testing
Given below are instructions to test the app manually.
| These instructions only provide a starting point for testers to work on; testers are expected to do more exploratory testing. |
F.1. Launch and Shutdown
-
Initial launch
-
Download the jar file and copy into an empty folder
-
Double-click the jar file
Expected: Shows the GUI with a set of sample contacts. The window size may not be optimum.
-
-
Saving window preferences
-
Resize the window to an optimum size. Move the window to a different location. Close the window.
-
Re-launch the app by double-clicking the jar file.
Expected: The most recent window size and location is retained.
-
{ more test cases … }
F.2. Deleting a restaurant
-
Deleting a restaurant while all restaurants are listed
-
Prerequisites: List all restaurants using the
listcommand. Multiple restaurants in the list. -
Test case:
delete 1
Expected: First contact is deleted from the list. Details of the deleted contact shown in the status message. Timestamp in the status bar is updated. -
Test case:
delete 0
Expected: No restaurant is deleted. Error details shown in the status message. Status bar remains the same. -
Other incorrect delete commands to try:
delete,delete x(where x is larger than the list size) {give more}
Expected: Similar to previous.
-
{ more test cases … }
F.3. Selecting a restaurant
-
Selecting a restaurant while all restaurants are listed
-
Prerequisites: List all restaurants using the
listcommand. Multiple restaurants in the list. -
Test case:
select 1
Expected: First restaurant in the list is selected. Details of the selected restaurant is shown in the 2 panels next to the restaurant list panel. -
Test case:
select 0
Expected: No restaurant is selected. Error details shown in the status message. -
Other incorrect select commands to try:
select,select x(where x is larger than the list size) Expected: Similar to previous.
-
-
Selecting a restaurant when
Filtercommand is called-
Prerequisites: There is at least one restaurant in the list.
-
Test case:
select 1
Expected: First restaurant in the list is selected. Details of the selected restaurant is shown in the 2 panels next to the restaurant list panel. -
Test case:
select 0
Expected: No restaurant is selected. Error details shown in the status message. -
Other incorrect select commands to try:
select,select x(where x is larger than the list size)
Expected: Similar to previous.
-
F.4. Sorting restaurant list
-
Sorting entire restaurant list
-
Test case:
sort
Expected: All restaurants in the list are sorted in descending order of ratings. -
Test case:
sort or/ASC
Expected: All restaurants in the list are sorted in ascending order of ratings. -
Test case:
sort or/dEs
Expected: All restaurants in the list are sorted in descending order of ratings. -
Test case:
sort or/1
Expected: No restaurant is sorted. Error details shown in the status message to indicate wrongORDERformat. -
Other incorrect select commands to try:
sort 1,sort or/ASCENDIng,sort or/deSCENDING
Expected: Similar to previous.
-
-
Sorting restaurant list and limiting to top/bottom ranking restaurants
-
Scenario: There are 6 restaurants in the list.
-
Test case:
sort l/2
Expected: All restaurants in the list are sorted in descending order of ratings, restaurants with the 2 highest ratings are displayed in descending order of ratings. -
Test case:
sort or/ASC l/2
Expected: All restaurants in the list are sorted in ascending order of ratings, restaurants with the 2 lowest ratings are displayed in ascending order of ratings. -
Test case:
sort or/dEs l/10
Expected: All restaurants in the list are sorted in descending order of ratings. Status message indicates that restaurants with top 10 (the limit input by user) rankings are sorted in descending order. -
Test case:
sort l/-10
Expected: No restaurant is sorted. Error details shown in the status message to indicate wrongLIMITformat. -
Other incorrect select commands to try:
sort l/-20,sort or/asc l/1.567,sort or/des l/0
Expected: Similar to previous.
-
F.5. Adding a Review to a restaurant
-
Adding a review to the first restaurant when all restaurants are listed
-
Test case:
addReview 1 re/Nice food rr/4
Expected: A review of entry "Nice food" and rating "4" added to the first listed restaurant. -
Test case:
addReview 22 re/Nice food rr/4
Expected: No review is added. Error message shown indicating an invalid index specified. -
Test case:
addReview 1 re/Nice food
Expected: No review is added. Error message shown indicating an invalid command format.
-
F.6. Adding a default Review to a restaurant
-
Adding a default review of rating 3 to the first restaurant when all restaurants are listed
-
Test case:
addR 1 3
Expected: A new review of entry "Average, normal" and rating "3" is added to the first restaurant. -
Test case:
addR 1 6
Expected: No new review is added. Error message indicating an invalid command format will be shown.
-
F.7. Editing the Review of a restaurant
-
Editing the first review of the first restaurant when all restaurants are listed
-
Test case:
select 1, followed byeditReview 1 re/poor
Expected: The first review’s entry of the first restaurant will be changed to "poor". -
Test case:
select 1, followed byeditReview 10 rr/5
Expected: No review is edited. Error message shown indicating an invalid review index. -
Test case:
select 1, followed byeditReview 1
Expected: No review is edited. Error message shown indicating that at least one field to edit must be provided.
-
F.8. Deleting the Review of a restaurant
-
Deleting the first review of the first restaurant when all restaurants are listed
-
Test case:
select 1, followed bydeleteReview 1
Expected: The first review of the first restaurant will be deleted. -
Test case:
select 1, followed bydeleteReview
Expected: No review is deleted. Error message shown indicating an invalid command format.
-
F.9. Setting the categories of a restaurant
-
Setting categories to a listed restaurant that does not have categories set yet with
setCategories-
Test case:
setCategories c/fast food oc/casual pr/$
Expected:Cuisineset asFast Food,Occasionset asCasualandPrice Rangeset as$. -
Test case:
setCategories c/$ oc/casual pr/expensive
Expected: No categories are set. Error details shown in the status message, indicating command invalid.
-
-
Setting categories to a listed restaurant that already has categories set with
setCategories-
Test case:
setCategories c/fast food
Expected: Only theCuisineis set toFast Food. All other categories remain unchanged. -
Test case:
setCategories c/ oc/ pr/
Expected: No categories are set. Error details shown in status message.
-
F.10. Visiting website of a restaurant
F.10.1. Visiting website of restaurant inside the restaurant list
Prerequisites:
-
The select restaurant must have a weblink.
-
There must be internet connection to display the weblink.
-
Test case:
visitWeb 3
Expected: Website of Restaurant 3, Sunday Folks, from the sample data will be displayed on the pop-up window. -
Test case:
visitWeb 5
Expected: Since no weblink is added for Nipong Naepong, error message shown in the status message, indicating that a weblink is not found. -
Test case:
visitWeb 21
Expected: Since there is only 20 restaurants in the sample data, an error message will be shown, indicating that the index provided is invalid
-
F.10.2. Visiting website of restaurant that is not in the restaurant list
Prerequisites:
-
The weblink you input must be in the correct form and is a valid Url.
-
There must be internet connection to display the weblink.
-
Test case:
visitWeb www.kfc.com.sg
Expected: Website of KFC will be displayed on the pop-up window. -
Test case:
visitWeb asdjasdjasd
Expected: Since weblink provided is not in proper Url form, an error message indicating that the weblink is not in the correct form and examples of weblinks will be provided. -
Test case:
visitWeb www.asdjasdjasd.com
Expected: Since weblink provided is invalid, an error message indicating that the weblink cannot be reached will be displayed.
-
F.10.3. You can test the following command in airplane mode on your device to mimic no internet connection
-
Test case:
visitWeb 3
Expected: Error message showing no internet connection found is displayed in the status message. -
Test case:
visitWeb www.kfc.com.sg
Expected: Error message showing no internet connection found is displayed in the status message.