By: W17-1 Since: Feb 2019 Licence: MIT
- 1. Welcome to The Food Diary
- 2. Quick Start
- 3. Features
- 3.1. Restaurant Features
- 3.1.1. Adding a restaurant:
add - 3.1.2. Editing details of a restaurant :
edit - 3.1.3. Deleting a restaurant:
delete - 3.1.4. Listing all restaurants :
list - 3.1.5. Listing all restaurants that you have not visited :
listUnvisited - 3.1.6. Sorting restaurants by rating:
sort - 3.1.7. Searching restaurants by name:
find - 3.1.8. Selecting a restaurant :
select - 3.1.9. Setting the categories of a restaurant :
setCategories - 3.1.10. Filtering restaurants based on category:
filter - 3.1.11. Display website of selected restaurant :
visitWeb
- 3.1.1. Adding a restaurant:
- 3.2. Review Features
- 3.3. General Features
- 3.3.1. Personalising your food diary with your name:
name - 3.3.2. View your profile and usage statistics :
view - 3.3.3. Share to Facebook:
share(Coming in v2.0) - 3.3.4. Undo a command :
undo - 3.3.5. Redo a command :
redo - 3.3.6. Viewing help :
help - 3.3.7. Exiting the program :
exit - 3.3.8. Saving the data
- 3.3.1. Personalising your food diary with your name:
- 3.1. Restaurant Features
- 4. FAQ
- 5. Command Summary
1. Welcome to The Food Diary

If you would like to get use the Food Diary straightaway, jump to Section 2, “Quick Start” to get started
What is the Food Diary?
The Food Diary (FD) is a desktop app for storing your personal food reviews and obtain food recommendations based on your past reviews.
Why use the Food Diary?
The Food Diary is a one-stop application for you to document your food adventures and receive personalised recommendations for the next hidden gem to please your tastebuds.
Despite being optimized for those who prefer to work with a Command Line Interface (CLI), the Food Diary also has the benefits of a Graphical User Interface (GUI). To all you fast-typers out there, FD can get your foodie tasks done faster than traditional GUI apps! Furthermore, FD also stores your data locally, ensuring that you get security on top of speed.
Some of the features that you can look forward to:
-
Keeping track of restaurants you’ve visited.
-
Getting an aggregate rating over all your visits.
-
Finding out about new restaurants near you for your next gastronomical adventure!
Read on to find out more about the other exciting features of FD!
Callout
Callouts are boxes with important information regarding the usage of the Food Diary. These 3 callouts are used throughout our User Guide.
| This is a note. A note indicates important additional information that should be read. |
| This is a tip. A tip indicates good to know information that would improve your user experience. |
| This is a warning. A warning indicates critical information that would affect the functionality of this programme. |
2. Quick Start
-
Ensure you have Java version
9or later installed in your Computer. -
Download the latest
fooddiary.jarhere. -
Copy the file to the folder you want to use as the home folder for your Food Diary.
-
Double-click the file to start the app. The GUI should appear in a few seconds.
-
Type the command in the command box and press Enter to execute it.
e.g. typinghelpand pressing Enter will open the help window. -
Some example commands you can try:
-
list: lists all restaurants -
addReview 1 rr/4 re/delicious: adds a review to the 1st restaurant in the list, Astons, with rating 4 with the comment "delicious" -
delete 3: deletes the 3rd restaurant shown in the list -
exit: exits the app
-
-
Refer to Section 3, “Features” for details of each command.
3. Features
Command Format
-
Words in
UPPER_CASEare the parameters to be supplied by the user e.g. inadd n/NAME,NAMEis a parameter which can be used asadd n/Burger King. -
Items in square brackets are optional. e.g. in
add n/NAME a/ADDRESS po/POSTAL CODE [p/PHONE] [e/EMAIL] [t/TAG]… [w/WEBLINK] [o/OPENING_HOURS],PHONE,EMAIL,TAG,WEBLINKandOPENING_HOURSare optional. -
Items with
… after them can be used multiple times including zero times e.g.[t/TAG]…can be used ast/friend,t/friend t/familyetc. -
Parameters can be in any order e.g. if the command specifies
re/ENTRY rr/RATING,rr/RATING re/ENTRYis also acceptable.
3.1. Restaurant Features
3.1.1. Adding a restaurant: add
You can add a restaurant that is not found in the current list of restaurants.
Format: add n/NAME a/ADDRESS po/POSTAL CODE [p/PHONE] [e/EMAIL] [t/TAG]… [w/WEBLINK] [o/OPENING_HOURS]
Examples:
-
add n/Astons a/Blk 30 Geylang Street 29, #06-40 po/267951 p/66123024 e/astons@dummy.com w/astons.com.sg o/1000 to 2300 -
add n/Bangkok Jam p/65272758 e/bangkokjam@example.com a/Blk 30 Lorong 3 Serangoon Gardens, #07-18 po/018956 t/Spicy -
add n/KFC a/Bukit Panjang Plaza po/670111
|
When you are adding in the Weblink, the Food Diary will check whether the Weblink is valid for you. You need to have internet connection, else the Food Diary will proceed to add the restaurant without the Weblink. |
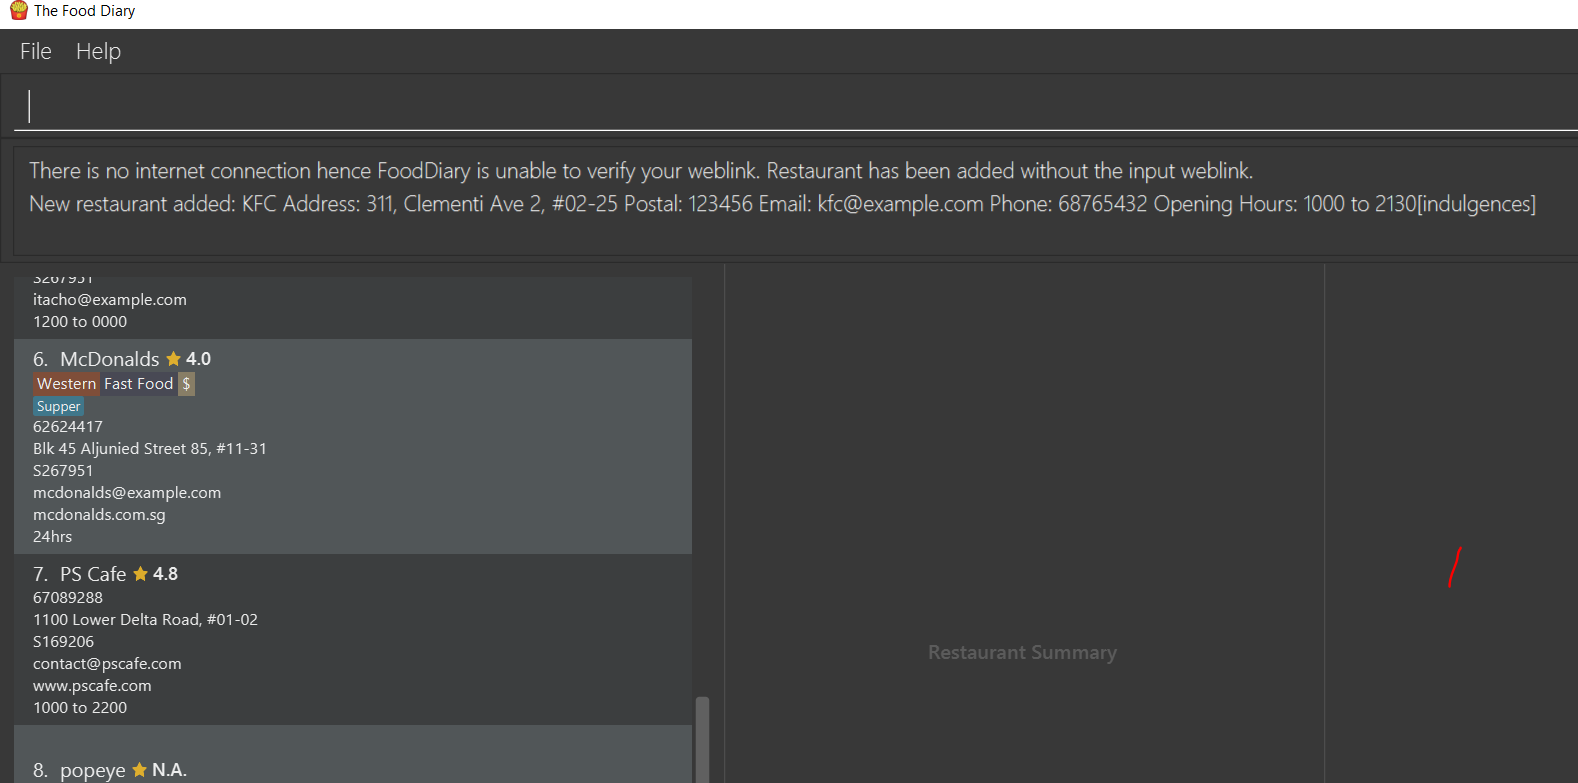
Image 1.1 When there is no internet connection, adding a restaurant with weblink will display this result
3.1.2. Editing details of a restaurant : edit
You can edit the details of a restaurant identified by the index number used in the list.
Format: edit INDEX [n/NAME] [p/PHONE] [e/EMAIL] [a/ADDRESS] [po/POSTAL] [t/TAG]… [w/WEBLINK] [o/OPENING HOURS]
Examples:
-
edit 2 n/MACS
Changes the name of the second restaurant in the list toMACS.
|
When you are editing the Weblink of a restaurant, the Food Diary will check whether the Weblink is valid for you. You need to have internet connection else, the Food Diary will not edit the Weblink for you. |
3.1.3. Deleting a restaurant: delete
Delete a restaurant that is in the current list of restaurants.
Format: delete INDEX
Examples:
-
delete 1
Deletes the first restaurant in the Food Diary. -
filter Western
delete 2
Deletes the second restaurant in the filtered list with the cuisineWestern.
3.1.4. Listing all restaurants : list
Shows a list of all restaurants in the Food Diary.
Format: list
Examples:
-
list
Returns a list of all the restaurants in the Food Diary.
3.1.5. Listing all restaurants that you have not visited : listUnvisited
Shows a list of all restaurants that have not been reviewed by you, ranked based on the proximity to the postal code provided by you.
Format: listUnvisited po/POSTAL_CODE
|
Calculation of proximity is based on |
Examples:
-
listUnvisited po/267951
Shows all the restaurants that has no reviews ranked based on the proximity to the postal code267951.
|
If you simply want to view unreviewed restaurants, enter |
3.1.6. Sorting restaurants by rating: sort
Sorting your restaurants from favourite to least favourite, or vice versa, has never been easier.
Order all of the restaurants in the Food Diary from highest to lowest ratings based on the average ratings from all the reviews that you have given each restaurant.
Format: sort [or/ORDER] [l/LIMIT]
|
|
Examples:
-
sortorsort or/DES
Both will sort your list of restaurants in descending order of ratings. -
sort or/asCorsort or/ASC
Both will sort your list of restaurants in ascending order of ratings. -
sort or/ASC l/2
Your list of restaurants will be sorted in ascending order of ratings and you will only see the restaurants with the 2 lowest ratings displayed.
|
Restaurants with no reviews will have no ratings, and will thus have an |
Example of usage:
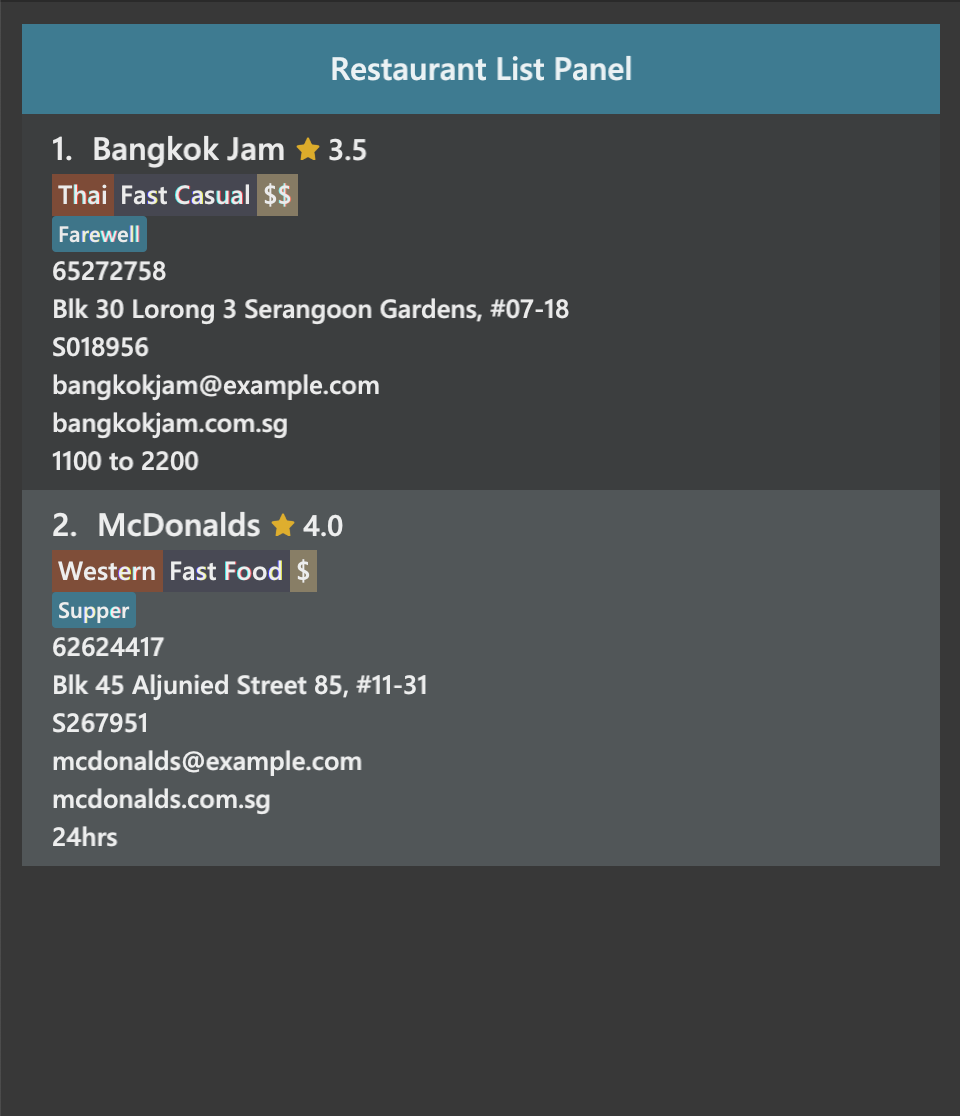
-
Before the
sortcommand is executed, the following shows the list of restaurants in the restaurant list.
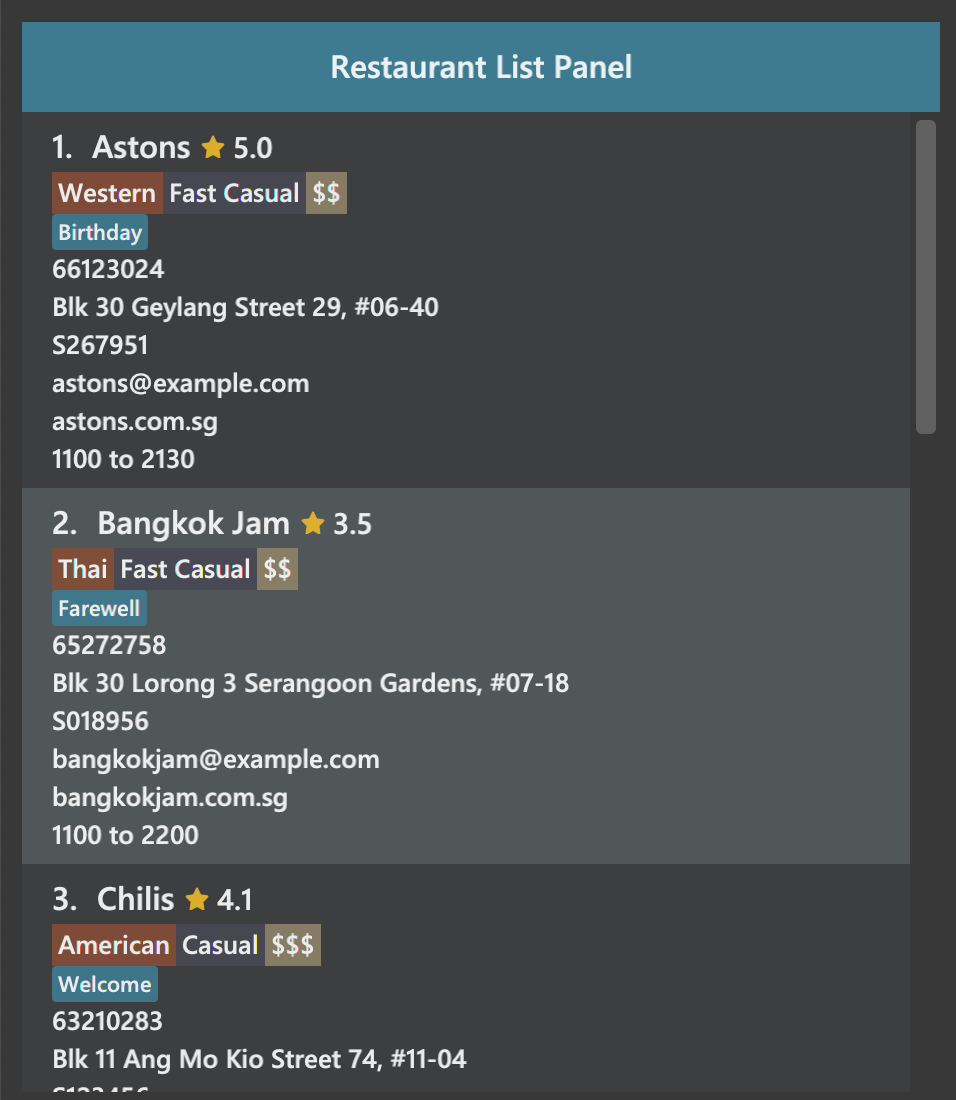
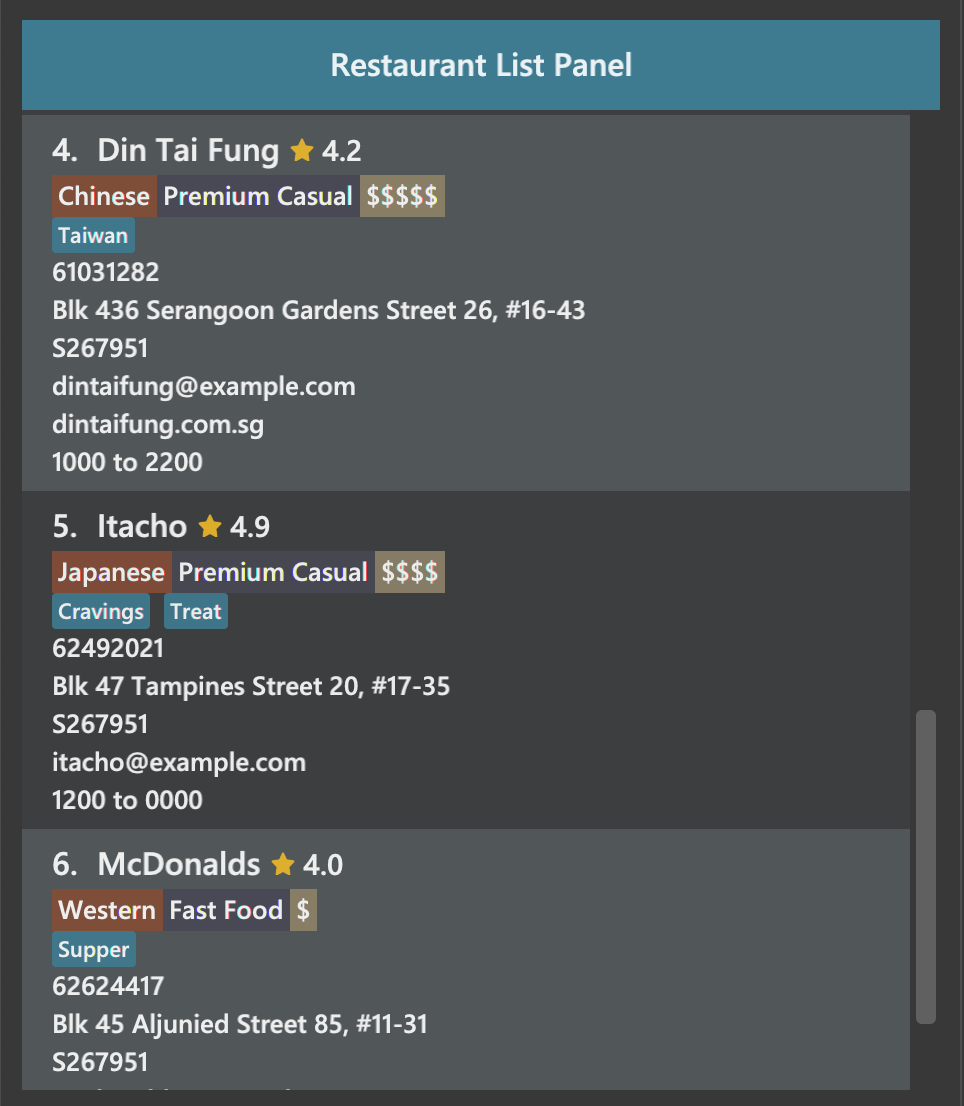
Figure 1. List of restaurants before sorting, take note of their unordered ratings
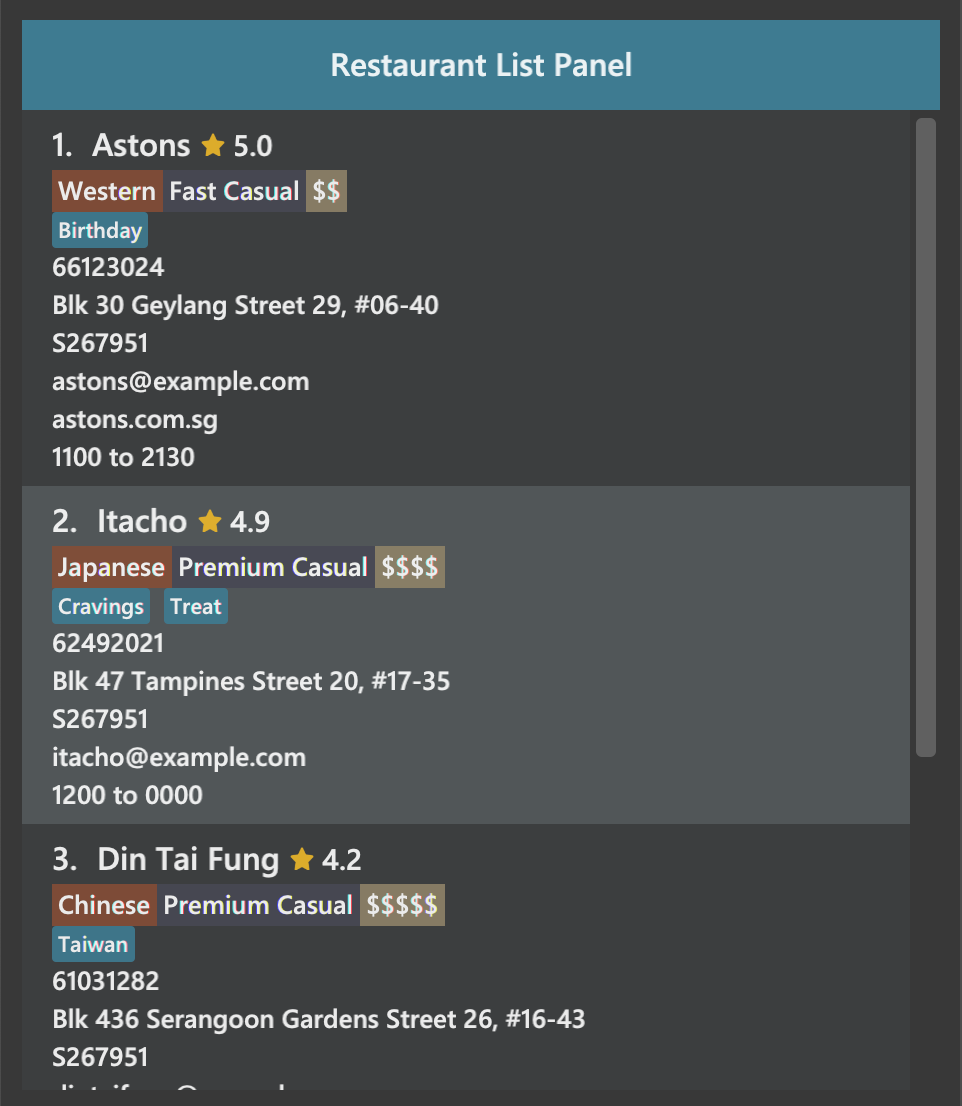
-
After 2 different
sortcommands are executed
|
|
Figure 2. List of restaurants with the 2 lowest ratings in ascending order is obtained when the command |
Figure 3. List of restaurants with the 3 highest ratings in descending order of ratings is obtained when the command |
3.1.7. Searching restaurants by name: find
Find restaurants with names containing any of the given keywords.
Format: find KEYWORD [MORE_KEYWORDS]
|
Only full words will be matched e.g. |
Examples:
-
find KFC
Returns any restaurant with name containingKFC.
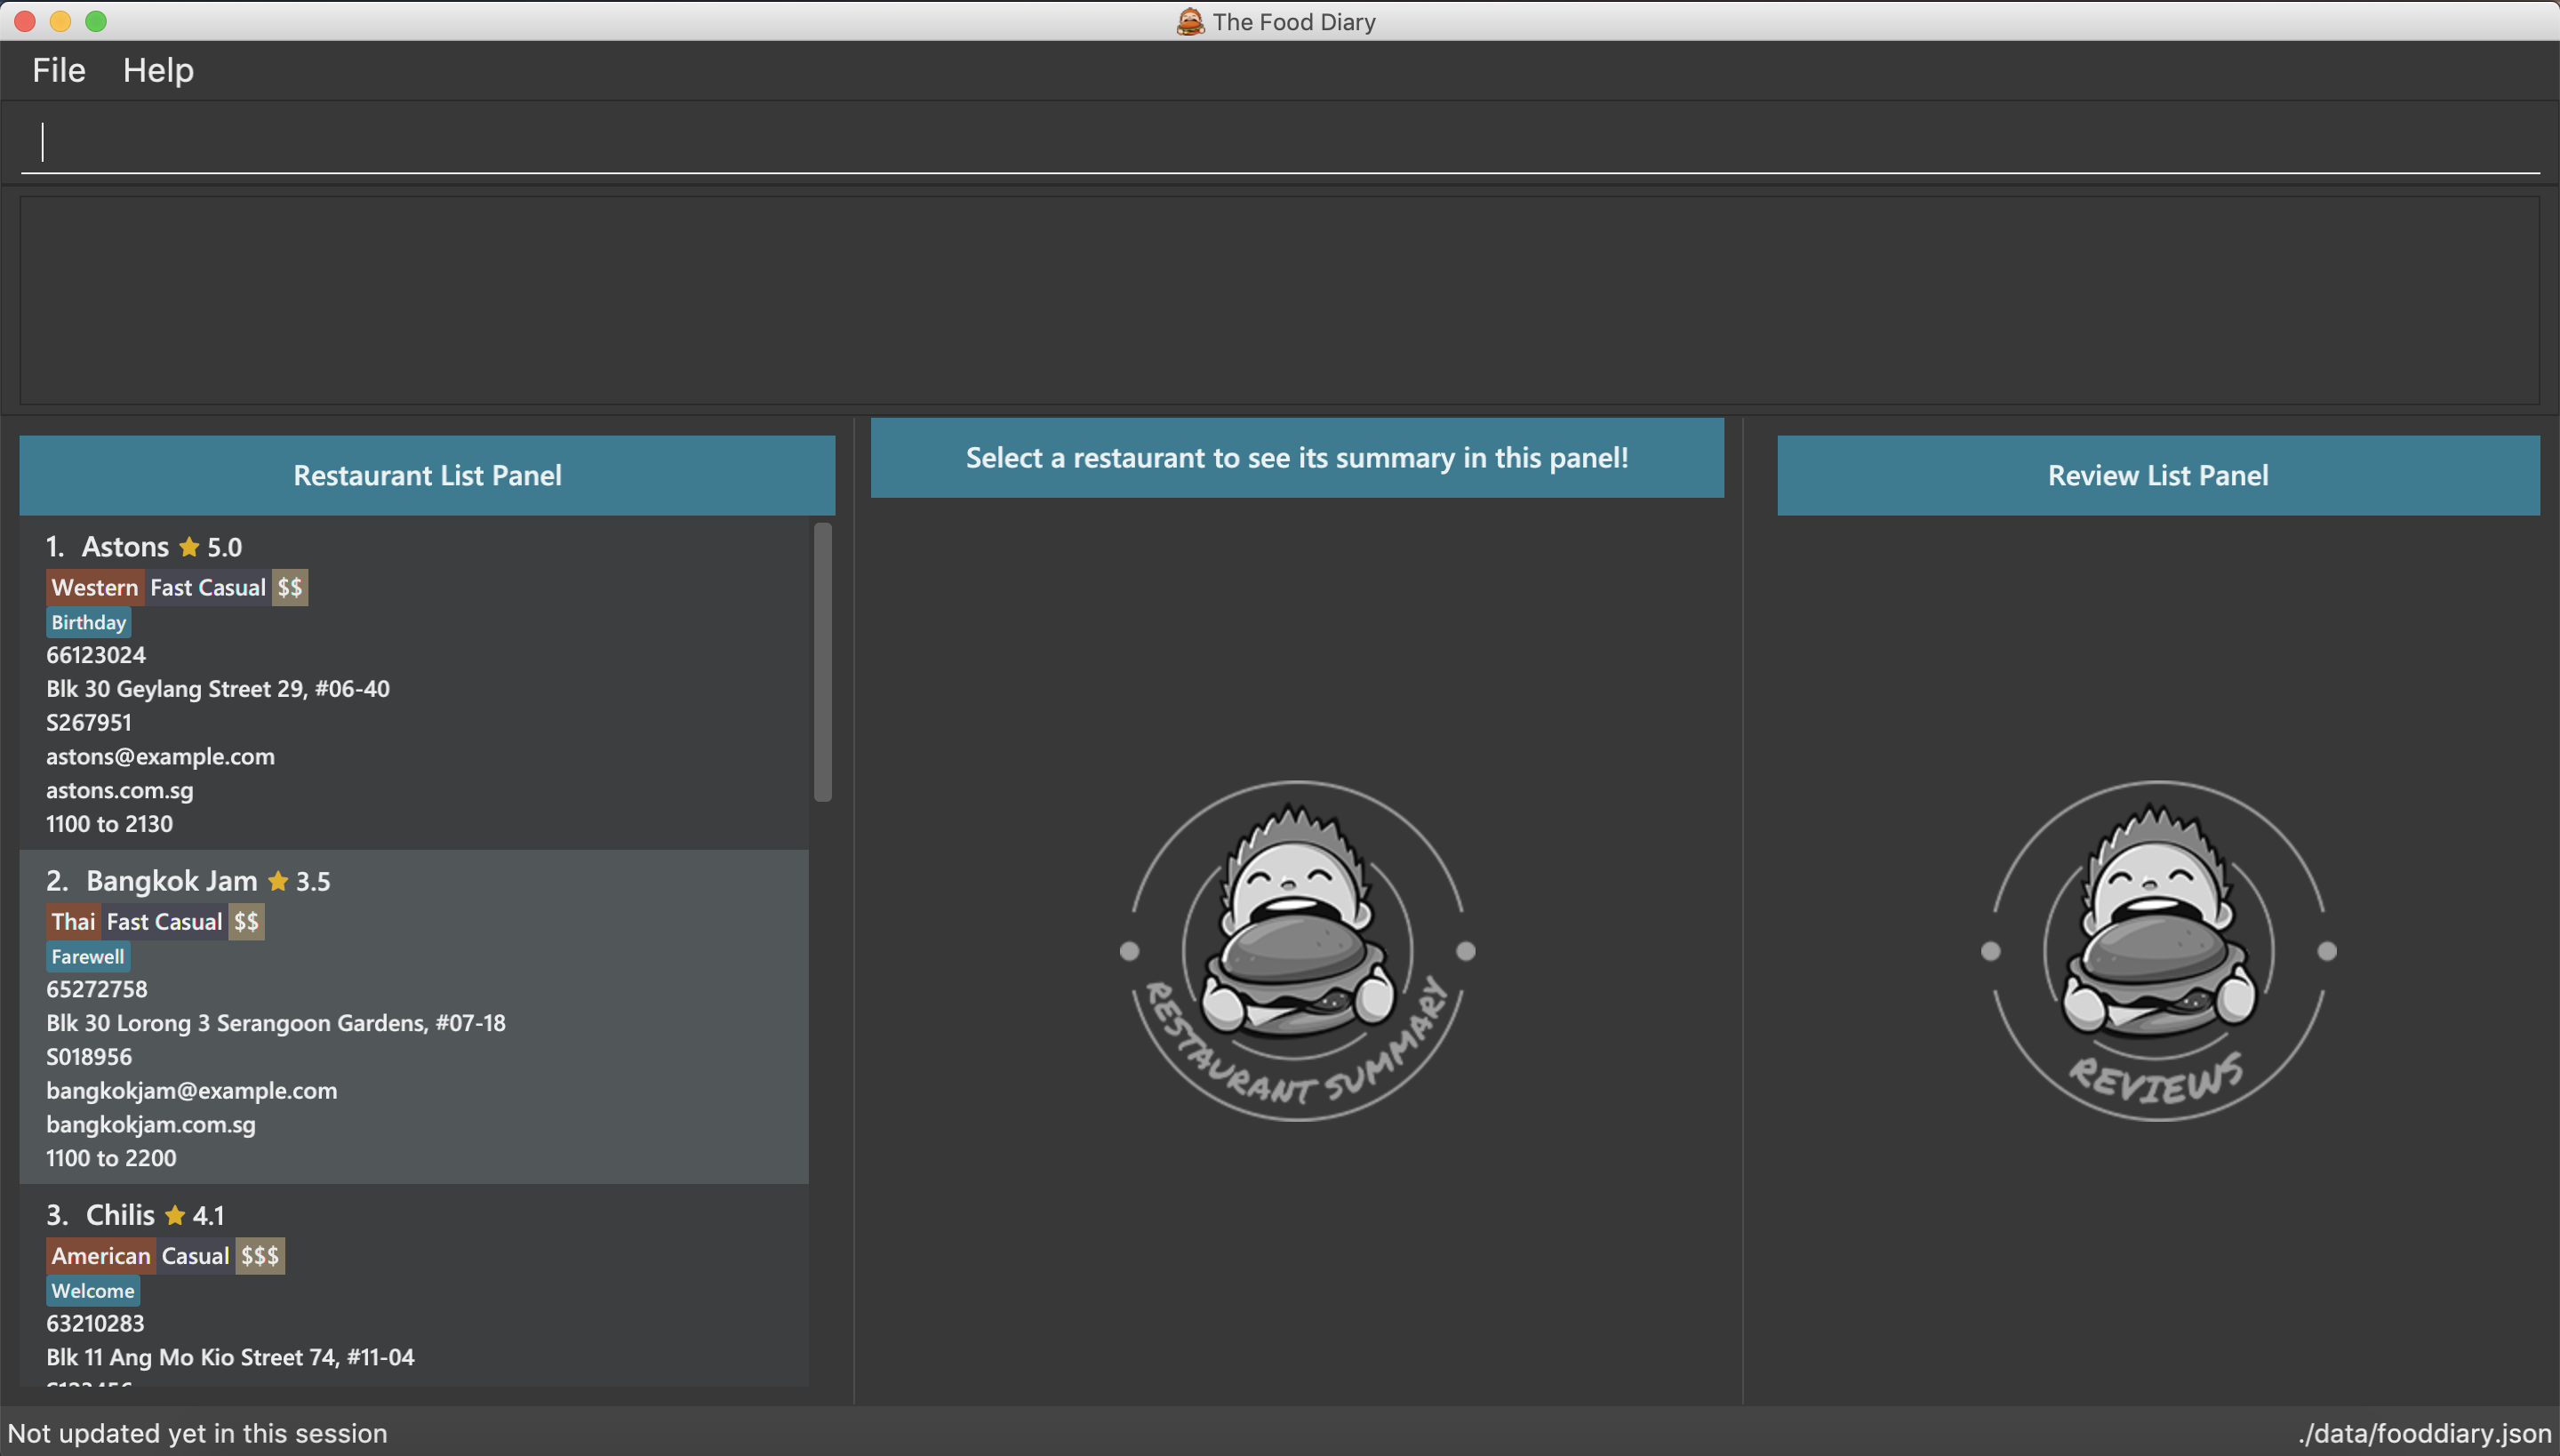
3.1.8. Selecting a restaurant : select
Select a restaurant based on its index on the list and display information about it.
Format: select INDEX
Examples:
-
select 3
Selects the restaurant in the displayed restaurants list with index 3 and displays its summary and reviews.

Figure 1. Before selecting any restaurant
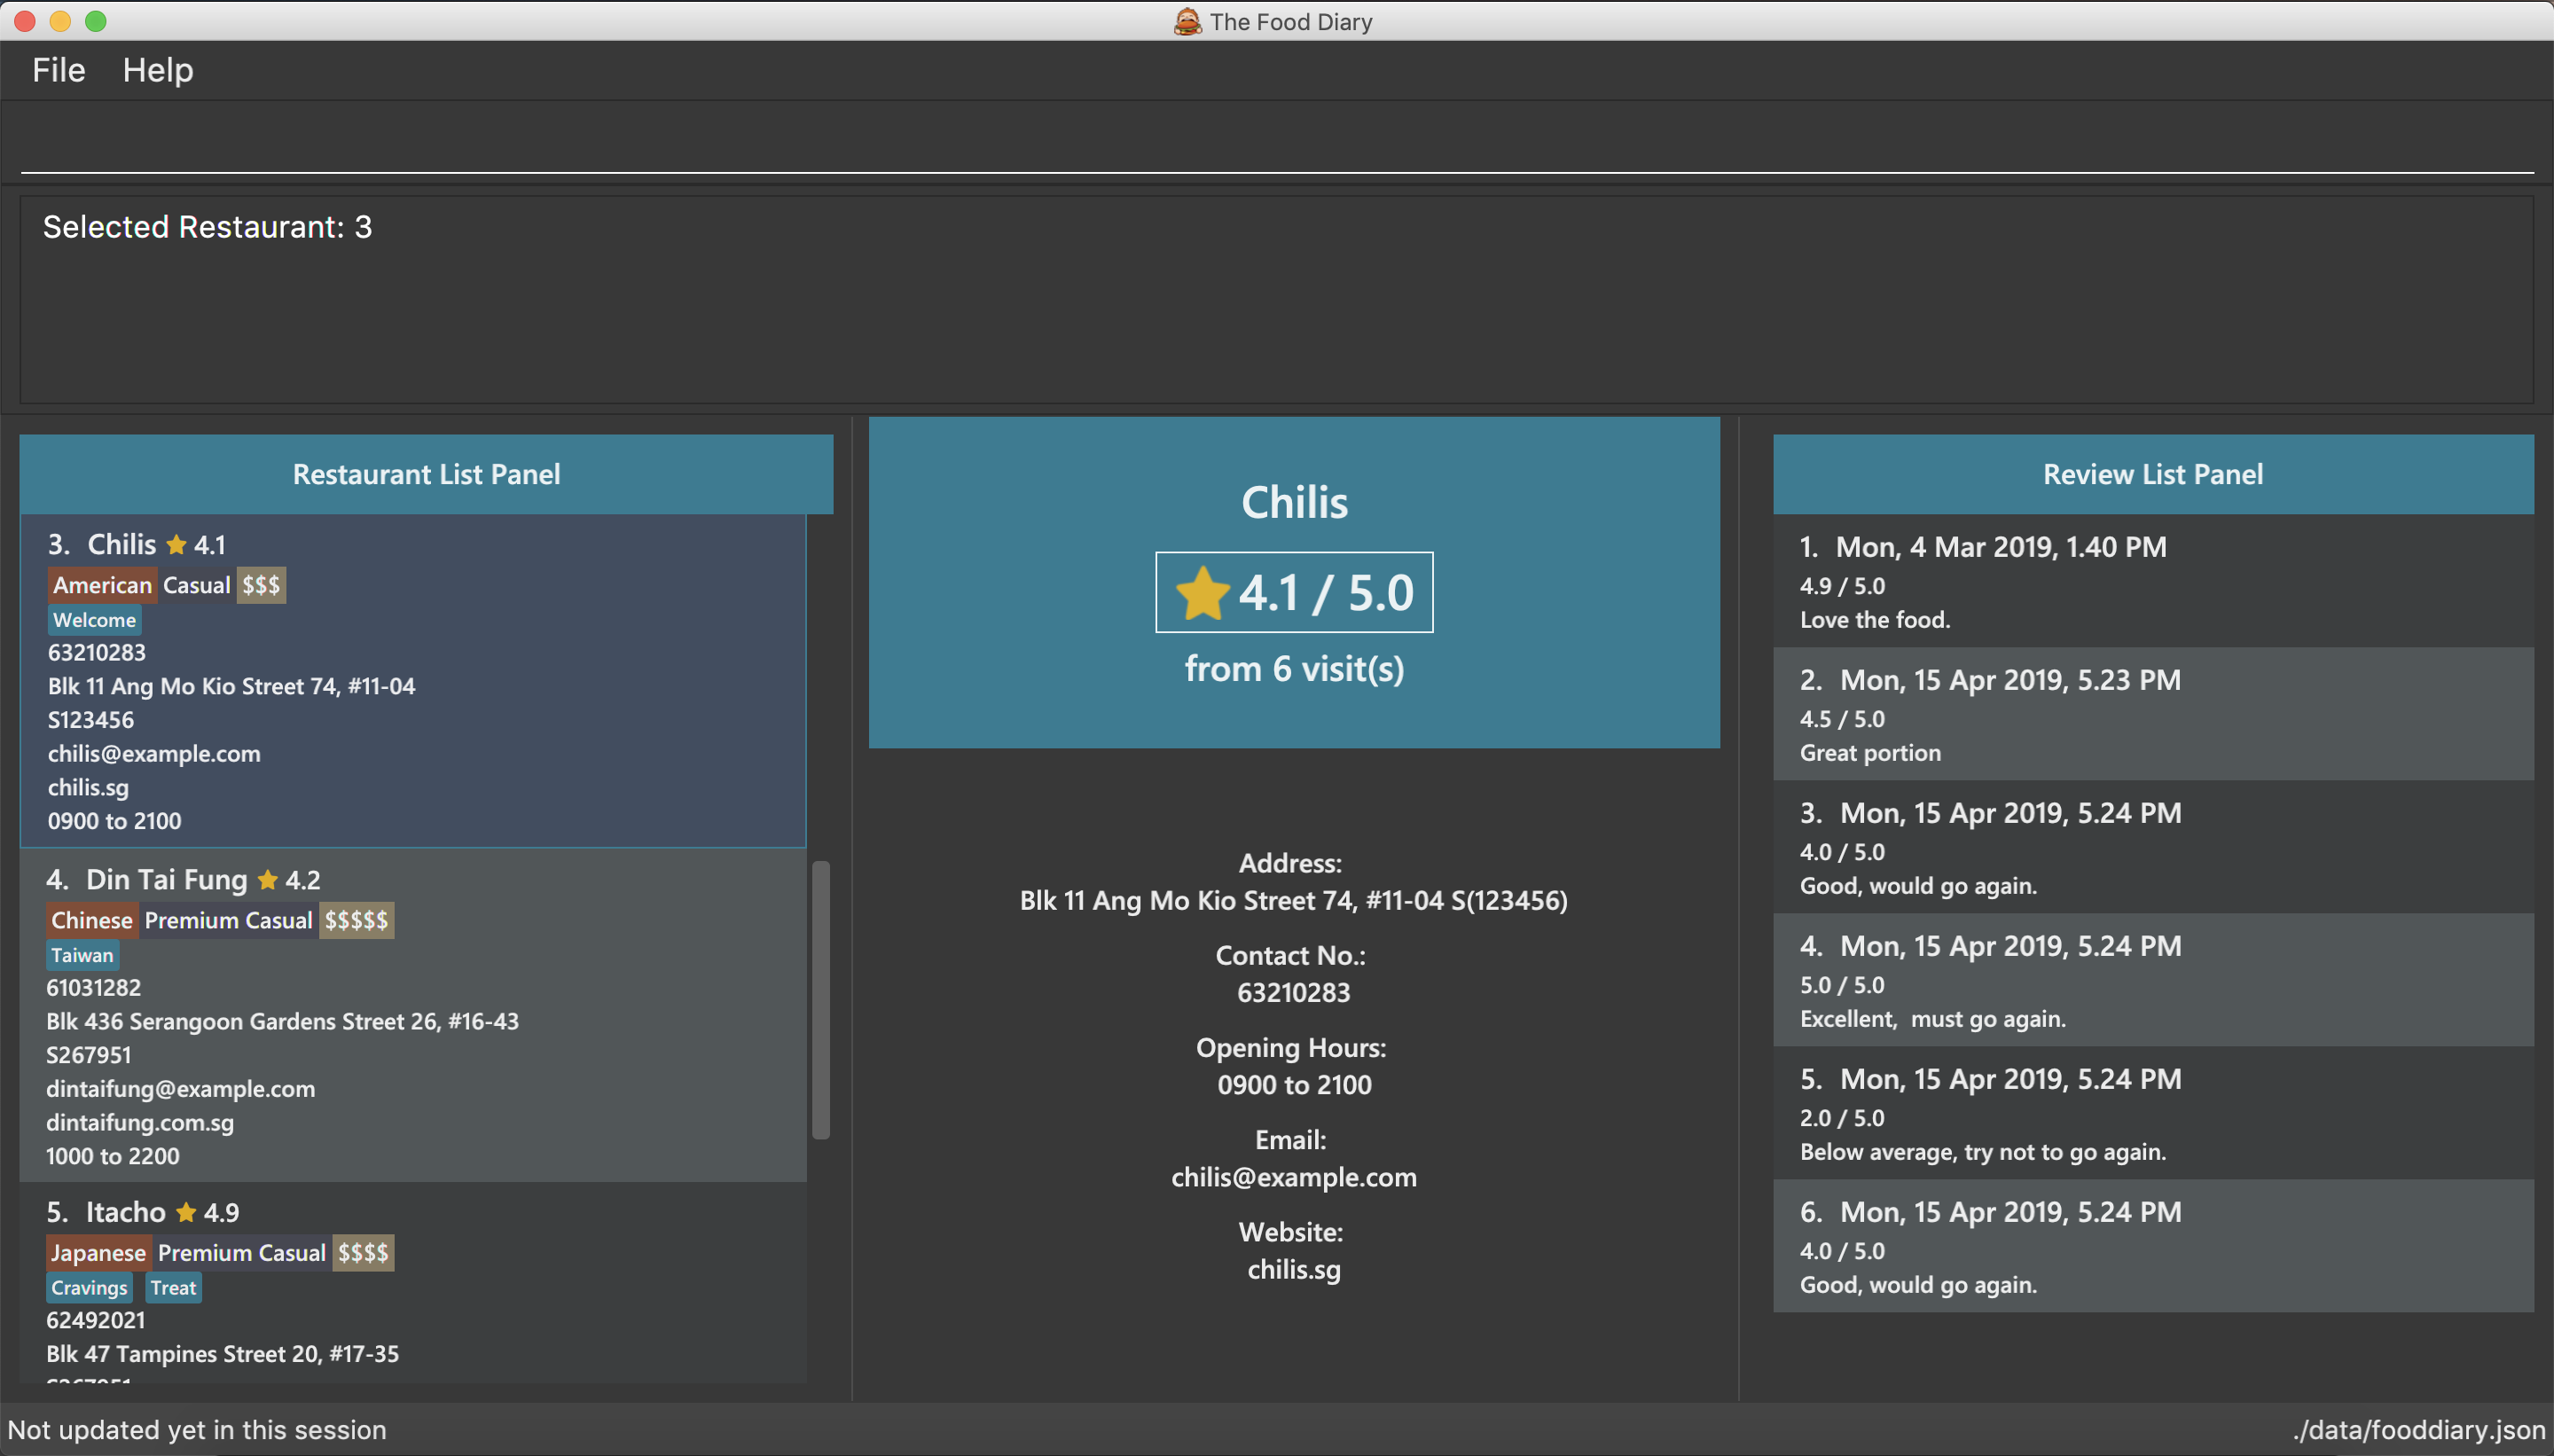
Figure 2. After selecting restaurant with index 3, Chilis' summary and reviews are displayed in the second and third (from left to right) respectively
3.1.9. Setting the categories of a restaurant : setCategories
Sets the categories of a restaurant identified by the index number used in the list.
Format: setCategories INDEX [c/CUISINE] [oc/OCCASION] [pr/PRICE_RANGE]
|
Step by step guide on how to set categories:
Step 1: List all the restaurants by typing list, then press enter, as shown below.
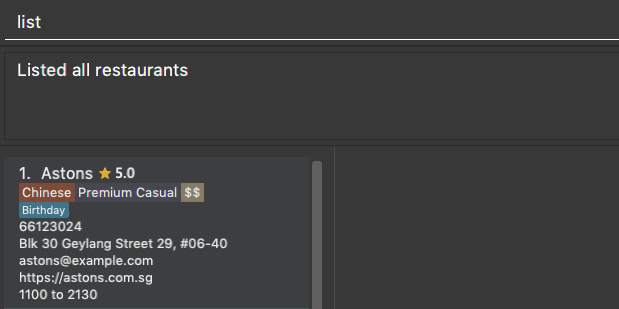
Figure 1: After typing list. Oh no, the categories for Aston’s are wrong! It is definitely not Chinese. Let’s change it.
Step 2: Choose a restaurant you want to set categories to. Let us choose Astons for this example. Take note that Astons
is identified by INDEX 1. Start typing setCategories 1 c/ as follows:
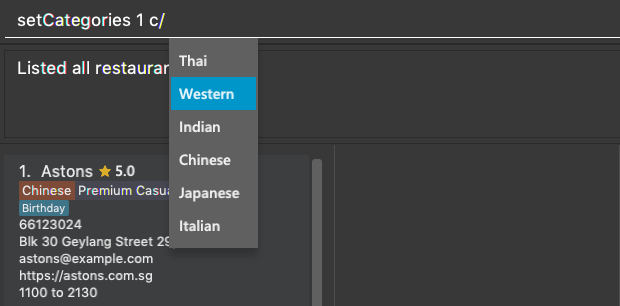
Figure 2: Notice suggestions for cuisines will pop up. Use arrow keys to select the desired suggestion and press enter, or you can also choose to continue typing something not in the suggestions.
Step 3: Continue keying in the occasion prefix after you finished keying in the cuisine. The occasion prefix is oc/.
Follow Figure 3 shown below.
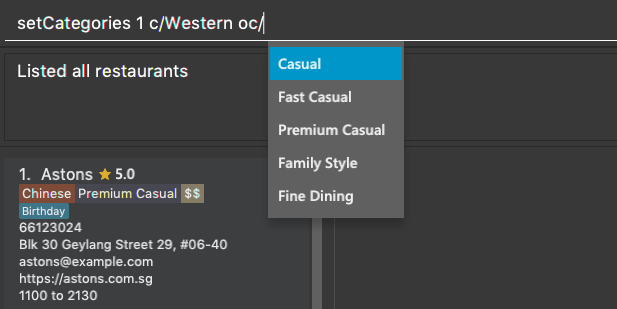
Figure 3: Once again, you can pick the occasion you see in the suggestions or continue typing.
Step 4: Key in the price range next, as demonstrated by Figure 4 below. The price range prefix is pr/.
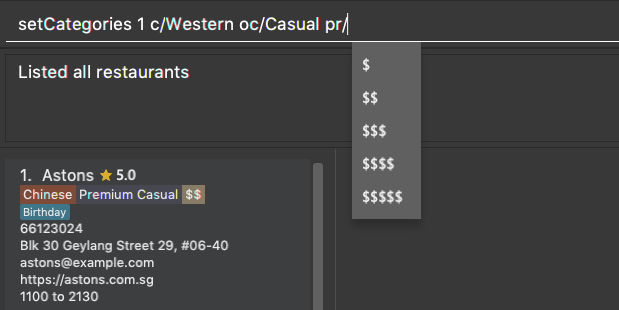
Figure 4: Pick a price range from the list or just type, whichever is faster for you.
Step 5: Press enter and the categories will be set! Else, you might have made a typo somewhere. You should see the following status message shown in the Figure below.
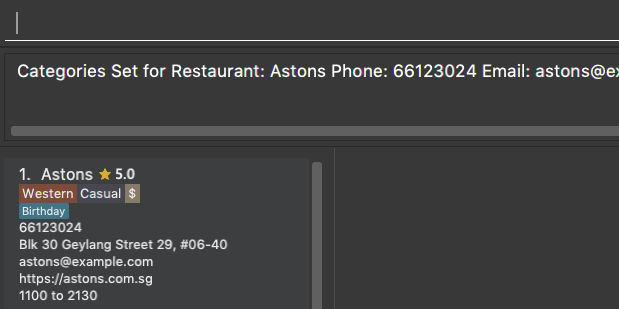
Figure 5: Success!
|
Other examples you can try:
-
setCategories 2 oc/Premium Casual pr/$
Sets the categories of the second restaurant in the list toPremium Casualfor occasion and$for price range. -
setCategories 3 c/Western
Only sets the cuisine of the third restaurant toWestern.
3.1.10. Filtering restaurants based on category: filter
Filters and lists the restaurants with categories matching the keywords entered.
Format: filter KEYWORD [MORE_KEYWORDS]
Step by step guide on how to filter:
Step 1: Suppose you want to filter out all Western, Japanese, as well as Chinese restaurants. Type filter
western japanese chinese into the command box.
Step 2: Press enter again and now all Western, Japanese and Chinese restaurants will be shown.
|
Some examples you can try:
-
filter fine dining casual
Displays restaurants with any category matchingfine,diningorcasual. -
filter $ casual western
Displays restaurants with any category matching$,casualorwestern.
3.1.11. Display website of selected restaurant : visitWeb
The restaurant’s website can serve as your reference when you are adding it into your restaurant list or when writing a review for the restaurant.
You can display the website of a restaurant identified by the index number used in the list based on its weblink.
Format: visitWeb INDEX
|
You can also display the website of any restaurant by entering its url.
Format: visitWeb URL
This allows you to visit website of any restaurant before they are entered into the list of restaurants in the FoodDiary.
Website is displayed on a browser window which shows upon visitWeb command.
|
A URL is a valid link to a website. It should be in this format: local-part.domain and adhere to the following contraints:
|
Examples:
-
list
visitWeb 4
This command displays the webpage of the 4th Restaurant in your restaurant list. -
visitWeb www.jollibee.com.ph
This command displays webpage of Jollibee as shown below.

Image 1.1 Result of visitWeb www.jollibee.com.ph.
| You need to have internet connection to visit the website of the restaurant. |
3.2. Review Features
3.2.1. Adding a review: addReview
Adds a review to the Food Diary
Format: addReview INDEX re/ENTRY rr/RATING
Examples:
-
addReview 2 re/Peach Pie was amazing rr/4
Adds a review to the second restaurant in the list.
3.2.2. Editing a specified review : editReview
Edit selected fields in a specified entry.
Format: editReview INDEX [re/ENTRY] [rr/RATING]
Steps to execute editReview command:
-
From the main screen of the application, first select a restaurant by clicking on it with the mouse or using the
select INDEXcommand.
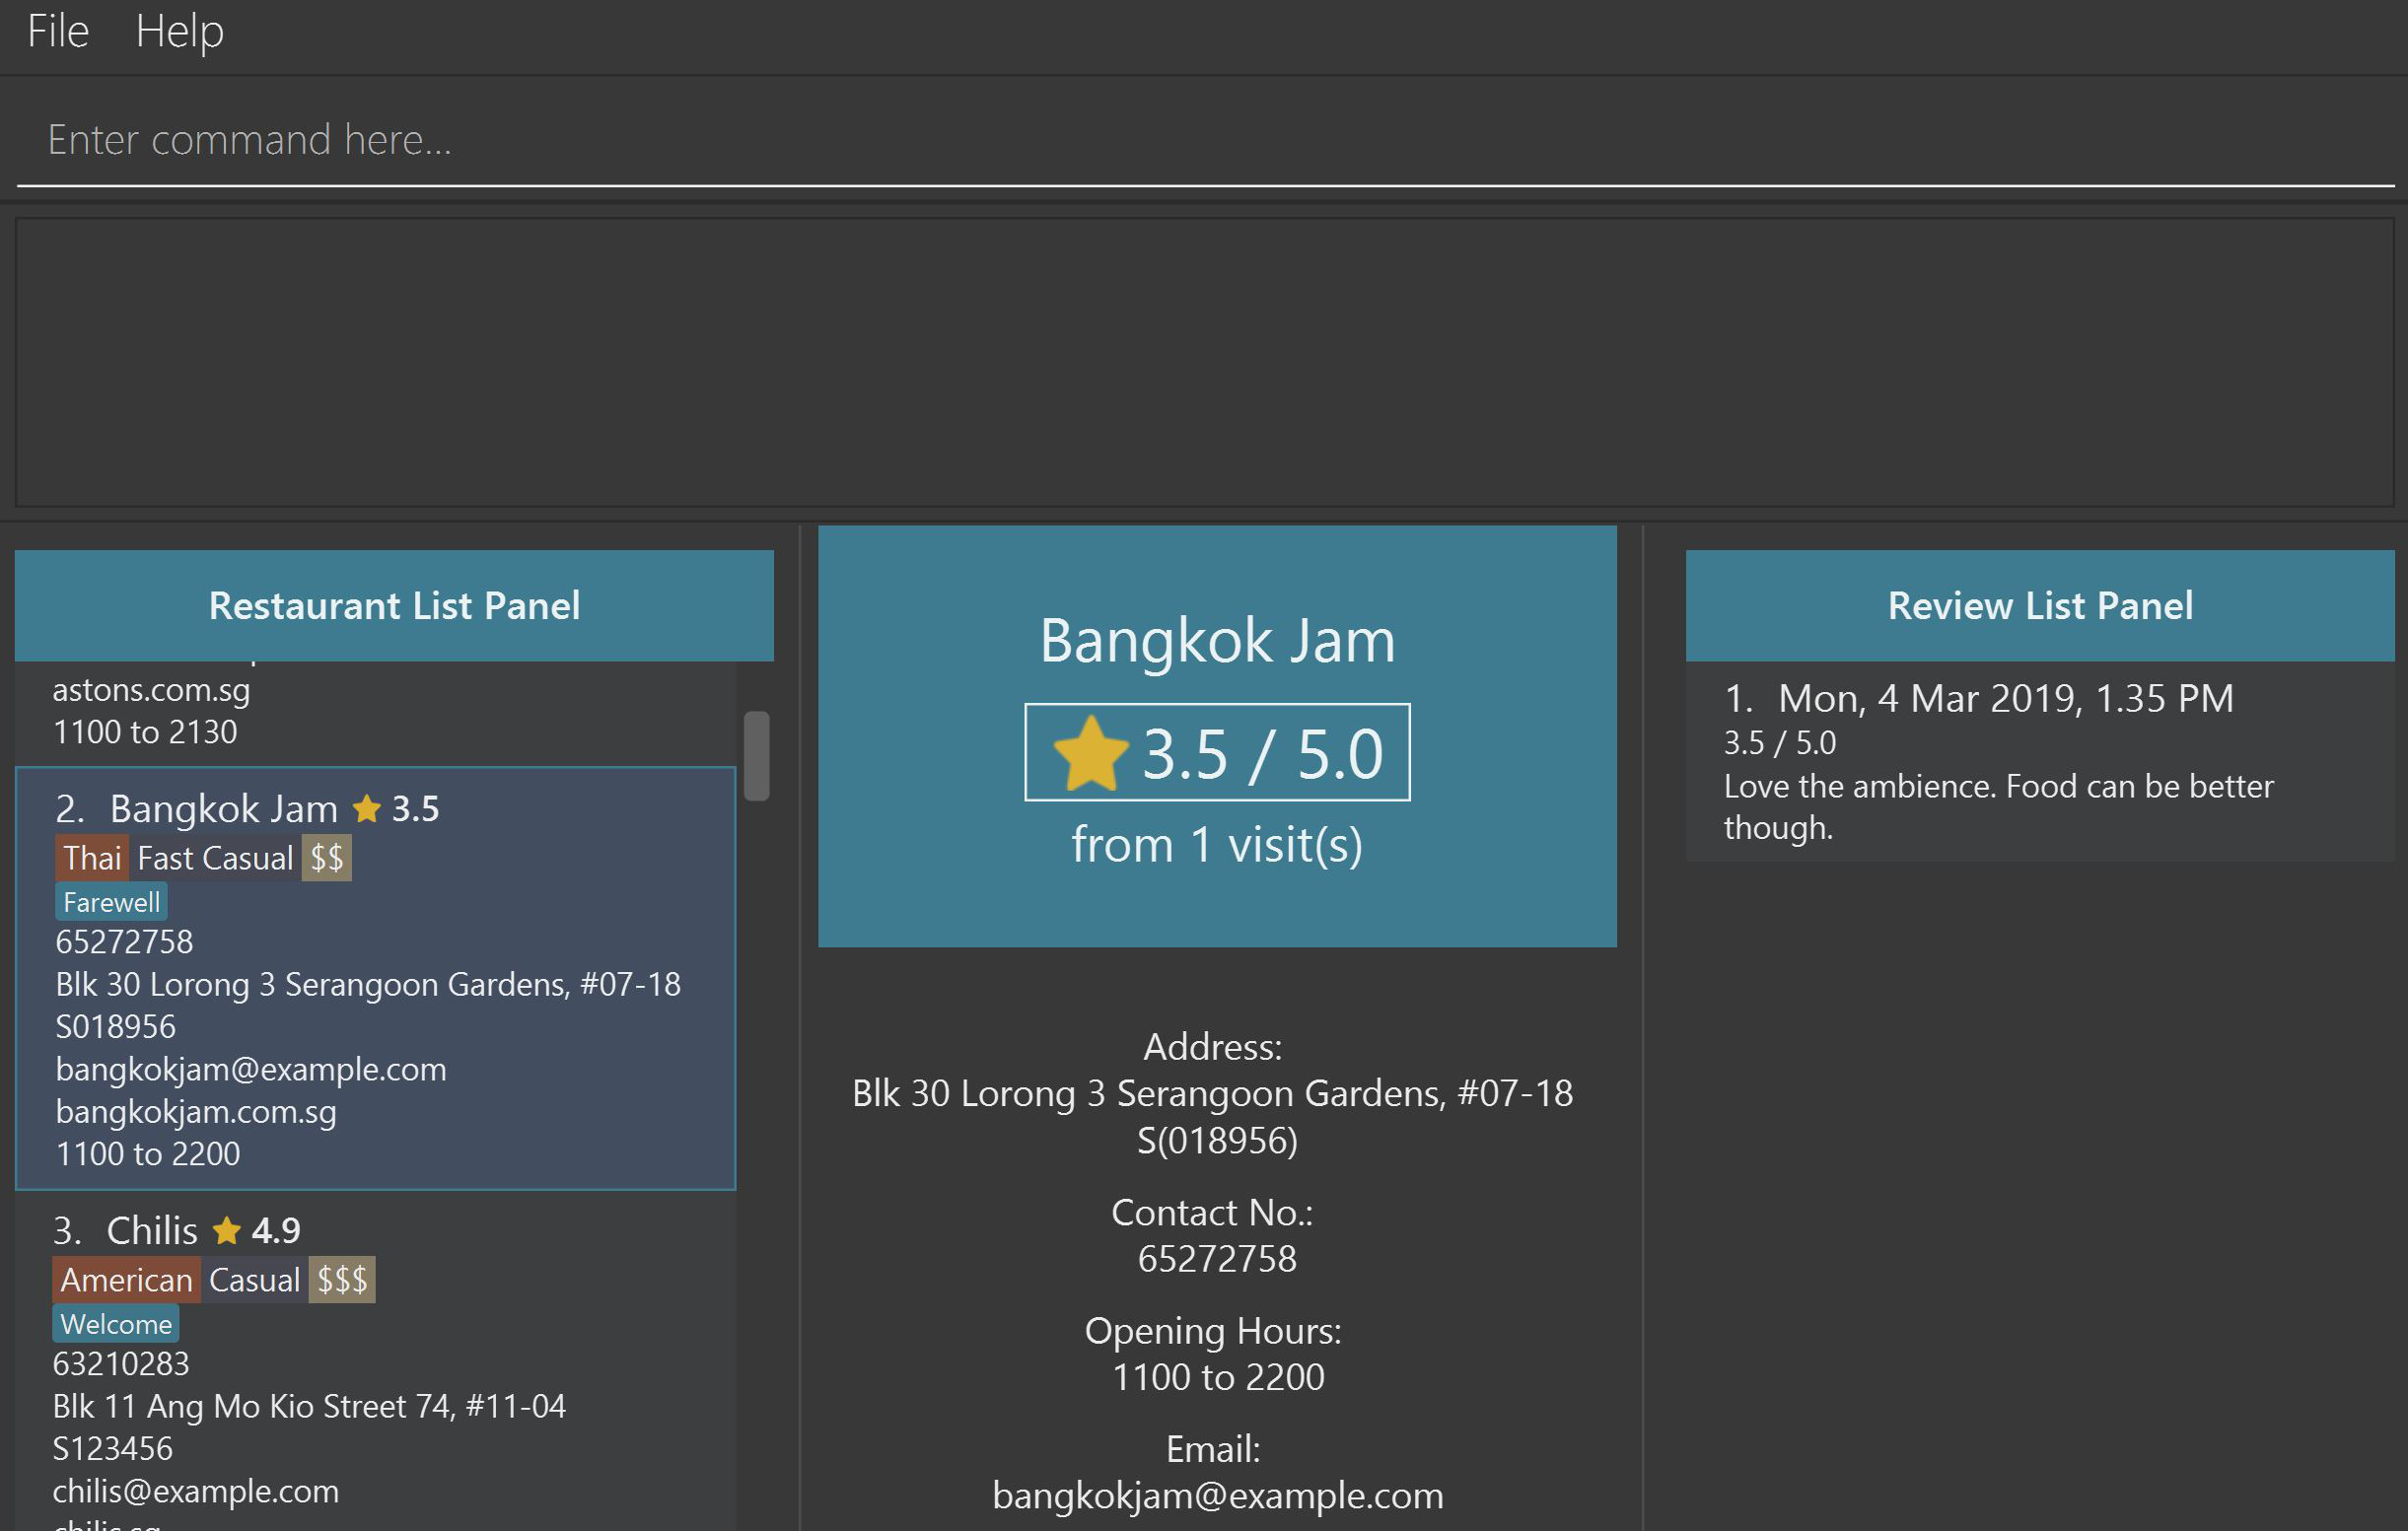
Figure 1. Upon selecting a restaurant, the reviews of the restaurant will show on the rightmost review panel
-
Following the above, enter the command. Upon successful execution of the command:
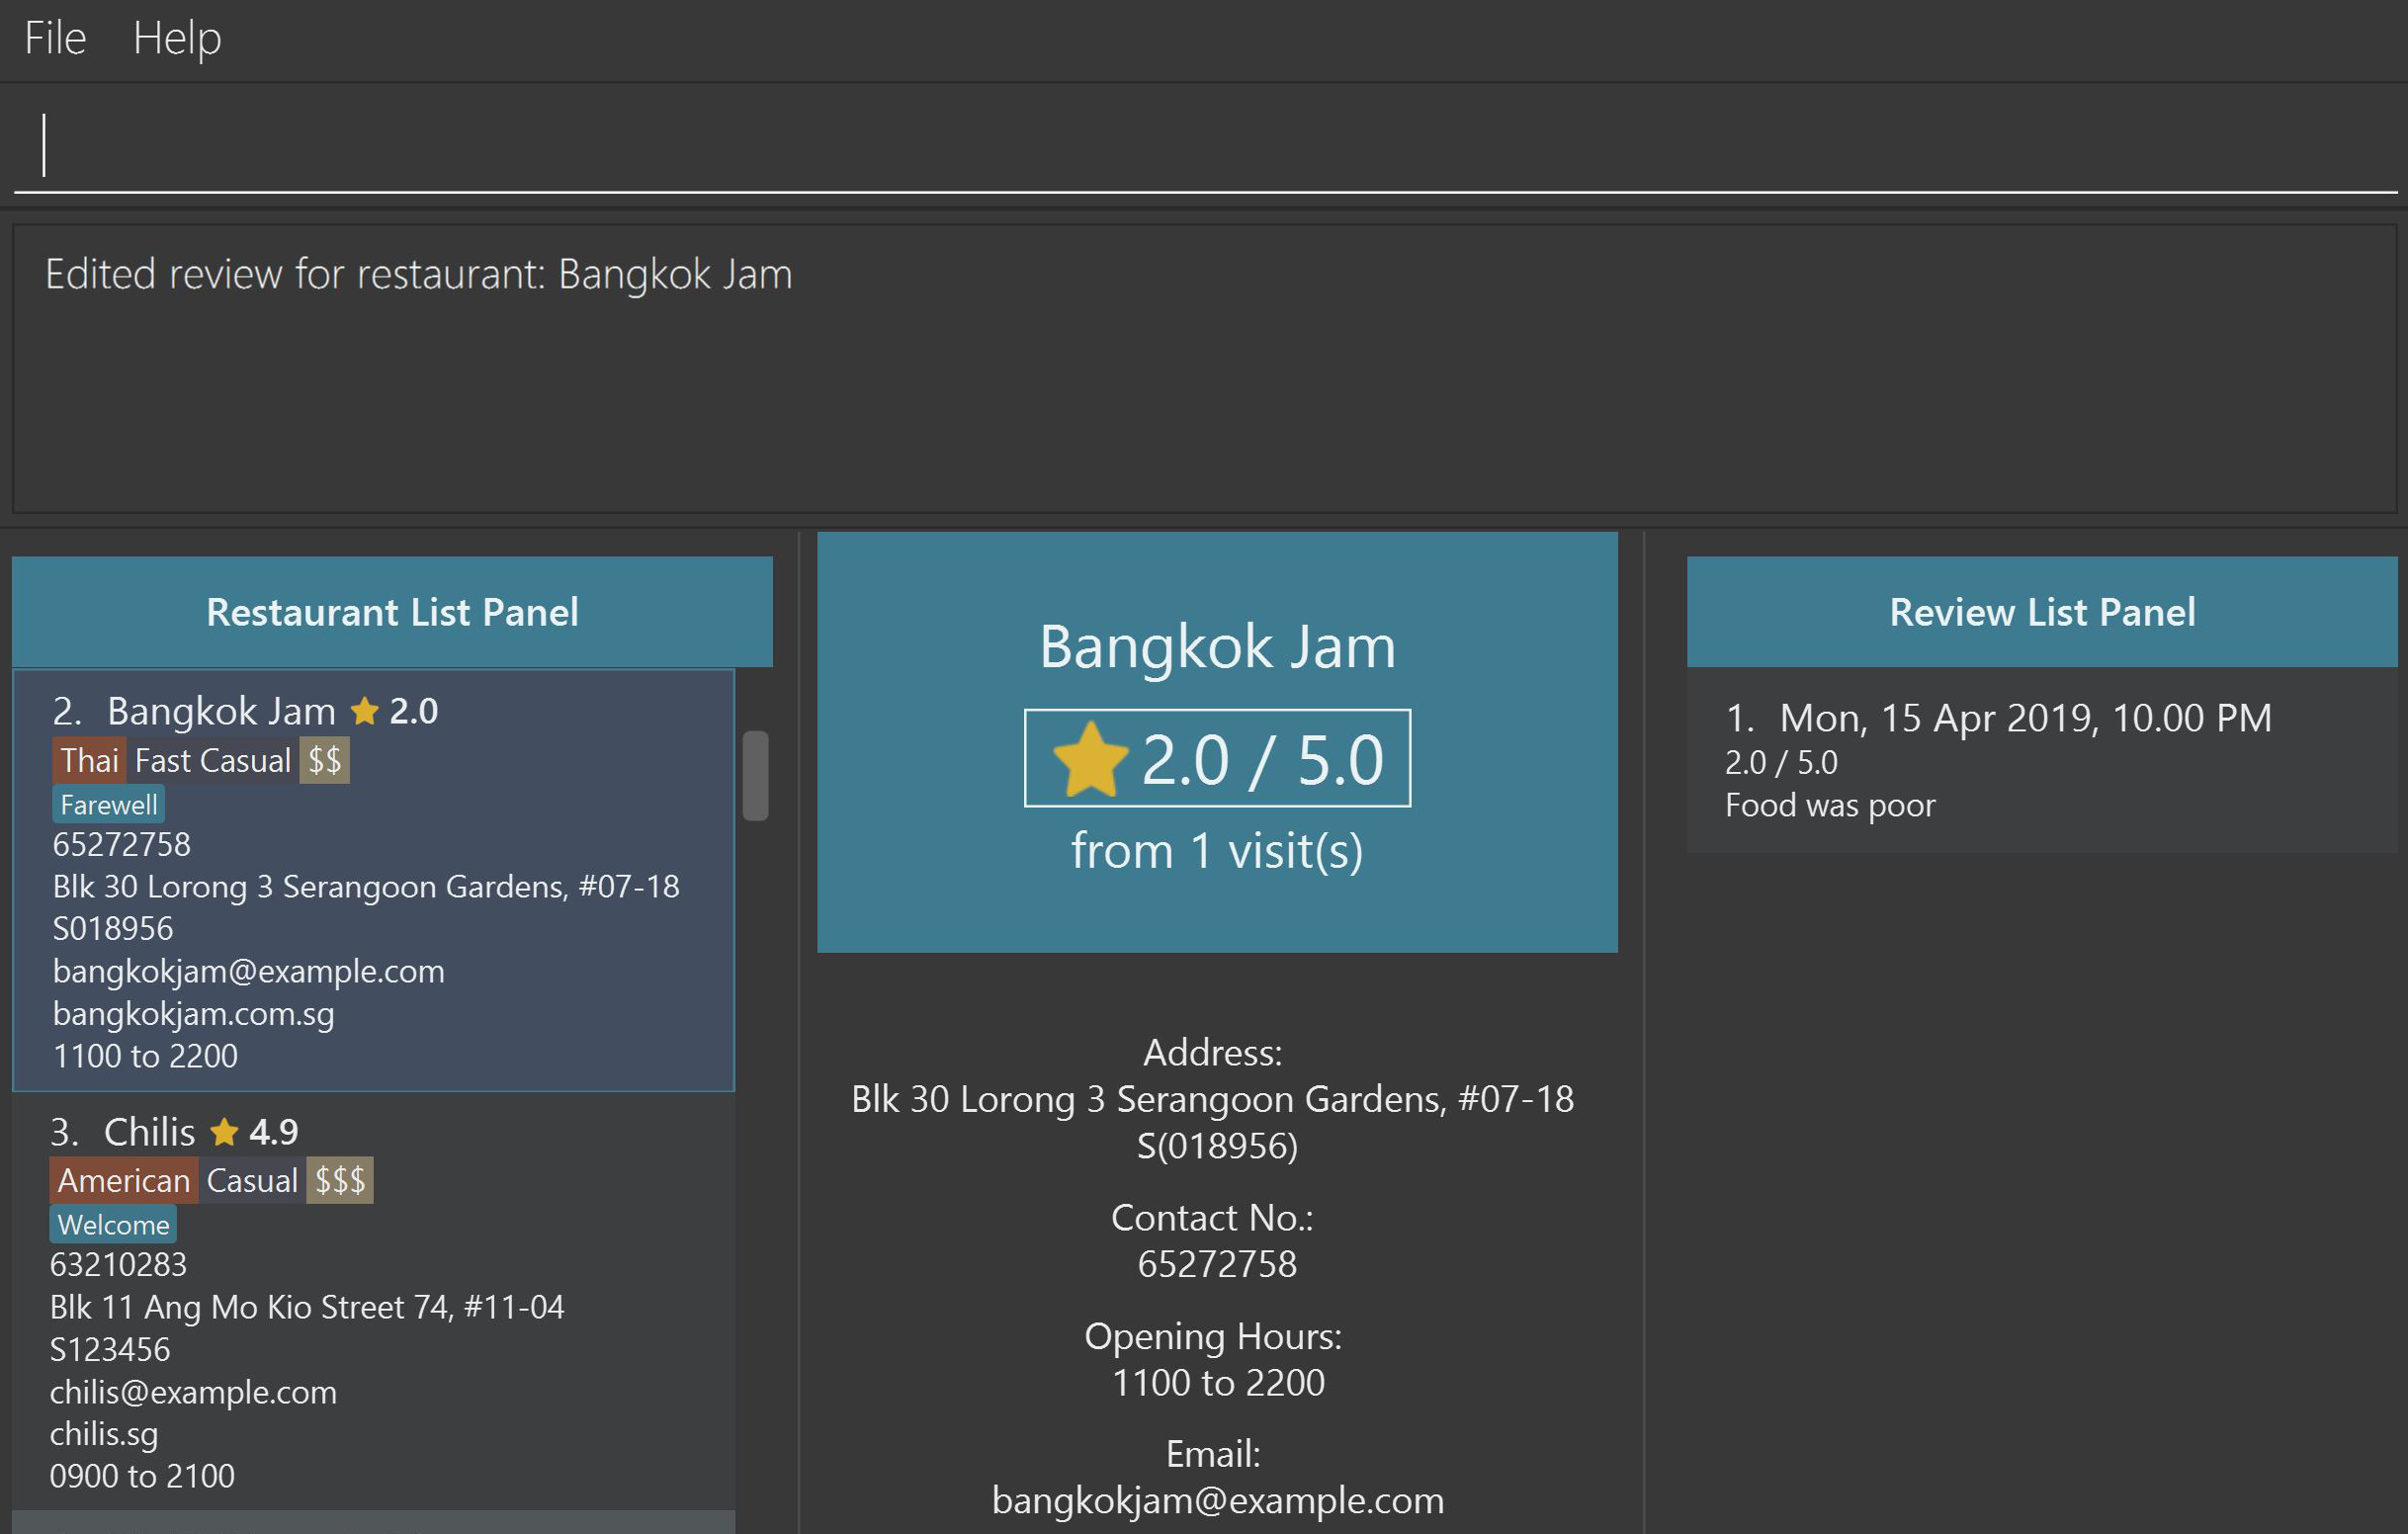
Figure 2. The above screenshot shows the end-product of the successful execution of editReview command
Examples:
-
editReview 2 re/Food isn’t the best
Edits the comment of the second review toFood isn’t the best -
editReview 2 re/Food isn’t the best rr/4
Edits the comment of the second review toFood isn’t the bestand the rating to be4.
3.2.3. Deleting a review : deleteReview
Deletes the review from the Food Diary.
Format: deleteReview INDEX
Examples:
-
deleteReview 2
Deletes the 2nd review of the selected restaurant in the Food Diary.
3.2.4. Adding a default review : addR
In a real hurry? Fear not because The Food Diary has built in default reviews! You can use this command to quickly add a review with minimal typing. The command and syntax to add default reviews is much shorter and simpler than the normal addReview command.
These default reviews are representative of the rating scale from 1 - 5. There is a default review entry associated with each default review rating. They range from:
-
Default review of rating 1: "Very poor, never ever go again." to
-
Default review of rating 5: "Excellent, must go again."
Format: addR INDEX NUMBER
Examples:
-
addR 1 4adds a review of rating 4 and entry "Good, would go again." to the first restaurant on the displayed list.
3.2.5. Edit default review entry (Coming in v2.0)
Edits the default review entry according to the specified index. This allows you to customize your default review entries.
Format: editR NUMBER re/NEW_ENTRY
Examples:
-
editR 4 re/Not too shabby at allchanges the default review corresponding to rating 4 to "Not too shabby at all".
3.3. General Features
3.3.1. Personalising your food diary with your name: name
Personalise your foodDiary with your name
Format: name n/YOUR_NAME
Examples:
-
name n/Jack Stone
3.3.2. View your profile and usage statistics : view
View your individual Food Diary profile and usage statistics.
Format: view
Examples:
-
view -
Example of profile statistics is shown below:
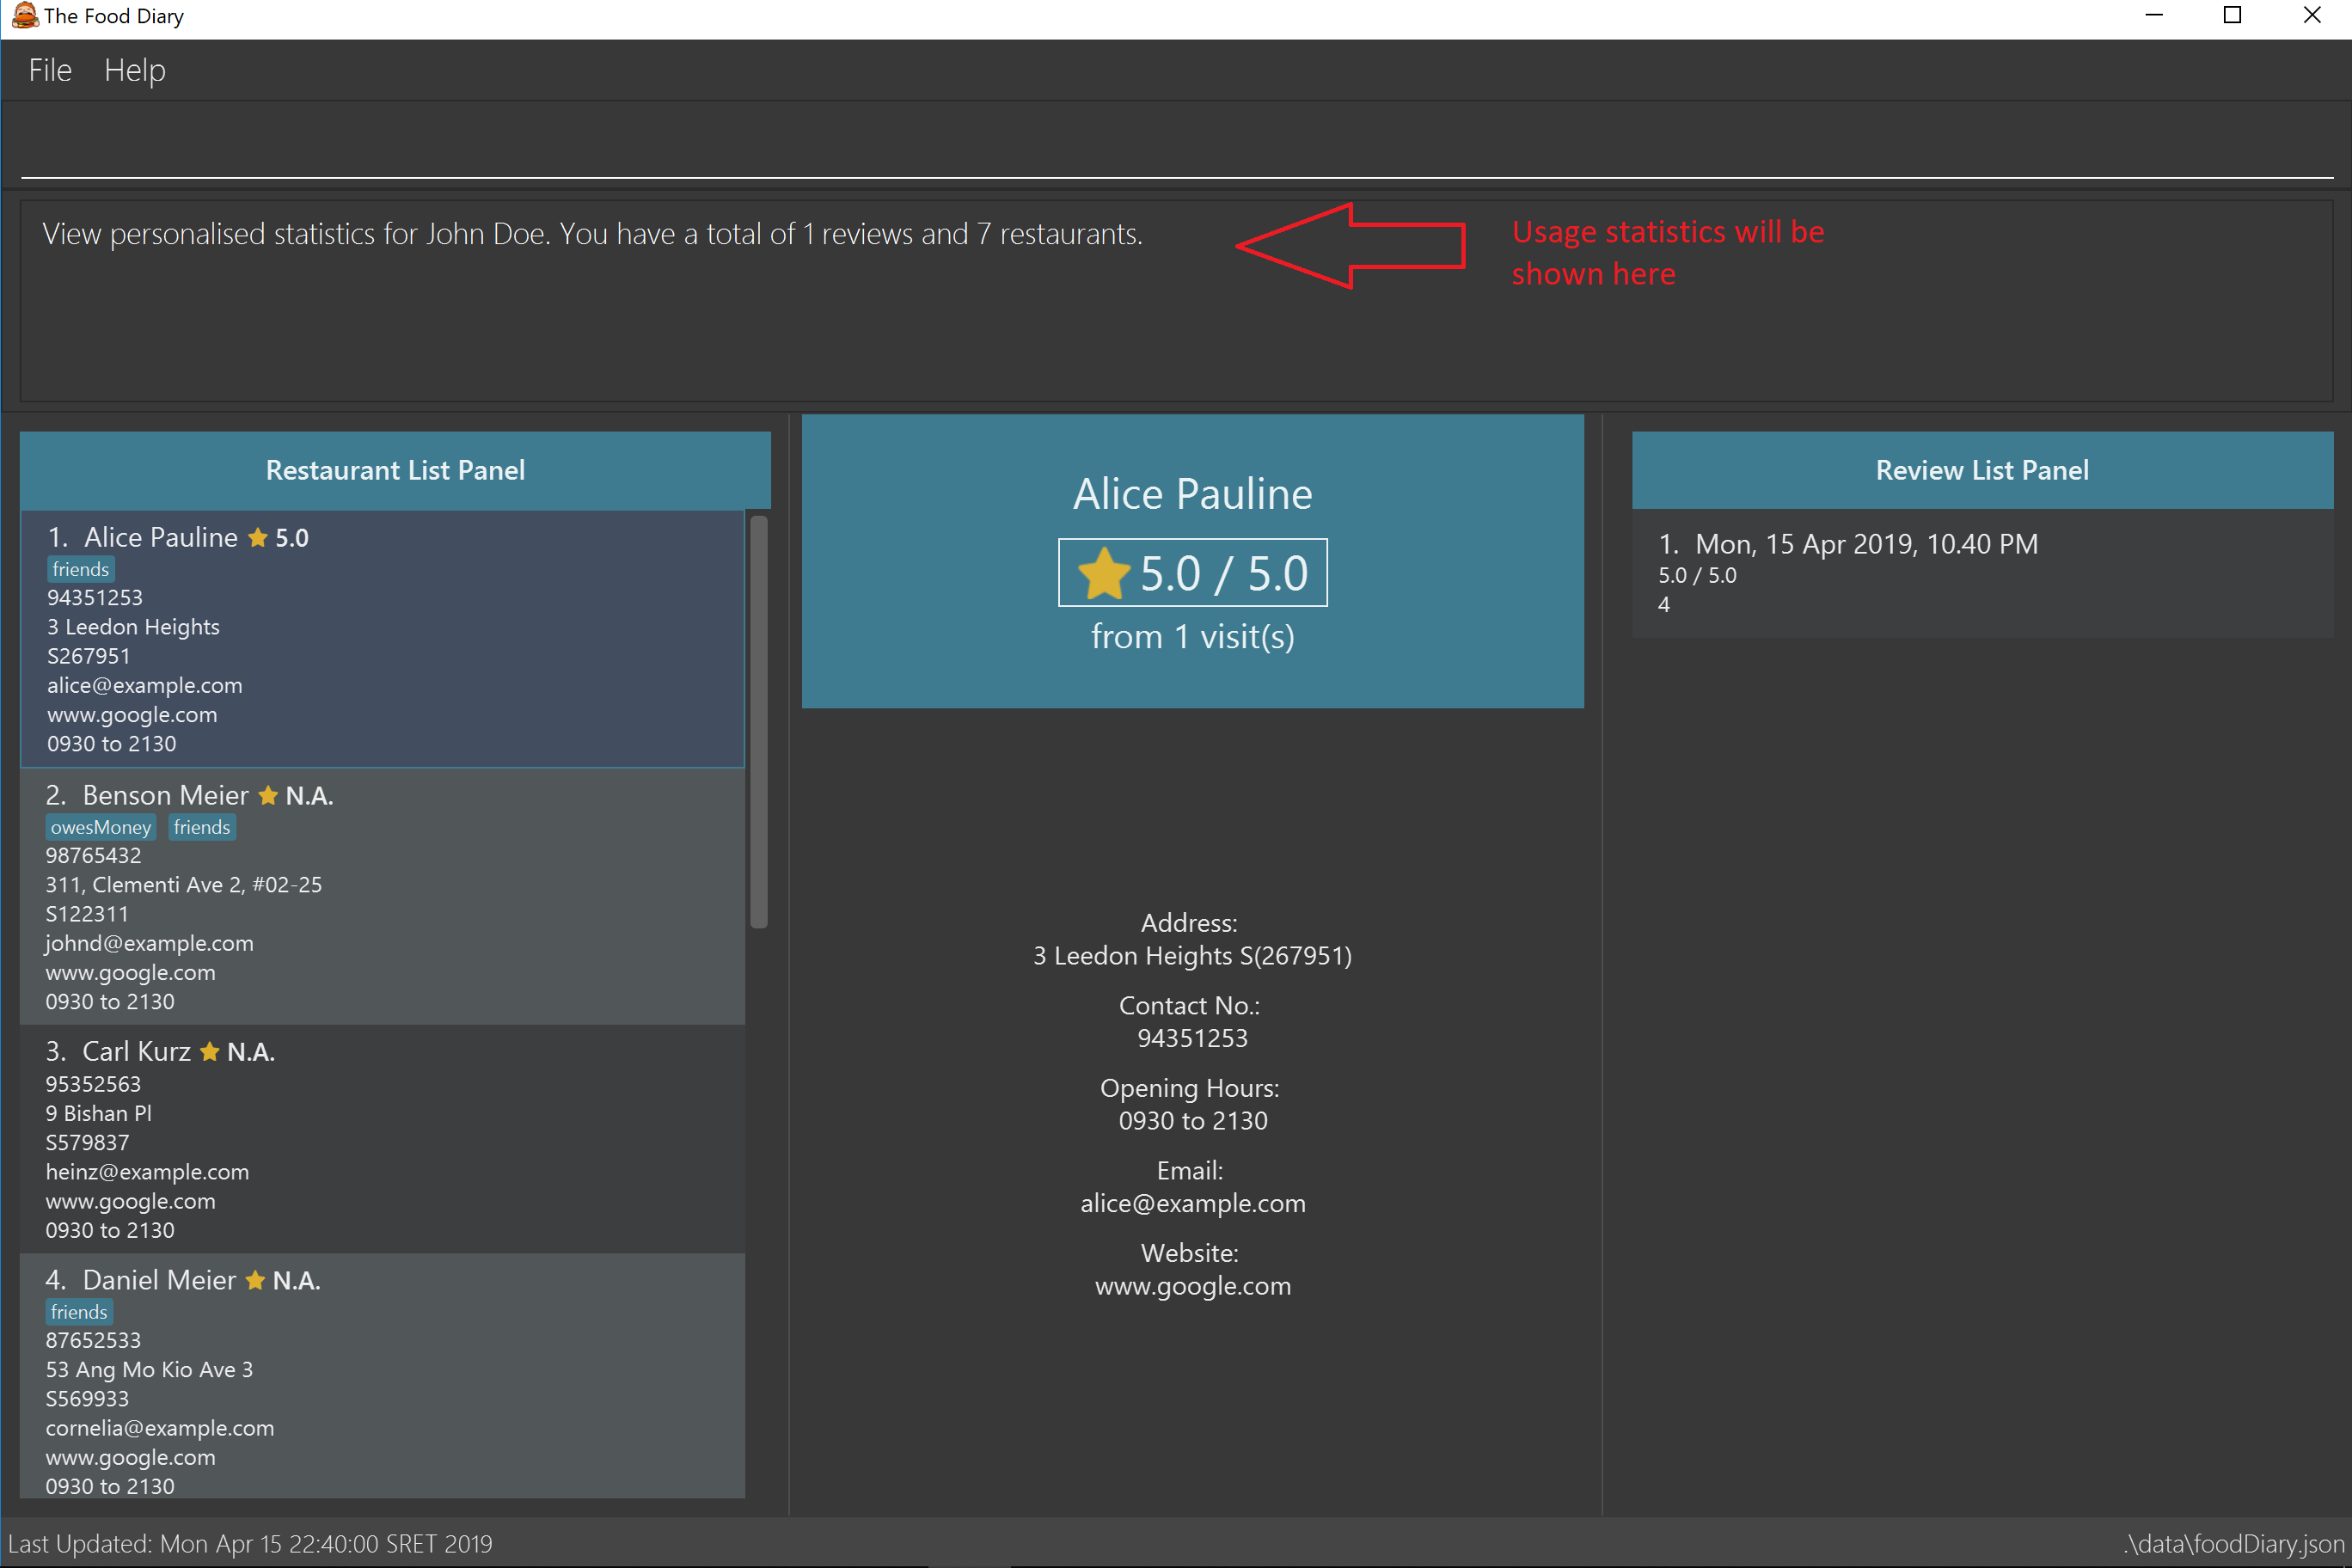
Figure 7. Your profile statistics will be reflected in the result command box as pointed out in the picture above
3.3.3. Share to Facebook: share (Coming in v2.0)
Share your reviews to Facebook.
Format: share INDEX
Steps to share your review to Facebook:
-
Select your desired restaurant by either clicking on it using a mouse or executing the
select INDEXcommand, using its index number to replaceINDEX. -
Enter
share INDEXcommand, replacingINDEXwith the desired review’s index number to indicate the review to be shared. -
Enter your login details when prompted by the Facebook pop-up.
-
Give write permission to The Food Diary post the review on your Facebook account. Rest assured that your account details would not be retained in The Food Diary to protect your privacy.
-
Click the
Share to Wallbutton when prompted and you’ll see your review on your Facebook wall!
Examples:
-
list
share 2
|
You will not be able to share the review to Facebook if you do not give The Food Diary write permission to your Facebook account. |
3.3.4. Undo a command : undo
Undoes your last command.
Format: undo
This command is only able to undo commands that made a change in the state of the Food Diary.
i.e. Commands such as select, list, listUnvisited and find will not be able to be undone using this undo command.
|
3.3.5. Redo a command : redo
Redoes your undo command.
Format: redo
This command is only able to redo a command that was undone by an undo command.
|
3.3.6. Viewing help : help
Format: help
3.3.7. Exiting the program : exit
Exits the program.
Format: exit
3.3.8. Saving the data
The Food Diary data are saved in the hard disk automatically after any command that changes the data.
There is no need to save manually.
4. FAQ
Q: How do I transfer my data to another Computer?
A: Install the app in the other computer and overwrite the empty data file it creates with the file that contains the data of your previous Food Diary folder.
Q: How do I return to default screen?
A: Enter the command list to show all the restaurants.
5. Command Summary
Restaurant Commands
-
add :
add n/NAME p/PHONE e/EMAIL a/ADDRESS po/POSTAL_CODE [t/TAG]… [w/WEBLINK] [o/OPENING_HOURS]
e.g.add n/Astons p/66123024 e/astons@dummy.com a/Blk 30 Geylang Street 29, #06-40 po/267951 w/astons.com.sg -
edit :
edit INDEX [n/NAME] [p/PHONE] [e/EMAIL] [a/ADDRESS] [po/POSTAL_CODE] [t/TAG]… [w/WEBLINK] [o/OPENING HOURS]
e.g.edit 2 n/MACS -
delete :
delete INDEX
e.g.delete 1 -
list :
list -
listUnvisited :
listUnvisited po/POSTAL_CODE
e.g.listUnvisited po/267951 -
sort :
sort [or/ORDER] [l/LIMIT]e.g.sort or/ASC l/2 -
find :
find KEYWORD [MORE_KEYWORDS]e.g.find KFC Chicken -
select :
select INDEXe.g.select 2 -
setCategories :
setCategory INDEX [c/CUISINE] [oc/OCCASION] [pr/PRICE_RANGE]
e.g.list
setCategory 2 c/Fine Dining oc/Wedding pr/$ -
filter :
filter KEYWORD [MORE_KEYWORDS]
e.g.filter fast food gathering -
visitWeb :
visitWeb INDEX
e.g.list
visitWeb 1
Review Commands
-
addReview :
addReview INDEX re/ENTRY rr/RATING
e.g.addReview 2 re/Peach Pie was amazing rr/4 -
editReview :
edit INDEX [re/ENTRY] [rr/RATING]
e.g.edit 2 re/Food isn’t the best -
deleteReview :
deleteReview INDEX
e.g.delete 3
FoodDiary Commands
-
name :
name n/YOUR_NAME
e.g.name n/JackTheSheep -
view :
view
e.g.view
Miscellaneous
-
undo :
undo -
redo :
redo -
help :
help -
exit :
exit